FoneDog Screen Recorder FoneDog Screen Recorder
Special Offer Special Offer
Only Only
$4.49 $4.49
to get a ONE-month license to get a ONE-month license
Sale ends in xx days Sale ends in xx days
Buy Now
sale

(2024) How to Screenshot on ThinkPad - 6 Easy Methods

By Adela D. Louie, Last updated: May 6, 2024

Have you ever thought about the ability to save and share that significant moment displayed on your computer screen? There is no need to search any longer! This guide presents the straightforward and effective strategies to become skilled on how to screenshot on ThinkPad device.

Whether you possess extensive expertise or such of a beginner in the field of technology, this article will provide you with the necessary guidance to effortlessly capture screenshots. This coverage includes a range of topics, from basic shortcuts to more complex tactics. Join along as we explore ThinkPad screenshotting, enabling you to effortlessly record as well as connect with accuracy.

Part 1. Best Tool to Screenshot on Lenovo ThinkPad – FoneDog Screen RecorderPart 2. Ways on How to Screenshot on ThinkPadPart 3. Tips to Optimize and Enhance Screenshotting on ThinkPadPart 4. FAQs of Taking Screenshots on ThinkpadConclusion

Part 1. Best Tool to Screenshot on Lenovo ThinkPad – FoneDog Screen Recorder

FoneDog Screen Recorder can be considered a top-notch application for capture screenshots on Lenovo ThinkPad laptops, thanks to its user-friendly design and extensive functionality. FoneDog allows users to easily snap screenshots of any size or area of the screen, modify them instantly as well as indeed neatly save or perhaps simply share these screenshot. It also has the powerful screen recording features for PC.

windows Free Download For Windows mac Free Download For normal Macs mac Free Download For M1, M2, M3

How to Make Use:

  1. Acquire, set up as well as indeed initiate FoneDog Screen Recorder on the ThinkPad device.
  2. Following that, simply proceed over into the main interface of the software, where be certain to locate and find the "Screen Capture" option.
  3. After doing that, have to locate again and after which select the "Custom Size" feature, then ensure to use the left mouse button to indeed define the desired capture area.
  4. Confirm the selection to save the screenshot automatically to the ThinkPad device.
  5. Thereafter, opt to copy the screenshot towards the clipboard as well as indeed save it simultaneously through simply selecting the copy button.
  6. Alternatively, tap on the option "Cancel" to discard the current screenshot as well as to really capture a new one.
  7. Customize those screenshot before saving it by utilizing various annotation tools available.

Screenshot on Lenovo ThinkPad via FoneDog Screen Recorder

Part 2. Ways on How to Screenshot on ThinkPad

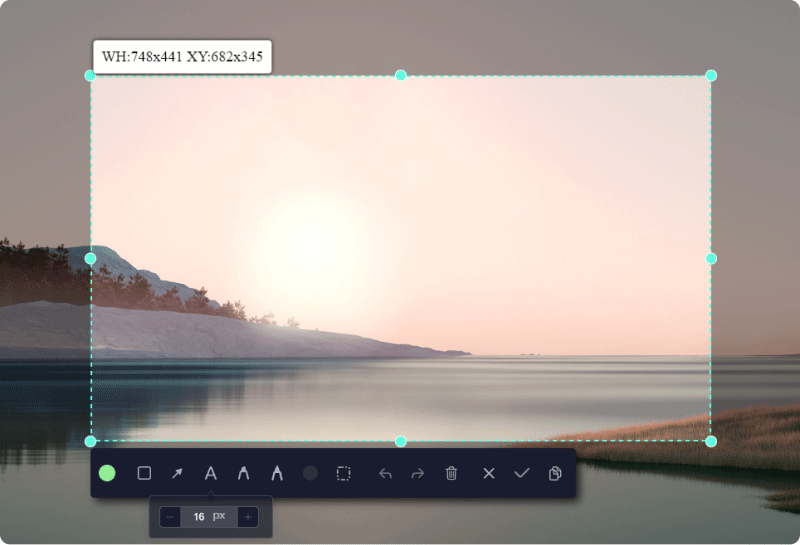
Capturing a screenshot is a frequent occurrence within our professional environment, serving to precisely capture your current view. This particular image is frequently utilized to elucidate procedural instructions. Observers of such images swiftly grasp your intended message, serving as a means to circumvent any potential confusion.

For those seeking guidance on how to screenshot on ThinkPad laptop, make sure to check upon this section, which then outlined various way or tutorials to know how to screenshot fully within Lenovo ThinkPad.

2.1 How to Screenshot on ThinkPad (Capturing Full Screen)

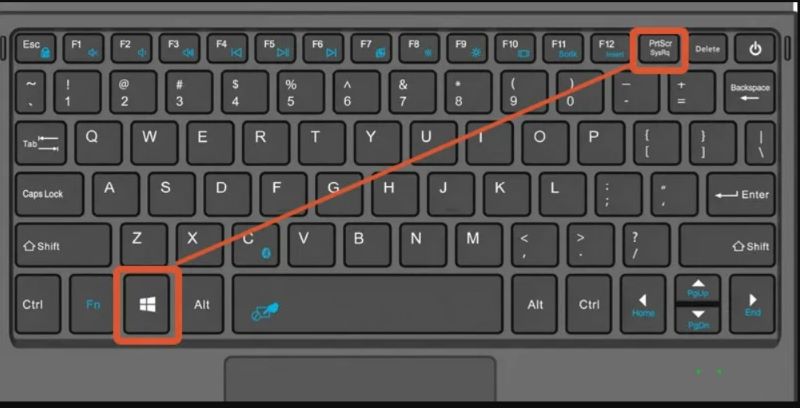
There exist two methods for capturing a screenshot of the entire display on your ThinkPad laptop.

Utilize "Print Screen" Key:

  1. To begin, simply click on the "Print Screen" key (which then typically denoted as "PrtScn" or perhaps "PrtSc") on the keyboard to seize the complete screen.
  2. From that, the screenshot will be stored into the clipboard for subsequent pasting into an image editor or document.

Employ "Windows+Print Screen" Combination:

  1. Simultaneously press the "Windows" and "Print Screen" keys to instantly save the screenshot such of file right within the computer.
  2. Following that, these captured image will reside within the "Screenshots" directory right into the "Pictures" library.

This method also works for other laptops, for example, you can take screenshots on an HP laptop in the same way.

Capture Full Screen on Thinkpad

2.2 How to Screenshot on ThinkPad (Capturing Active Window Screen)

Should you solely aim to capture the active window on the ThinkPad laptop, adhere to the following instructions:

  1. Activate a window by clicking within it.
  2. Simultaneously press the "Alt" as well as the "Print Screen" keys to capture the active window.
  3. After that, this screenshot will be then stored in the clipboard.
  4. From that utilize the Paint application, simply press "Ctrl" and "V" keyboard keys concurrently to paste, then "Ctrl" and "S" to save it locally.

Capture Active Window Screen on Thinkpad

2.3 How to Screenshot on ThinkPad (Capturing Custom Area Screen)

To capture a customized screenshot on a ThinkPad or another Lenovo device, utilize the shortcuts to access the Snip & Sketch Tool. It's important to recognize that the Snip & Sketch tool is exclusively accessible on Windows 10 systems. For alternative operating systems, seek alternative screenshot methods.

  1. To get started, be ensure to locate the desired screen.
  2. After that, simultaneously press the "Windows+Shift" keys, followed by the "S" key to launch Snip & Sketch tool.
  3. Following that, click onto option "New" right within top left of the Snip & Sketch window
  4. From there, choose from within these snip types option Rectangular, Freeform, or Full screen.
  5. After selecting the screen area, the snip will be captured and pasted into Snip & Sketch window.
  6. Upon doing that, make sure to employ the editing tools within the Snip & Sketch interface to customize the screenshot.
  7. Upon completion, just simply tap on option "Save" icon in the window's left corner to store the image in the preferred location on the computer.

Capture Custom Area on a Thinkpad

2.4 How to Screenshot on ThinkPad (Snipping Tool)

Snipping Tool was indeed a pre-installed screenshot utility which then bundled with Windows and subsequent editions, is readily available for use on ThinkPad laptops. To utilize it, follow the steps below:

  1. First thing to do was to, locate the desired screen to screenshot.
  2. Initiate by clicking the "Start" icon, after that have to enter "capture tool" into the search bar, and hit on option that implies to "Enter".
  3. From there, tap onto the "New" button which then located within top left corner of the tool interface.
  4. At that point, make sure to employ the mouse to form such of a rectangle around the desired screen area or perhaps the opt for a specific snip type right into dropdown menu.
  5. Upon selecting the screen area, the snip will be captured and transferred within the Snipping Tool window.
  6. After which, utilize the editing tools within the Snipping Tool window to fully modify the screenshot, such as the pen, the eraser or maybe even the cropping tool.
  7. Upon completion of edits, simply access the "File" menu and ensure to choose the option "Save As" to store the image in the preferred location on the device.

2.5 How to Screenshot on ThinkPad (Xbox GameBar)

The Xbox Game Bar serves as an integrated tool for capturing screenshots and recording screens on Windows and subsequent versions. It presents a viable choice for capturing in-game screenshots.

  1. To get started initiate the Xbox Game Bar by simply simultaneously pressing the "Windows" and "G" keys on the keyboard.
  2. If accessing a game, the Xbox Game Bar prompts confirmation to open, make sure to select this option "Yes, this is a game."
  3. Upon opening the Game Bar, select the camera icon to capture a screenshot.
  4. After which, the screenshot is automatically stored right within the "Captures" subfolder within the "Videos" directory.

How to Screenshot on ThinkPad via Xbox GameBar

Part 3. Tips to Optimize and Enhance Screenshotting on ThinkPad

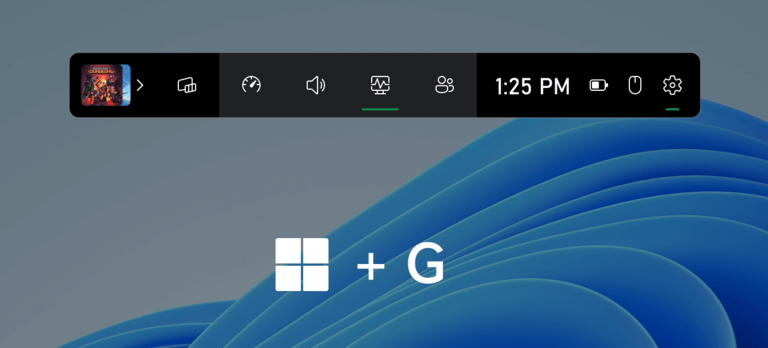
Here are tips to optimize and enhance screenshotting on your ThinkPad:

  1. Customize Shortcut Keys: Tailor shortcut keys to streamline the screenshot process, ensuring efficiency in capturing images swiftly.
  2. Utilize Annotation Tools: Enhance screenshots with annotations such as text, arrows as well as highlights for clearer communication and documentation.
  3. Familiarize with Built-in Features: Fully utilize ThinkPad's built-in screenshotting capabilities, including window selection as well as scrolling capture, for comprehensive screen capture needs.
  4. Incorporate Annotation: Enhance your screenshots with annotations as well as highlights to convey information more effectively.
  5. Regularly Update Software: Ensure your ThinkPad's operating system as well as screenshotting software are up to date to access the latest features along with such app improvements.

Part 4. FAQs of Taking Screenshots on Thinkpad

Are there any advanced screenshotting features available on newer ThinkPad models?

Newer ThinkPad models may offer advanced screenshotting features such as enhanced editing tools, integrated cloud storage options for seamless sharing, and innovative shortcuts for quicker capture.

What are the steps to troubleshoot the issue of being unable to capture screenshots from a ThinkPad?

Whenever you are experiencing difficulty with capturing screenshots within your ThinkPad, it is advisable to verify the proper working of the keyboard shortcuts as well as applications being utilized. Examine for any competing apps or system configurations that may be impeding the screenshot efficiency, and contemplate updating or simply reinstalling appropriate software.

Can I schedule automatic screenshots on my ThinkPad?

Regrettably, the ThinkPad does not have a pre-installed capability to schedule automatic screenshots. Alternatively, you might consider utilizing third-party software solutions specifically created for this task, which provide features to organize and streamline the process of capturing screenshots based on your desired time intervals or even triggers.

People Also ReadQuick Guide: How to Screenshot on Dell Laptop Or DesktopHow to Screenshot on Gateway Laptop [Quick Guide]

Conclusion

To sums up, mastering screenshotting on ThinkPad involves exploring built-in tools, customizing shortcuts, and potentially leveraging third-party applications for enhanced functionality. Ultimately, familiarity with ThinkPad's capabilities and regular practice will lead to efficient and effective screenshotting, enhancing productivity and communication in various contexts. Happy Capturing!

Leave a Comment

Comment

Comment ()
author image

Adela D. Louie

Tech Website Writing /Content Optimization

Singing, smiling, surprising every day!

So as a technical writer, it is my duty to gather effective and reliable solutions to answer questions on how to deal with the issues they are having with their devices.

Screen Recorder logo

Screen Recorder

Powerful screen recording software to capture your screen with webcam and audio.

How Do You Like This Article?

Check icon/ Check icon

INTERESTINGDULL

Check icon/ Check icon

SIMPLEDIFFICULT

Thank you! Here' re your choices:

Rate This Article: Excellent

Rating: 4.7 / 5 (based on 73 ratings)

Screen Recorder logo

Screen Recorder

Powerful screen recording software to capture your screen with webcam and audio.

FoneDog uses cookies to ensure you get the best experience on our website. Click here to learn more.