

By Nathan E. Malpass, Last updated: August 8, 2018
Every gadget out there is not without certain flaws. Same goes for Android devices. We can face a multitude of errors with the Android system. Some can be easy to fix, others are very difficult to solve. One such error you can face with an Android device is the one that states “Unfortunately, System UI has stopped.”
Here is a real case from an Android user: "I’m a fanatic of Android devices. I use it for virtually every possible thing. I use my Android device to capture photos, view videos, send messages, and even open documents. It’s very handy for me. Recently, I have been seeing this problem on my device, 'Unfortunately, System UI has stopped.' I don’t know what to do to fix this. Kindly help me repair my Android device."
If you have encountered this situation, don’t worry. We’ve got you covered. In this article, we will give you multiple ways to fix this error. Let’s start with the first one.
Having spent several years coding software for Android devices, we have created a professional tool to help Android users with data backup.
Check this tip: Download FoneDog Android Data Backup & Restore to easily backup your data on android devices in case of data loss if you decided to do a factory reset to fix this system issue. For you to fix the System UI has stopped issue, we have gathered some great solutions below.
Part I: 5 Useful Ways To Fix “Unfortunately, System UI Has Stopped” ErrorPart II: How to Back Up Your Data Using Android Data Backup & Restore?Video Guide: How to Backup Android Data to Deal With Factory Reset Lost Data?Part III: Conclusion.
Below are some useful methods to fix the System UI Has Stopped error.
Why does my Android say System UI Has Stopped? Updated Google applications might be the reason why this problem appears on Android devices. It means the update has failed. Thus, you need to uninstall the updates especially if you have encountered the error after the Google applications have been updated.
Here’s how to fix unfortunately system UI has stopped working in Android:
Step 1 - Launch Settings
Step 2 - Go to Application Manager
Step 3 - Choose Installed App
Step 4 - Search for the Google application you want to uninstall
Step 5 - Press Uninstall App
Step 6 - Reboot your Android device and check if this works to fix the said problem

If you have an Android device that runs on version 4.2 and up, you can also clear your cache to fix the “Unfortunately, System UI Has Stopped” problem.
Here’s how to do it:
Step 1 - Launch Settings
Step 2 - Go to Storage
Step 3 - Select “Cached Data.” Once you have chosen this, a window will appear asking for confirmation
Step 4 - Choose OK to confirm that you really want to clear the cache
If the two methods stated previously did not work, then you can reboot the Android device while it is in safe mode.
Here’s how to make it:
Step 1 - Turn off your Android device
Step 2 - Turn it on again using the power button and hold it until Step 3
Step 3 - When the brand logo of the device appears, release the Power button immediately. After which immediately do Step 4
Step 4 - Press the Volume Down button and hold it for a few seconds
Step 5 - Once you have seen that the device is in Safe Mode, release the Volume Down button
In this method, you will locate some third-party applications you have downloaded and installed from unknown sources. These applications might not be compatible with your Android system UI configuration. It might also be incompatible with the Android operating system itself.
Here are the steps to do it:
Step 1 - Launch Settings
Step 2 - Go to Application Manager
Step 3 - Choose the app that might be causing issues with your Android device
Step 4 - Press Uninstall
Step 5 - Reboot your Android device and check if this works to fix the said problem
Probably the best method to fix this problem is to factory reset your device. When we say factory reset, we mean deleting all existing data and restoring the Android device to its original state (the state before it was purchased). Before doing this though, you have to make a backup of your Android data.
Backing up your data before doing a factory reset is very important if you do not want to lose the necessary docs, images, videos, and the like. A tool we recommend for backing up your data is FoneDog’s Android Data Backup & Restore.
Here’s how to use it step-by-step:
With FoneDog Toolkit, backing up your Android data has never been easier. You can back up your Android data to the computer and even select which data you want to restore back to your Android phone. We’ll show you how to do it.
In this step, you will download the software and open it on your computer. You have to ensure that no other backup software or applications are running on your device.
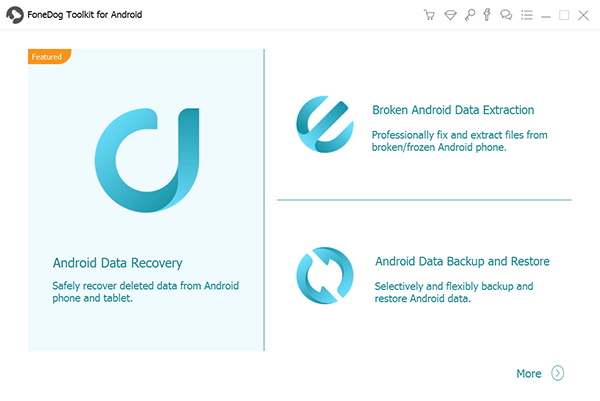
In this step, you have to select the option “Android Data Backup & Restore.” After which, you have to connect your Android phone to your computer through the USB cable.
Ensure that USB debugging mode is enabled on the Android phone. If you have an Android operating system version of 4.0 and up, a window will appear asking you if you want to allow USB Debugging. Simply select OK if this happens.

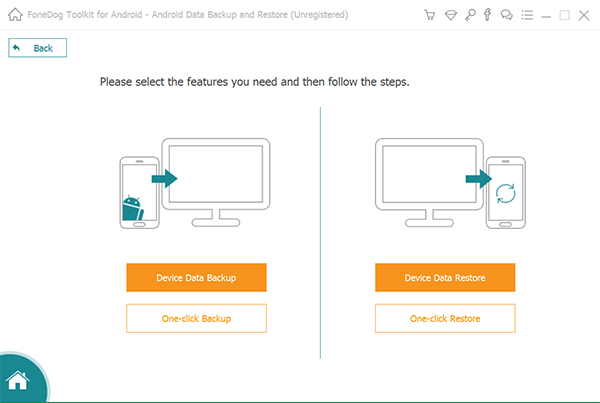
Once your phone is connected to the computer, FoneDog Toolkit will automatically detect it. Next, click the button entitled “Device Data Backup”. By default, the software will check out every file type out there. However, you can still choose which specific data you want to backup on your computer.
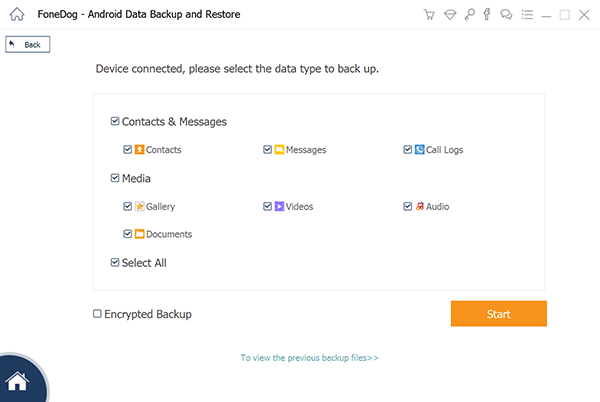
After choosing and selecting one or more file types, click “Start.” This will start the process of backing up your Android phone. Make sure you do not disconnect your phone to your computer. Do not use it as well. This might interrupt the process and might cause in deletion of data.
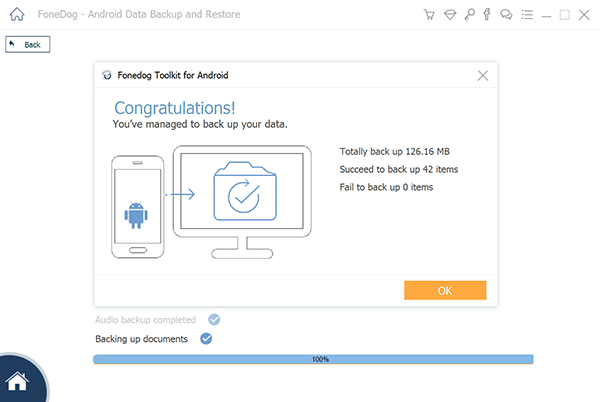
Once the process is completed, click OK to finish it. After which, you can start to view the file’s contents.
Launch FoneDog Toolkit again and connect your Android device to the computer. After which, select “Device Data Restore.” FoneDog Toolkit will show the latest backup files by default. However, you can also select a specific backup file from the said software.
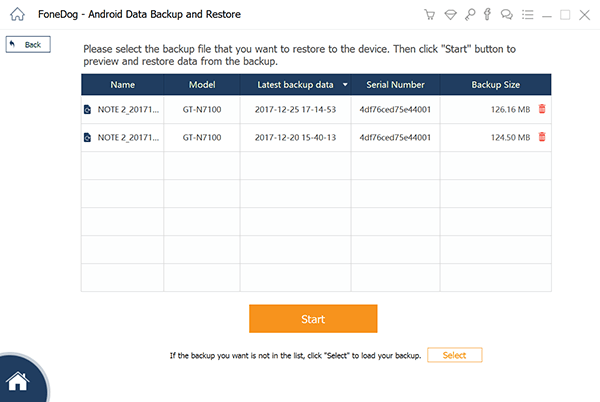
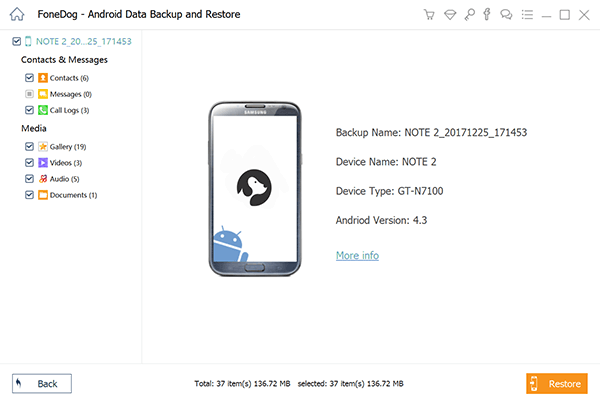
In this step, you will select the data type you want to restore to your Android device. Different file types can be seen in the left side of the screen. Select the file types you want. After which, click “Restore.” Click OK to confirm the restore process.
Now, to solve the problem of “Unfortunately, System UI Has Stopped,” you must do a factory reset of your Android device. The process is different depending on the brand and the type of device you want to do a reset on. After you have done the hard reset, move on to the next step.
People Also ReadThe Simple Guide to SMS Backup and Restore on AndroidSMS Recovery Guide: Recover Deleted SMS from Android
Yup! you can do it with one click. This is through the help of a great program called FoneDog Toolkit - Android Data Backup & Restore, which will help you backup and restore whatever data you like before factory reset!
Android is not free of errors and one problem you might encounter is the “Unfortunately, System UI Has Stopped.” This error can be fixed through various methods, the most effective of which is doing a factory reset of your Android device.
But before doing a hard reset, you must ensure you back up your files for future recovery. This is where FoneDog’s Android Data Backup & Restore comes in. You can use this tool to back up important files from your Android device and recover them at a later point in time.
This article has taught us that no problem or error within any device cannot be fixed. As such, you can follow the steps and methods stated in this guide to help you fix the specific problem in Android System UI.
Leave a Comment
Comment

Geoglitz2019-09-17 14:40:59
This works perfectly well
Android Data Backup & Restore
Back up your Android data and selectively restore to Android
Free Download Free DownloadHot Articles
/
INTERESTINGDULL
/
SIMPLEDIFFICULT
Thank you! Here' re your choices:
Excellent
Rating: 4.6 / 5 (based on 92 ratings)