By Adela D. Louie, Last updated: December 6, 2023
Are you ready to capture your Windows 11 screen in all its glory? Any differences from recording screen on Win 10? Whether you want to create how-to tutorials, share exciting gaming moments, or simply document your digital escapades, this guide is your passport to screen recording success!
In this article, we'll unveil the steps you must do to know how to record screen on Windows 11 screen effortlessly. We'll walk you through the process, from selecting the right software to understanding all the nifty features at your disposal.
Part #1: Understanding Screen Recording on Windows 11Part #2: Best Way to Screen Record on Windows 11 – FoneDog Screen RecorderPart #3: Methods on How to Screen Recording on Windows 11Part #4: Troubleshooting And TipsConclusion
Part #1: Understanding Screen Recording on Windows 11
How to record screen on Windows 11? First, we need to know why. Screen recording on Windows 11 is a powerful and versatile tool with a wide range of use cases. It enables users to capture what's happening on their computer screen in real time, creating video recordings that can serve various purposes.
Here's an explanation of the importance and some common use cases of screen recording on Windows 11:
- Creating Tutorials and How-To Guides: Screen recording is an invaluable tool for producing step-by-step tutorials, software demos, and instructional guides. Whether you're teaching someone how to use a particular application or explaining a complex process, screen recording helps convey information effectively.
- Gaming and Streaming: Gamers often use screen recording to capture their gameplay sessions, showcasing their skills or sharing entertaining moments. Streamers can also use screen recording to capture their entire streaming session for later editing or sharing on different platforms.
- Bug and Error Reporting: Screen recording is a practical way to document software glitches, errors, or unexpected behavior. By recording the issue, you can provide clear evidence to developers and support teams, making it easier for them to diagnose and fix the problem.
- Content Creation: Content creators, such as YouTubers, use screen recording to produce a wide variety of content, including product reviews, commentary videos, and vlogs. It allows them to capture web content, record presentations, and more.
- Preserving Web Content: Sometimes, valuable online content can disappear or change over time. Screen recording is a way to archive webinars, live streams, or web pages for future reference or offline viewing.
- Personal Use: Beyond professional applications, screen recording can be used for personal reasons, such as capturing video calls with loved ones, recording your gaming achievements, or preserving memorable digital moments.
Part #2: Best Way to Screen Record on Windows 11 – FoneDog Screen Recorder
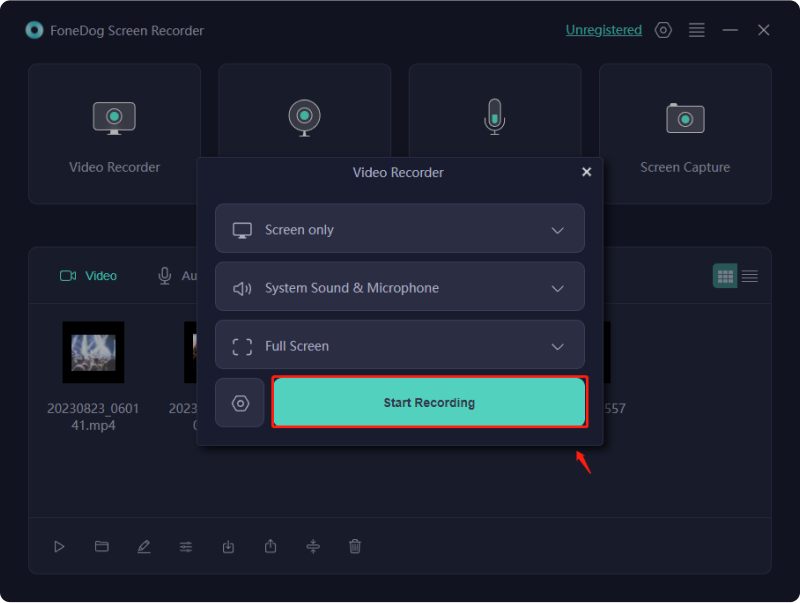
FoneDog Screen Recorder is a comprehensive and user-friendly screen recording software that's tailor-made for the Windows 11 environment. With FoneDog Screen Recorder, you can effortlessly capture video tutorials, gaming highlights, presentations, and more, all while enjoying a plethora of customization options and exceptional recording quality.
 Free DownloadFor Windows
 Free DownloadFor normal Macs
 Free DownloadFor M1, M2, M3
Here's how to record screen on Windows 11 with this top free screen recorder:
- Begin by downloading and installing FoneDog Screen Recorder from the official website. Follow the on-screen instructions for a seamless installation process.
- Once the installation is complete, launch the software on your Windows 11 PC.
- Before you hit the record button, tailor your recording settings to meet your specific requirements. You can set the recording area, frame rate, audio sources, and more.
- With your settings in place, click the "Record" button to initiate the screen recording. You can freely capture the entire screen or a customized region based on your needs. FoneDog Screen Recorder allows you to add annotations, text, and shapes in real time during your recording. This feature is perfect for creating informative tutorials or commentary.
- When you've completed your recording, simply click the "Stop" button. FoneDog Screen Recorder will automatically save your video to your chosen destination.
- If you want to fine-tune your recording, FoneDog Screen Recorder offers basic video editing tools to trim, cut, and enhance your video. After editing, you can effortlessly share your recording on various platforms.

Part #3: Methods on How to Screen Recording on Windows 11
Screen recording on Windows 11 can be done using various methods, each with its own set of steps. Here are common methods on how to record screen on Windows 11 and how to execute them:
Method #1: Built-in Screen Recorder (Game Bar)
- Begin by launching the specific application or content you wish to capture in your screen recording.
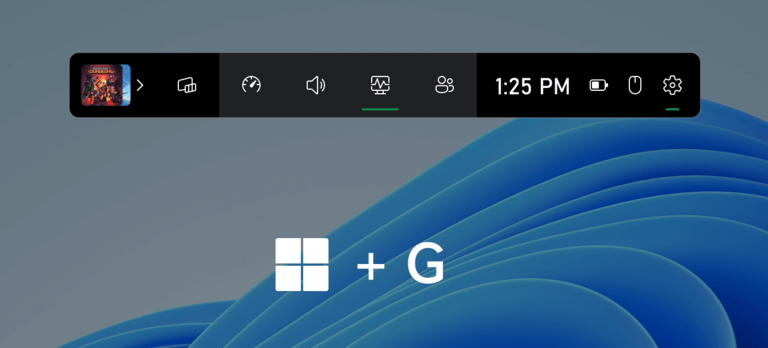
- Access the Game Bar by simultaneously pressing the Windows key (Win) and the G key on your computer keyboard. This key combination opens the Game Bar, which is a built-in feature for screen recording on Windows 11.
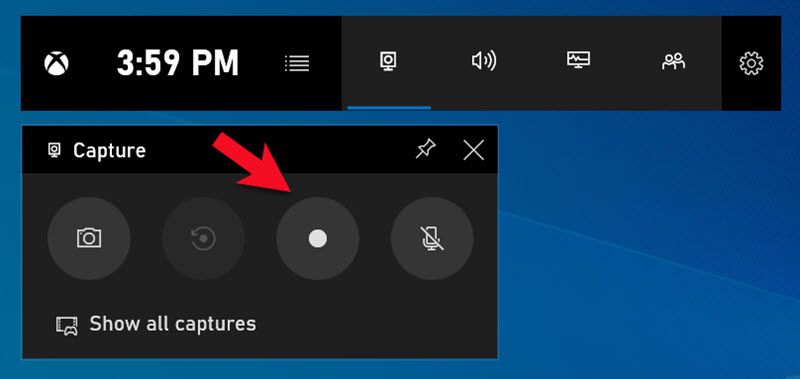
- Within the Game Bar overlay, you will see several options. Look for the "Record" button and click it to initiate the screen recording process. This action signals the system to start capturing the contents of your screen.
- When you're ready to conclude your recording, either press the "Stop" button within the Game Bar overlay or use the keyboard shortcut Win + Alt + R. This will halt the recording process, ensuring that your screen capture is complete.
- Your screen recording is automatically stored in a designated location. Specifically, it can be found in the "Captures" folder within your Videos library, ensuring easy access to your recorded content for future use or sharing.

By following these step-by-step instructions, you can effectively utilize the Windows 11 Game Bar feature to record your screen, save your recordings in an organized manner, and seamlessly share or review your captured content.
Method #2: Recording with PowerPoint
- Begin by launching Microsoft PowerPoint on your Windows 11 computer.
- At this point, you have two options: either create a brand new presentation from scratch or open an existing one that you wish to use for your screen recording.
- Once your presentation is ready, navigate to the specific slide from which you'd like to initiate the screen recording.
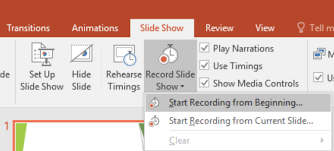
- Go to the "Slide Show" tab located in the PowerPoint toolbar at the top of the screen. Within this tab, you will find an option labeled "Record Slide Show".
- After selecting "Record Slide Show", a dedicated recording toolbar will make its appearance on your screen. Here, you should click on the "Start Recording" button to commence the screen recording process.
- As you move forward through your presentation using the navigation buttons, PowerPoint will automatically record not only the content on your screen but also your voice narration if you are providing one.
- When you have completed your presentation or screen recording, simply click on the "Stop Recording" button within the toolbar.
- Following the conclusion of your recording session, you have the choice to save your recorded presentation in its original PowerPoint file format or export it as a video in a format that suits your needs.

Method #3: Using the Snip & Sketch Tool
While the primary purpose of the Snip & Sketch tool is to facilitate the capture of screenshots, it can also be employed to record screen activity, especially when you intend to obtain a static representation of your screen. Here is a step-by-step guide on how to record screen on Windows 11 utilizing this tool:
- Initiate the process by pressing the key combination Win + Shift + S, which will promptly open the Snip & Sketch tool.
- Within the tool, you will be presented with the option to select the type of "snip" you desire, including Rectangular, Freeform, Window, or Full-screen snips.
- Subsequently, proceed by clicking and dragging your cursor to outline the specific area on your screen that you wish to capture.
- Once you have outlined and selected the desired area, the Snip & Sketch tool will promptly copy this portion to your computer's clipboard. You can then conveniently paste this selection into an image editing application, such as Paint or Paint 3D, and save it as an image file to meet your specific requirements.

Method #4: Using the Xbox App
If you happen to be the proud owner of a Windows 11 computer with the Xbox app installed, you have the opportunity to harness its built-in screen recording features. Here's a step-by-step guide on how to make the most of this functionality:
- To kick things off, you'll need to launch the Xbox app. In case it's not already on your system, you can swiftly remedy this by obtaining it from the Microsoft Store.
- Once you have the Xbox app at your disposal, the next order of business is to sign in using your Microsoft account.
- Within the Xbox app, direct your attention to the left sidebar, where you'll spot a cogwheel-shaped icon. This icon serves as the gateway to your settings.
- Among the settings options, you'll find one labeled "Game DVR". This is your gateway to fine-tuning your recording preferences, allowing you to customize parameters like video quality and the sources for audio.
- When you're ready to initiate a screen recording, press the key combination Win + G. This action will summon the Game Bar, and within its interface, you'll discover a conspicuous "Record" button. Go ahead and click it to commence your recording session.
- At any point when you wish to halt the recording process, you have two choices. You can either click the "Stop" button located within the Game Bar interface, or you can opt for the keyboard shortcut Win + Alt + R to achieve the same effect.
- All your completed recordings will be conveniently stored in a dedicated folder known as "Captures", thoughtfully nestled within your Videos library.

With these steps in mind, you'll be able to take full advantage of the screen recording capabilities offered by the Xbox app on your Windows 11 PC.
Part #4: Troubleshooting And Tips
Above you learned how to record screen on Windows 11. Here’s a breakdown of troubleshooting common issues and tips for optimizing your screen recording experience on Windows 11:
Common Issues And How to Resolve Them:
- Recording Lag or Frame Drops: If your screen recording is experiencing lag or frame drops, reduce the recording resolution, lower the frame rate, or close background applications to free up system resources.
- No Audio in Recordings: Check your audio settings and ensure the correct audio source is selected for recording. Sometimes, audio drivers may need an update or restart.
- Large File Sizes: If your recordings result in excessively large files, consider using video compression software or choose a lower quality setting during recording to reduce file size.
- Recording Doesn't Start: If the recording software fails to start or encounters errors, try restarting the application, updating it, or reinstalling the software.
- Distorted or Out-of-Sync Audio: This can occur if your computer's performance is struggling. To fix this, lower the recording quality settings, close unnecessary applications, or consider upgrading your hardware.
- Blurry or Pixelated Recordings: Adjust the recording settings to ensure you're capturing at the desired resolution and frame rate. Higher settings generally produce better quality.
Tips for Optimizing Your Screen Recording Experience:
- Plan Your Recording: Before starting, have a clear plan of what you want to capture. This helps you keep your recordings concise and focused.
- Use a Clean Desktop: Clear you’re desktop of unnecessary icons and clutter to make the recording look more professional.
- Audio Settings: Test your audio settings and ensure you're recording from the correct source (e.g., microphone, system audio).
- Use a Dedicated Microphone: For voiceovers or commentary, consider using a dedicated microphone for better audio quality.
- Frame Rate and Resolution: Choose appropriate frame rates and resolutions based on your needs. Higher settings offer better quality but may require more processing power.
- Practice and Patience: Screen recording can take practice. Don't be discouraged by initial difficulties; with time, your recordings will improve.
By addressing common issues and following these tips, you'll be well on your way to mastering screen recording on Windows 11 and creating high-quality recordings that meet your needs.
People Also ReadCapturing Conversations: Full Guide to Google Meet RecordingShowcase Mac Skills: Guide on How to Record Screen Mac
Conclusion
In summary, knowing how to record screen on Windows 11 is a valuable skill with a multitude of applications. Whether you're creating tutorials, preserving memories, or enhancing productivity, screen recording is a game-changer.
With FoneDog Screen Recorder, you have a reliable and user-friendly tool at your fingertips. It offers customization, quality, and editing capabilities, making it the perfect choice to start your screen recording journey with confidence. Capture your digital experiences and share your stories effortlessly today!


Free DownloadFor Windows
Free DownloadFor normal Macs
Free DownloadFor M1, M2, M3


/
/