
By Adela D. Louie, Last updated: April 3, 2025
The digital world requires digital solutions. Whether you want to make a tutorial about a certain matter, record or capture any moment with regards to your gameplay life, the knowledge about it is a must. And all you need to know is how to screen record on Microsoft Surface (if you are particularly using one).
As a touch-based functional desktop, developed by Microsoft, the Microsoft Surface is a device that offers peak convenience when it comes to the functionality of becoming a tablet and a computer all at once. However, if you are a new user of the device, all you need is comprehensive instructions about how to take a screenshot on your Surface. Along with that, we also present some alternatives to hasten your recording and make it functional.
Part 1. Reasons Why You Screen Record on Microsoft SurfacePart 2. 4 Methods to Screen Record on Microsoft SurfaceConclusion
Having a Microsoft Surface is a real convenience, and we also understand why we screen record using this device. Below are the top reasons that it is better to screen record on Microsoft Surface.
Microsoft Surface provides you with a real desktop experience on a mobile device like the Microsoft Surface Pro 7, as well as accessibility to the Windows feature of screen recording, like using the Xbox Game Bar to screen record your game play.
Desktop software also provides functional recording (for example: Xbox Gamebar) to record specific areas of the screen. Plus, you can also install other recording platforms aside from Gamebar, which could help you increase convenience.
Shareability is also a must when it comes to screen recording using Microsoft Surface. As a mobile device, sharing tutorials or recordings both online and offline is a major determining factor when it comes to choosing the right screen recorder available in the market.
Without further ado, here are the 4 trusted ways to teach you how to screen record on a Microsoft Surface.
You are probably here because you are struggling to screen record on your Microsoft Surface device on whatever recording you must do. Don’t worry as we discuss now the 4 screen recording programs which greatly alleviate your problems and help you learn how to screen record on Microsoft Surface.
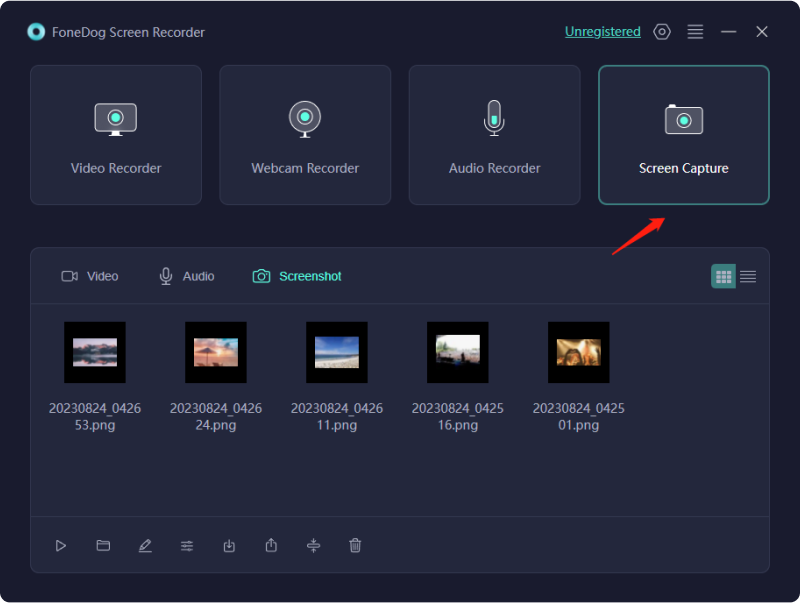
FoneDog Screen Recorder is a convenient and all-in-one screen recorder that makes your recording journey at ease. This offers options such as screen recording incorporated with video recording (suitable for making a tutorial or class video and recording online conferences), audio recording (that is fully utilized to record your voice and edit it), webcam recording (which can be utilized if you want to make an interview video in using your Microsoft Surface), and screen capturing ability (that provides additional editing capability).
Free Download
For Windows
Free Download
For normal Macs
Free Download
For M1, M2, M3
Unlike other screen recorders, this allows you complete flexibility, which makes your Microsoft Surface screen recording convenient and useful. To know how to screen record on Microsoft Surface using FoneDog Screen Recorder, follow the steps below:

Note: To take a faster screenshot, just click “Shift” + “Ctrl” + “Alt S”, or simply edit the shortcut key depending on your comfort in Settings > Keyboard Shortcut > Custom Size Screenshot.
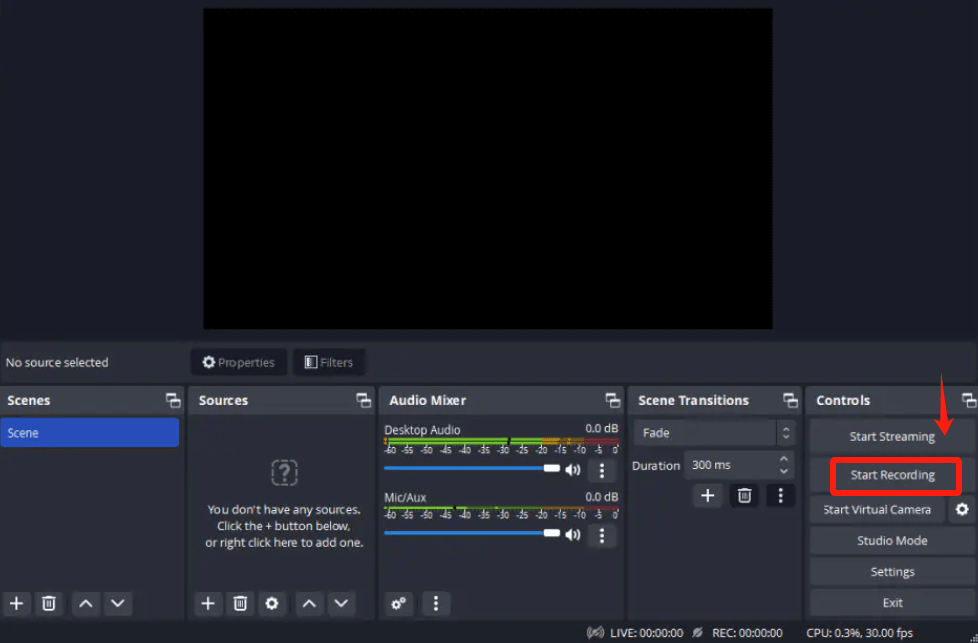
Another compatible and accessible screen recorder available for Microsoft Surface is the OBS Studio—a completely open-source program that helps you learn how to screen record on Microsoft Surface as well as live stream as it is also a streaming platform.
However, it is not considered to be user-friendly, especially for new users, because of its complex design and interface when it comes to doing an easy task like recording. However, if you have time to learn things, here are the steps to screen record on Microsoft Surface using OBS Studio.

Xbox Game Bar is free software that is built for game streaming but can function as a simple screen recording process on any Windows running device, including the Microsoft Surface.
However, as built to be for game streaming, it has limited editing features, and compatibility issues might be a hindrance, especially if you are using a mobile device that has a limited capacity on certain specs. Battery usage is also a consideration since it could drain your Microsoft Surface battery quickly.
If that is not the problem, here is how to screen record on Microsoft Surface using Xbox Game Bar.
Now that you learn how to screen record on Microsoft Surface, it is for you to decide what works best for you. But, among the screen recording methods presented, FoneDog Screen Recorder works well for new users as it provides multiple functions while being user-friendly software—making your Microsoft Surface screen recording experience at ease.
Leave a Comment
Comment
Screen Recorder
Powerful screen recording software to capture your screen with webcam and audio.
Hot Articles
/
INTERESTINGDULL
/
SIMPLEDIFFICULT
Thank you! Here' re your choices:
Excellent
Rating: 4.7 / 5 (based on 62 ratings)