FoneDog Screen Recorder
FoneDog Screen Recorder
Special Offer
Special Offer


By Nathan E. Malpass, Last updated: March 17, 2025
Switching to a new phone is an exciting experience, but what do you do when your old device has met an unfortunate fate? A broken phone can be a source of stress, especially when you're worried about losing all your valuable data, from contacts and messages to photos and apps. Thankfully, there's a solution that doesn't involve the use of a computer.
In this guide, we'll walk you through the process of how to transfer data from a broken phone to a new phone without PC. Whether you're dealing with a cracked screen, a malfunctioning battery, or any other issue, we've got you covered with easy-to-follow steps to ensure your data makes the seamless transition to your new device. So, let's dive in and learn how to make this transition as smooth as possible, without the need for a computer.
Part 1. Method to Transfer Data from a Broken Phone to a New PhonePart 2. Best Method to Transfer Data from a Broken Phone to a New PhonePart 3. Conclusion
One of the most convenient and secure ways to transfer data from a broken phone to a new one without the need for a computer is by utilizing Google Drive backups. Google Drive offers a seamless backup and restore feature that allows you to store your device's data in the cloud and access it whenever you need, even on a different device. Here's how to do it:
Step 1: Verify Your Google Account
Ensure that you are signed in to the same Google account on both your old broken phone and your new phone. This is crucial for the data transfer to work seamlessly.
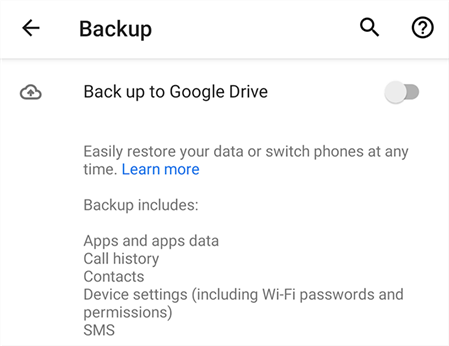
Step 2: Enable Backup and Sync on Your Old Phone
Open the "Settings" app on your old phone. Scroll down and select "Google." Tap on "Backup." Turn on "Back up to Google Drive." This will initiate a backup of your app data, contacts, and other settings to your Google Drive account.
Step 3: Factory Reset Your Old Phone (Optional)
If your old phone is still functioning to some extent, you can perform a factory reset to erase your data securely. However, if your phone is completely broken and inaccessible, you can skip this step. In the "Settings" app, go to "System." Select "Reset." Tap on "Erase all data (factory reset)."
Step 4: Set Up Your New Phone
Power on your new phone and complete the initial setup wizard.
Step 5: Restore Data on Your New Phone
During the setup process of your new phone, you'll be prompted to sign in with your Google account. Use the same account you used for the backup on your old phone. Once signed in, follow the on-screen instructions. You should see an option to restore data from your Google Drive backup. Select the backup you want to restore from and tap "Restore." Your contacts, app data, and some settings will be transferred to your new device.
Step 6: Download Missing Apps
After the data restore is complete, visit the Google Play Store on your new phone to download the apps that were installed on your old device. They will be listed under "My apps & games."
Using Google Drive backups is a straightforward method to transfer your essential data from a broken phone to a new one without a computer. However, please note that not all apps and settings may be backed up, so it's a good practice to periodically check and ensure your data is being backed up to Google Drive for a smooth transition to a new device.
If you're an Apple user and your broken phone is an iPhone, you can use iCloud backups to seamlessly transfer your data to a new iPhone without the need for a computer. iCloud provides a secure and convenient way to store your device's data in the cloud. Here's how to do it:
Step 1: Verify Your Apple ID
Make sure you are signed in to the same Apple ID on both your old broken iPhone and your new iPhone. This is essential for the data transfer to work smoothly.
Step 2: Enable iCloud Backup on Your Old iPhone
Open the "Settings" app on your old iPhone. Tap on your Apple ID at the top of the screen. Select "iCloud." Scroll down and tap on "iCloud Backup." Turn on "iCloud Backup" if it's not already enabled. Tap "Back Up Now" to initiate an immediate backup of your device to iCloud. Wait for the backup to complete; this may take some time, depending on the amount of data.
Step 3: Set Up Your New iPhone
Power on your new iPhone and complete the initial setup process.
Step 4: Restore Data on Your New iPhone
During the setup process of your new iPhone, you'll be prompted to sign in with your Apple ID. Use the same Apple ID you used for the backup on your old iPhone. Continue with the setup instructions until you reach the "Apps & Data" screen. Select "Restore from iCloud Backup." Choose the most recent backup from the list and tap "Restore." Your contacts, photos, messages, and other data will start transferring to your new device.

Step 5: Download Missing Apps
After the data restore is complete, visit the App Store on your new iPhone to download any missing apps. They will be listed under "Purchased."
Using iCloud backups is an efficient way to transfer your data from a broken iPhone to a new one without the need for a computer. Keep in mind that iCloud offers limited free storage, so ensure you have enough space or consider upgrading your iCloud storage plan if your backup exceeds the available free space. Regularly back up your device to iCloud to ensure a seamless transition to a new iPhone in the future.
If you're looking for a simple way to transfer your contacts from a broken phone to a new one without a computer, using your SIM card can be a handy option. This method primarily works for transferring contacts, so keep in mind that other types of data, like photos and messages, won't be included. Here's how to do it:
Step 1: Remove the SIM Card from Your Old Phone
Power off your old phone, if possible.Locate the SIM card tray. It's usually on the side or top of the phone.Use a SIM card ejector tool, a paperclip, or a small pin to gently eject the SIM card tray.Remove the SIM card from the tray.
Step 2: Insert the SIM Card into Your New Phone
Power off your new phone, if it's not already. Locate the SIM card tray on your new phone and open it. Place the SIM card into the tray, aligning the notched corner as indicated. Carefully slide the tray back into the phone.
Step 3: Configure Contacts
Once the SIM card is in your new phone, you may need to configure your contacts to ensure they are displayed correctly: Turn on your new phone. Open the "Contacts" or "Phone" app. Access the app's settings or options. Choose "Manage Contacts" or a similar option. Select "Import/Export Contacts." Choose "Import from SIM Card." Follow the on-screen instructions to import the contacts from the SIM card to your new phone's storage. Your contacts should now be accessible on your new phone.
While using a SIM card for transferring contacts is a straightforward method, it has limitations. It only works for contacts, and you may not be able to transfer additional data like photos, messages, or app data. For a more comprehensive data transfer, especially if you're switching to a new phone of a different brand or operating system, consider using methods like Google Drive (for Android) or iCloud (for iOS) for a more complete transition.
If both your old and new phones support external SD cards, you can use this method to transfer various types of data, including photos, videos, documents, and more, from a broken phone to a new one. Here's how to do it:
Step 1: Check Compatibility
Ensure that both your old broken phone and your new phone have an SD card slot and support external storage. Many Android smartphones have this feature, but it's essential to confirm it before proceeding.
Step 2: Remove the SD Card from Your Old Phone
Power off your old phone, if possible. Locate the SD card slot. It's typically located near the SIM card slot or on the side of the phone. Gently eject the SD card tray using a SIM card ejector tool, a paperclip, or a small pin. Remove the SD card from the tray.
Step 3: Insert the SD Card into Your New Phone
Power off your new phone, if it's not already. Locate the SD card slot on your new phone and open it. Place the SD card into the tray, ensuring it's correctly aligned. Carefully slide the tray back into the phone.
Step 4: Access and Transfer Data
Once the SD card is in your new phone, you can access the data stored on it: Power on your new phone. Open the file manager app or a similar app on your new phone. Navigate to the SD card storage. Browse the folders and files to find the data you want to transfer. Copy or move the data to the internal storage of your new phone. You may create new folders if needed.
Step 5: Organize and Use the Data
After transferring the data to your new phone's internal storage, you can organize and use it as you like. For example, photos can be accessed from the gallery app, documents from the appropriate apps, and so on.
Using an SD card for data transfer provides flexibility and allows you to transfer various types of data without relying on a computer. However, keep in mind that not all data from your old phone may be stored on the SD card. For a more comprehensive transfer, especially if you're switching between different phone models or operating systems, consider using cloud services like Google Drive, iCloud, or third-party apps designed for data migration.
Now that you’ve learned how to transfer data from a broken phone to a new phone without PC, let’s talk about how to do it with a help of a computer software. While transferring data without a PC is convenient, there are situations where using a computer becomes necessary, especially when dealing with severely damaged or non-functional phones. In such cases, software tools like the iPhone 15 supported FoneDog Broken Andriod Data Extraction can be incredibly helpful.
FoneDog Broken Android Data Extraction is a powerful software solution designed to recover your data from your broken Android device and transfer data via a computer. This tool is particularly useful when your old phone is physically damaged, has a broken screen, or is experiencing software issues. Here's how to use it:
Step 1: Download and Install FoneDog Broken Android Data Extraction
Broken Android Data Extraction
Recover photos, messages, WhatsApp, videos, contacts, call history from broken Samsung Phone.
Recover Data when you cannot enter the password on Android.
Complete Compatible with Samsung Galaxy devices.
Free Download
Step 2: Launch the Software
After installation, launch the FoneDog Broken Android Data Extraction tool on your computer.
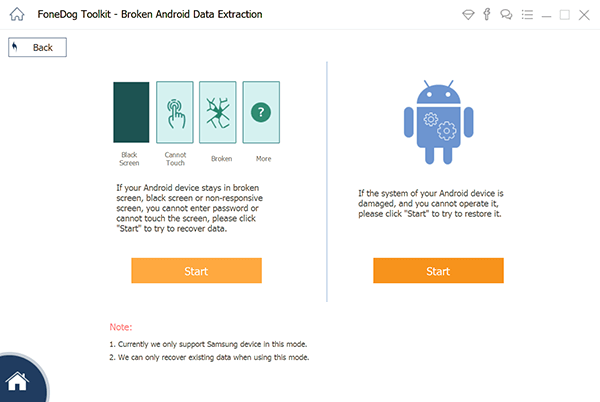
Step 3: Connect Your Broken Phone
Step 4: Select Data Types to Recover
You'll be presented with a list of data types to recover. Choose the types of data you want to transfer to your new phone. Options typically include contacts, messages, photos, videos, and more.
Step 5: Scan Your Broken Phone
The software will initiate a scan of your broken phone to recover the selected data types. This process may take some time depending on the amount of data and the condition of your device.
Step 6: Preview and Select Data
After the scan is complete, you can preview the recovered data. Select the specific files you want to transfer to your new phone.
Step 7: Transfer Data to Your New Phone
Connect your new phone to the computer using a USB cable. The software will guide you through the process of transferring the selected data from your broken phone to your new one.
Step 8: Complete the Transfer
Once the transfer is complete, you'll receive a confirmation message. Disconnect both phones from the computer.
Using FoneDog Broken Android Data Extraction tool allows you to efficiently recover and transfer data from a broken Android phone to a new one, even when the old device is not functioning correctly. This method is particularly useful when other options like cloud backups or SD cards are not feasible due to the extent of the damage.
In conclusion, transferring data from a broken phone to a new one can be achieved with or without a PC, depending on your device's condition and the type of data you need to move. While methods like Google Drive, iCloud, SIM cards, and SD cards offer straightforward solutions for specific data types, the FoneDog Broken Android Data Extraction tool becomes invaluable when facing severe phone damage or non-responsiveness. Choose the method that best suits your situation to ensure a seamless transition to your new device and safeguard your valuable data.
Leave a Comment
Comment

iPhone/Android Devices’ Maintenance Expert
Staying home, listening to music, writing tech articles
Many people asked me to repair their mobile phones so I have a lot of experience in mobile phone repair, and I know a lot about Android or Apple phones.
Broken Android Data Extraction
Extract data from broken Android phone and fix brick phone.
Free DownloadHot Articles
 /
/
INTERESTINGDULL
/
SIMPLEDIFFICULT
Thank you! Here' re your choices:
Excellent
Rating: 4.7 / 5 (based on 103 ratings)