
By Vernon Roderick, Last updated: February 27, 2020
We all know of the popular brand which is the Western Digital external hard drives. They are known for being high-performance devices especially when it comes to their storage device products. However, that’s not to say that they are perfect.
Due to its complexity, we can’t help but wonder what would happen if you were to experience data loss in such a device. To give you a better idea, this article will show four ways on how to recover data from Western Digital external hard drive. Before that, what are the possible causes of data loss occurring on this device?
Why Should You Learn How to Recover Data from Western Digital External Hard Drive?1. How to Recover External Hard Drive Data with Data Recovery2. How to Recover External Hard Drive Data with Disk Management3. Troubleshoot - Recover Data from Western Digital External Hard Drive4. How to Recover External Hard Drive Data with Command PromptConclusion
As great as the Western Digital external hard drive is, we, as the users, are not perfect. Thus, we will make mistakes that will affect these devices. Maybe you accidentally delete some files. Maybe you forgot to eject it. Regardless, here’s some reasons why you’d want to learn how to recover data from Western Digital external hard drive:
Regardless of the situation that you are in right now, it doesn’t change the fact that you have lost some files and you are in need of a guide to learn how to recover data from Western Digital external hard drive. With that said, let’s proceed to our first method.
In order to make sure that you recover the data successfully, you will have to make use of a specialized tool. This also applies to when recovering files from your Western Digital hard drive.
Unfortunately, one of the common reasons why you lose data is through incompatible software. Thus, it would be hard to look for a specialized tool that recovers data, and that is why we recommend FoneDog Data Recovery.
FoneDog Data Recovery is just what you need, a third-party software specialized in recovering data from different kinds of software. This includes branded hard drives such as Western Digital products.
The best thing about this is that you can use it regardless of whether you are using Mac or Windows as it supports both operating systems. Now here’s what you have to do on how to recover data from Western Digital external hard drive using FoneDog Data Recovery.
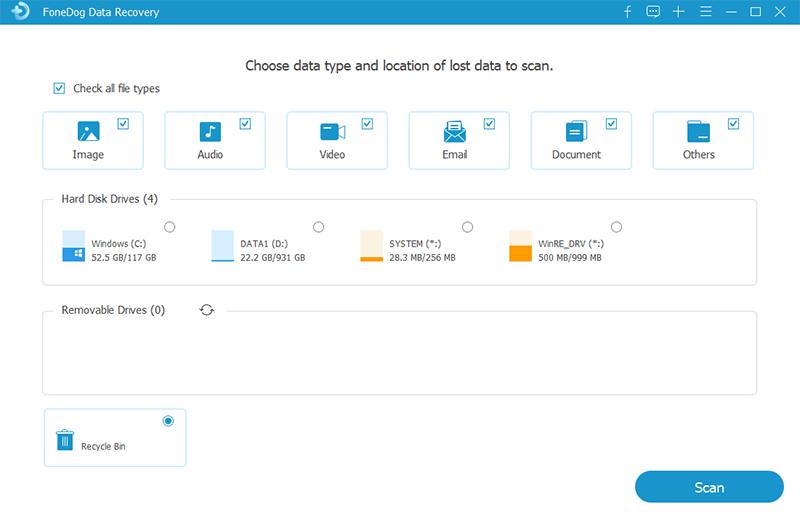
First of all, you have to download and install the software by heading here. Once you got the software, you will now have to launch it. Upon launching the tool, you will see an interface with a selection of file types as well as storage drives. For the file type, we advise that you click on the box for Check all file types. As for the storage drive, make sure that the Western Digital hard drive is connected first then select it under Removable Drives.
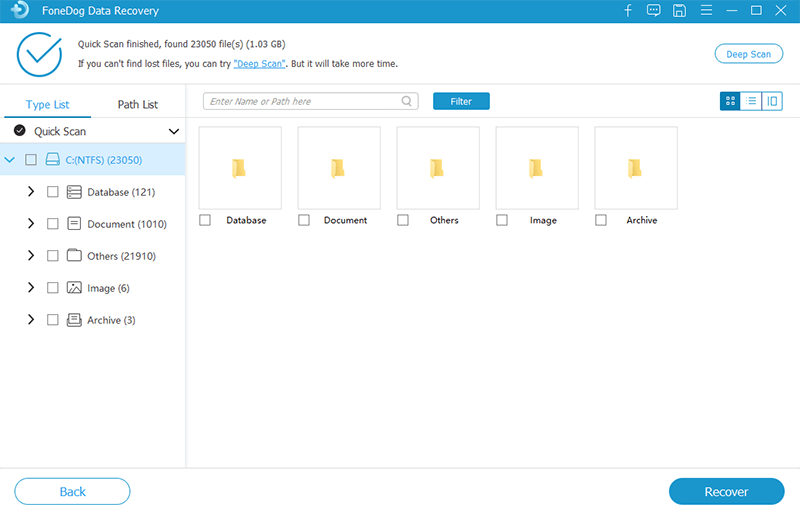
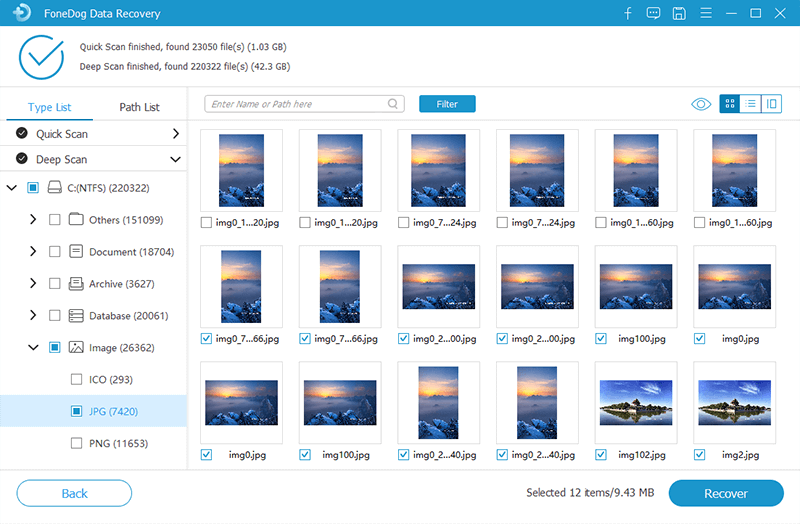
Next, you will have to click on the Scan button once the file type and storage drive is all set. The software will then automatically scan for files on the selected Western Digital hard drive. You can choose the Deep Scan after the initial scan is finished to make sure you get more accurate results. Additionally, we suggest not doing anything while the scan is ongoing and make sure the connection between the hard drive and computer is stable.
Once the scanning process is done, you will be able to recover your files at last. But first, you will have to select the files from the selection that will be shown in the next interface. To select files, you will only have to check their corresponding boxes. Once the selection is done, click on the Recover button.
That’s pretty much everything you need to know if you want to learn how to recover data from Western Digital external hard drive using the FoneDog software. The only disadvantage to this, as we’ve said before, is that it may be too risky for people that are cautious.
Since the previous method discussed how to recover data from Western Digital external hard drive using a third-party software, we will be lowering down our standards by making use of a less effective but safer method. This involves the Disk Management utility.
The Disk Management utility is known for having several functions that can help with solving most issues regarding a disk, whether it is internal or external/removable.
It can be used for replacing drive letters, partitioning, and more. With that said, here’s how you can solve our issue with this utility:
On your computer, press the Win key + R to access the Run dialog box. On the Open field, type in diskmgmt.msc then press Enter to open the Disk Management window. You may also simply press the Win key to head to the Start menu then search for “Disk Management”, then select the first option that pops up.
On the Disk Management utility window, you will see tons of options. But first, you will have to locate your Western Digital external hard drive first. You should be able to find it using the size and name. Now right-click on that disk then select Create New Simple Volume. This will ensure that your drive is recognized as a volume. Next, right-click on it then select Change the drive letter and path this time. Now use the drive letter that you want to use.
With this, you will be able to ensure that the operating system will use your drive as it is. This is because data loss may not be your issue here. Instead, the files may only be hidden. However, if this didn’t work, then you may need to conduct other fixes. Here’s a rather easy solution for you.
We’ve already discussed ways on how to recover data from Western Digital external hard drive such as using a third-party software as well as a built-in function. However, you don’t necessary have to make use of a tool just to solve your problem. Sometimes, it would be better if you simply try to solve it by troubleshooting it first.
There are many ways to troubleshoot your hard drive, but for the sake of safety, we recommend that you only make use of these steps:
Our first step for troubleshooting your hard drive is to access the utility that we will be using. This is most often used by experts when they don’t know yet what the problem is. To do this, simply press the Win key + R on your keyboard to open the Run command just like we did before. Then, type in devmgmt.msc then press Enter.
On the Device Management utility window, you will see a list of devices. To begin, you will have to find the option for Disk drives then expand it. Once expanded, locate the drive representing your external hard drive.
Once you find the drive, right-click on that option. Then, select Properties from the resulting dropdown menu. You will then get the Properties window. There, proceed to the Driver tab. You can do many things to that drive such as updating it, disabling it, uninstalling it, and more. However, we suggest you stick to the options Update Driver or Roll Back Driver. Use Roll Back Driver if it is available, and if not, select Update Driver.
By updating the firmware for the Western Digital External Hard Drive, you will be resolving most issues that are currently on that drive. However, for the best chance of recovery, we suggest restoring it which can be done with the Roll Back Driver option.
Command Prompt is a built-in utility tool in all computers that uses the Windows operating system. It makes use of codes to execute commands. Such commands are capable of solving most issues present on the operating system.
This includes hard drive-related issues such as data loss, corruption, and more. The advantage of using the Command Prompt is that most of the commands done here is not available in other utility tools of Windows. As such, it is used by experts.
On the other hand, the codes used in this tool is complex. So if you want to learn how to recover data from Western Digital external hard drive, you have to follow these steps carefully:
There are many ways to open the Command Prompt. First, you can press Win key + R on your keyboard just like before, then type in cmd and press Enter. You may also head to the Start menu then search for “cmd” and you simply have to select the first option that pops up.
The next and final step is to actually recover the data. To do this, you will have to type in different codes. The first set of codes you should type in is “chkdsk *: /d” and replace the letter d for the drive letter that represents the Western Digital hard drive. Now press enter and wait for a while. Then, type in the same drive letter you used earlier and press Enter again. Finally, type in “attrib -h -r -s /s /d *.* then press Enter.
With this, you have now successfully learned how to recover data from Western Digital external hard drive using codes with Command Prompt. This is very effective since it makes use of administrative privileges to conduct such commands. however, if you don’t know what you’re doing, you might do more harm than good.
Data Recovery
Recover deleted image, document, audio and more files.
Get deleted data back from computer (including Recycle Bin) and hard drives.
Recover loss data caused by disk accident, operation system crushes and other reasons.
Free Download
Free Download

Nowadays, there are too many causes of data loss. This issue is becoming more and more prevalent. It’s not only possible to internal storage, it can also happen to external hard drives, and that includes the products of Western Digital, no matter how high-performance it is.
Fortunately, you can easily solve data loss issues, especially now that you’ve learned four ways on how to recover data from Western Digital external hard drive. However, you have to still be careful when handling your hard drives so you won’t have to go to the trouble of learning this in the first place.
Leave a Comment
Comment
Data Recovery
FoneDog Data Recovery recovers the deleted photos, videos, audios, emails, and more from your Windows, Mac, hard drive, memory card, flash drive, etc.
Free Download Free DownloadHot Articles
/
INTERESTINGDULL
/
SIMPLEDIFFICULT
Thank you! Here' re your choices:
Excellent
Rating: 4.7 / 5 (based on 57 ratings)