FoneDog Screen Recorder
FoneDog Screen Recorder
Special Offer
Special Offer


By Vernon Roderick, Last updated: May 18, 2021
Despite its uses, there’s still no denying that a partition is one of the most delicate storage devices available to users. Even the smallest issue can lead to the dysfunction of a partition. It may either be inaccessible to you or the partition might suffer from data loss.
Either way, learning how to do partition repair is a very special skill. Considering how sudden such scenarios may take place, it’s only natural to learn about the solutions early on.
So today, we’re going to discuss everything about partition repair in detail, starting from how it occurred to how you can fix it.
Part 1. Why Did the Partition Malfunction?Part 2. How to Preserve PartitionsPart 3. Conclusion
Every expert knows very well how important it is to learn the cause of a problem before fixing it. This is especially true for our topic since there are many parts of a single partition. There’s a primary partition, and then there’s the extended partition.
Regardless of the quality of a partition, there’s a possibility for it to malfunction. It’s only a matter of time before you can make use of methods for partition repair. Here are the four main reasons why your partition malfunctioned:
Different causes make way to different solutions. Regardless, you should know very well how crucial it is to learn ways of partition repair as soon as possible so as to avoid further problems.
So how can you know if your partition is already damaged?
These four scenarios are the most common ones, though we can’t guarantee that these are the only scenarios there are.
Either way, if you belong to at least one of these, it’s time to learn partition repair. With that said, let’s head to our first method and perhaps the easiest and most effective as well.
One of the many solutions that experts come up with whenever they face problems with their computer is the use of third-party software or tools.
There are tools for transferring files. Some were made to convert files. And others were specifically made to do tasks such as partition repair. One such software is FoneDog Data Recovery.
As you might have already guessed, FoneDog Data Recovery is software specializing in recovering files which includes images, documents, videos, and more. While our topic may be partition repair, the issue with doing such a task is data loss.
Thus, it’s important to recover your files with the software, and perhaps you can increase your chances of repairing your partitions. The best thing about FoneDog Data Recovery is that it allows recovery of partition regardless of the reason, be it from a virus attack, improper management, disk accident, and more.
Here are the steps you need to take to do partition repair using FoneDog Data Recovery.
The software can be downloaded from the official website of FoneDog, and the downloaded file should automatically install the software. Once that’s done, open FoneDog Data Recovery. There should be an interface showing the File Types as well as Drives. For File Type, we recommend choosing to Check all file types to ensure no data is left behind. Then for the drive, choose the partition from which you want to recover files from.
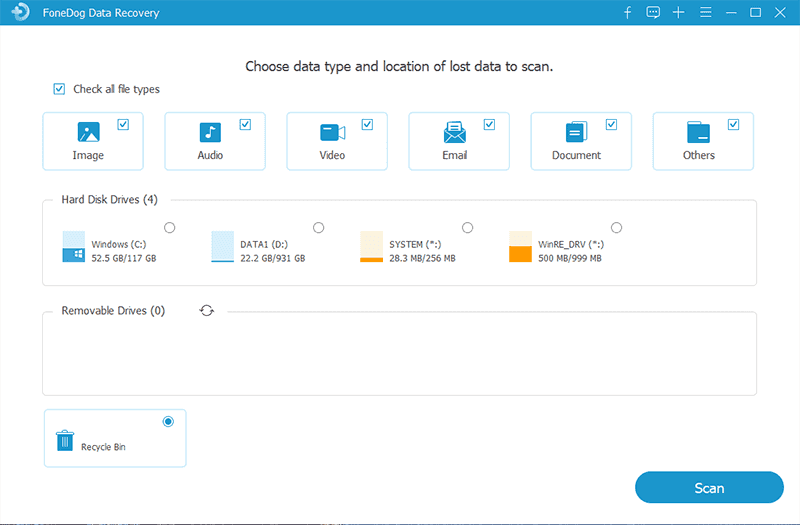
Once you’re done configuring the file type and location, click on the Scan button. Now FoneDog Data Recovery should start scanning for files. It should take a while depending on how large the partition is. To get more accurate results, you can choose to run another scan, this time it would be Deep Scan, although it would take much longer.
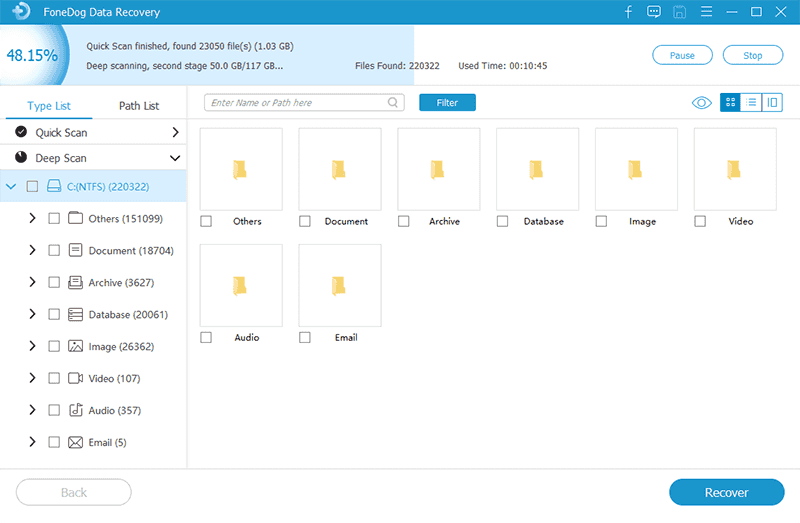
After the scanning, you will be redirected to the next screen where you will be able to see a selection of items. These are files that are recoverable from the partition. To select an item, click on the box for that file. Once you’re done with your selection, click on the Recover button.
Once you click on the Recover button, make sure not to interrupt the process as it can lead to data loss. Either way, all you have to do now is wait for the process to complete.
If this isn’t your preferred method for partition repair, then let’s head to our next option.

The Command Prompt is known for its complexity and difficulty to master. However, when it comes to partition repair, once you know what to do, it would be very easy. With that said, this time we’ll be using the famous Command Prompt function on Windows.
As you may already know, the Command Prompt is a built-in feature so you don’t have to worry about anything since it’s an official tool.
Either way, here are the steps to take to do partition repair using Command Prompt:
You may also press the Win key + R, type in “cmd”, then press OK for an alternative method of accessing Command Prompt.
There should be lines of text showing you that the process has already started. It should take some time depending on the volume of the partition. Either way, by doing these, you’ll be able to do partition repair easily.
Since learning about how the Command Prompt works would take too long, you should use a more basic option if this method were to fail.
As we’ve said in previous sections, one of the reasons why you have to do partition repair is that you can’t access the partition.
One of the causes for this is that there’s no stable connection between the operating system and the partition. An example of a sign for this is when you see a USB device not recognized error.
To fix this problem, you have to try out some, if not all, of these tips:
This will ensure if the connection between the OS and the partition is actually successful.
While we haven’t mentioned anything about a drive letter before, having an invalid drive letter is actually one of the reasons for a partition to malfunction. Thus, it is crucial to make sure that your partition has a drive letter.
To do this, you have to follow these steps:
You may also do what you did with Command Prompt. Press Win key + R then type in “diskmgmt.msc” and press OK.
Either way, you should be able to use the Disk Management window now.

This should assign a drive letter to the unnamed partition. The drive letter will depend on the last drive letter. For example, if the last letter was G, then it will automatically assign H as the next letter.
Another way to do partition repairis to completely erase the data contained in that partition. After all, there is a good chance that the problem lies within the data contained within that partition. To do this, you have to format the drive.
Here are the steps you need to take to format a partition:
As you’ll be doing formatting, this will definitely erase all data from that partition. Thus, it’s important to create a backup of your files first before doing this. Anyway, you can easily recover your data using FoneDog Data Recovery.
Perhaps one of the most complicated ways to do partition repair is to change permissions. As you may already know, permissions are what allow you to do various things to a directory.
Certain Permissions allow you to access a folder, add a file to it, or even delete the folder altogether. Partitions are no exception. Permissions decide who can control the partition and up to what extent.
If you want to learn how to configure the permissions to do partition repair, here are the steps to do so:
At this point, you would have already configured the permissions in your favor. Now if this still wasn’t enough to make the partition repair successful, you still have one more option left.

As we’ve said before, there are many parts of a partition. One of those parts is the partition table. Up until now, we’ve only focused on doing partition repair. However, one way to do that is to put our attention on the partition table.
Fortunately, there’s a feature that allows you to repair the partition table easily. Here’s how you can do this:
At this point, you would have already repaired your partition table.
While it may be assuring to know that there are lots of ways to do partition repair, you can’t always rely on such options. After all, there’s a chance that none of these methods will work.
So to speak, you have to learn how to preserve the lifespan of your partitions. And here are some tips that might help you with that:
By following these tips, you can ensure that your partitions will last as long as they can. It might not be directly related to doing partition repair, but it would be better than just waiting for the time to come for your partitions to sustain damage.
People Also ReadHow to Partition A Usb DriveHow to Recover Lost Partition on External Hard Drive
There are countless reasons for you to take care of your partitions. But like these reasons, there are also countless ways for a partition to suffer from damage.
Thus, it’s important to always be ready for the worst, and one way to do that is by learning how to do partition repair. However, that won’t be easy.
You’ll have to first learn more about partition malfunctions, but that shouldn’t be an issue for you since you’ve already learned about it in earlier sections.
Leave a Comment
Comment

Technical Expertise for PC/Website Optimization
One of my passion is to develop software of my own
I write articles to share knowledge about IT technology and some experience in developing my own software, and developing my own software is one of my passions for work.
Data Recovery
FoneDog Data Recovery recovers the deleted photos, videos, audios, emails, and more from your Windows, Mac, hard drive, memory card, flash drive, etc.
Free Download Free DownloadHot Articles
 /
/
INTERESTINGDULL
/
SIMPLEDIFFICULT
Thank you! Here' re your choices:
Excellent
Rating: 4.7 / 5 (based on 99 ratings)