FoneDog Screen Recorder
FoneDog Screen Recorder
Special Offer
Special Offer


By Vernon Roderick, Last updated: June 3, 2021
Losing your important files is tragic. That’s for sure. Whether it’s a picture of your loved ones or a document for your job interview, you will face some serious consequences when you accidentally hit the delete button on a file.
What makes it more devastating is the fact that it is fairly easy to encounter file deletion on Mac. This is because there are many ways to delete a file permanently on a Mac computer. For that reason, many users have tried to find a way to recover deleted files Mac.
Fortunately, you also have tons of options to choose from. This article was made especially for this reason, to give you the best methods to recover all kinds of files on your Mac.
But before we go into that part of this article, let’s first understand why you lost the data in the first place so that you won’t encounter it as often as others do.
Part 1. Common Causes for Deleted Files in MacPart 2. Recover Deleted Files Mac with a Third-Party ToolPart 3. Recover Files from Trash CanPart 4. Recover Files from Hidden Trash CansPart 5. Recover Any Files using iTunesPart 6. Recover Photos from Photos AppPart 7. Recover Documents by Restoring Older VersionsPart 8. Recover Mails from Trash FolderPart 9. Recover Songs from iTunesPart 10. Recover Contacts with UndoPart 11. Prevent Deletion with BackupsConclusion
While there are many ways to recover deleted files Mac, the same goes with the causes. But first of all, it’s important to understand that deleted files are different from data loss in a way that data loss can take the form of virus attack, corruption, and many more while deleted files are just human error.
In addition, the solution may also depend on how the problem came about. So it’s really important to understand where the problem came from.
Here’s a look at a list of causes of file deletion that are common for Mac users:
Since it was not the cause of a virus, removing the virus is out of the question. It is also not a result of an error so that’s also not plausible. The only thing left now is to actually recover deleted files Mac by relying on spare copies of it.
But that’s not exactly true since there’s another way to accomplish this without looking for a duplicate, and that is by using a third-party tool.
A Mac user should already know that different types of files have their own directories designated to them. This includes the Photos app for photos, the Emails app for emails, and many more. That’s why in order to recover deleted files Mac, you will have to go to different places, which would take some time.
That’s why we recommend that you use FoneDog Data Recovery which allows you to recover all types of files whenever you feel like it. In addition, FoneDog Data Recovery supports both Mac and Windows.
The software enables you to recover files directly from a memory card, documents, emails, and of course, the Recycle Bin where both intentionally and unintentionally deleted files go.
Data Recovery
Recover deleted image, document, audio and more files.
Get deleted data back from computer (including Recycle Bin) and hard drives.
Recover loss data caused by disk accident, operation system crushes and other reasons.
Free Download
Free Download

Now that we’ve got that out of the way, here are the steps you need to follow to use the tool:
Download and install the FoneDog Data Recovery software, then run the tool on your computer. Once you’re done, you should see the window popping up.
On the interface of the software, you will see a list of file types as well as the storage drives. The file type indicates where the file you want to recover belongs and the drive is where it can be found. For the file type, it is up to you, but you have to make sure to choose the Recycle Bin found at the bottom of the interface.
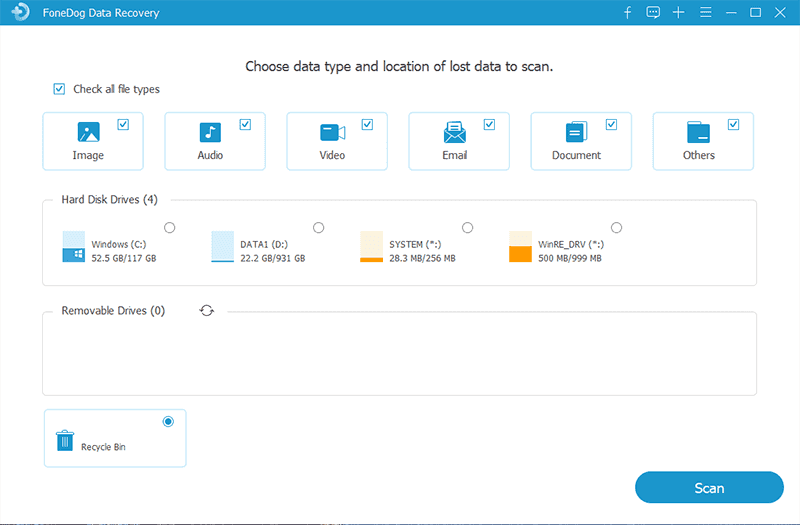
Now click on the Scan button. The software will start the scanning process. By default, the scan type is Quick Scan, but if you want to have a more accurate scanning, choose the Deep Scan. On the left side, there’s the Type list and Path list. This will be how the items will be listed. You can choose whatever you want.
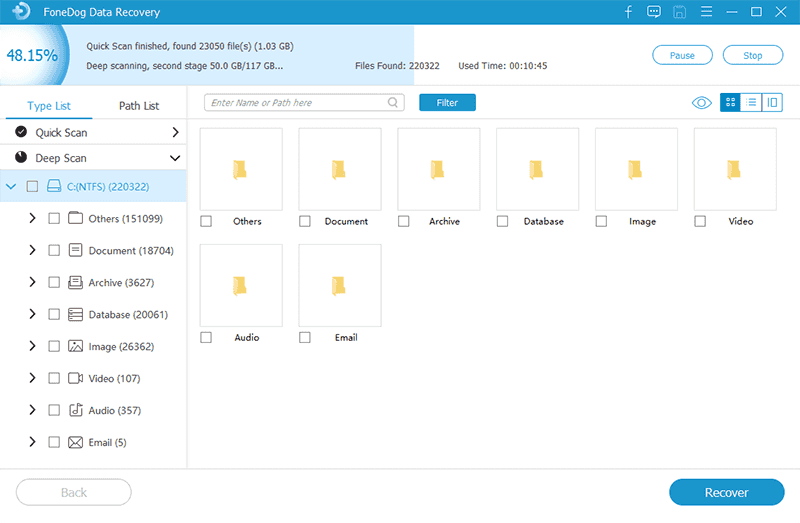
Once you’re done configuring the scan and list type, locate the files you want to recover. Then you can select the files by clicking on their corresponding boxes. You may also search for a file by entering the name on the search bar.
After you are done selecting the files, you can now click on the Recover button. Now all you have to do is to wait for the recovery process.
Once it’s finished, you will be able to recover deleted files Mac easily. Alas, you can’t be sure that this would work. So let’s head to your other options.

Of course, the first thing you have to do is to make sure that the file was actually deleted and you’re not just overreacting.
To do this, you will have to go to the Trash Can with these steps:
If the file is still in there, then you don’t exactly have to recover deleted files Mac because it isn’t what you can call a deleted file, considering that you can recover it easily.
This is if you haven’t cleared the Trash recently or you just hit the Delete button. Now if you can’t find the file here, then your next task is to check other Trash Cans.
When the file that you are looking for can’t be found on the Trash Can, there’s a chance that it is located on a hidden trash can. Hidden trash cans are where deleted files from external drives or flash drives go.
For that reason, it is also important to look at these places. However, since they are hidden, you’ll have to put some extra effort into finding them. To do this on Sierra, simply press the Shift + CMD + Period key on your keyboard.
On the other hand, you can do this on older OS versions by pressing Command + Space then typing Terminal. Here, type in “defaults write com.apple.finder AppleShowAllFiles TRUE”. After this, type in another command with the words “kill all Finder”.
Once you’re done with this, there should be a. Trashes folder found on your Mac. To find this, you simply have to search for this name. Now to undo what you did, you just have to type in the two commands before, except now instead of TRUE, you will have to replace it with FALSE.
However, if you can’t find the file on the Trash Can or the Hidden Trash Can, then there’s a high chance that it really is deleted. In that case, you will really have to recover deleted files Mac.
As previously said, if you’re going to rely on the spare copies of your file, it will take a long time. So you might as well rely on an easier method. That’s why we recommend trying iTunes first.
While it’s not exactly made to recover files that you accidentally deleted, it’s still a plausible option if ever you want to recover deleted files Mac.
Here are the steps you need to follow to accomplish this:
This will enable your computer to automatically create a backup so you can recover deleted files Mac if ever you need it.
If you think the above steps are not very detailed, you can click this article to learn how to use iTunes to restore any file.
You may have already used it, but there’s actually an app that stores your photos even if you delete them locally in your internet store. The photos app has its own server where you can find all the photos you had on your device.
Once you delete a photo, you will have 30 days to recover it on the Recently Deleted section of the app before it gets removed permanently.
Here are the steps to use this feature:

This should take back that photo to the main library of the Photos app. On your internal storage, the directory would be at the location it was in before it was deleted.
Although it’s not exactly a common method, there’s also a way to recover deleted files Mac using iWork apps. This time, it would be documents instead of photos. iWork is a set of built-in apps on macOS.
There’s an app like Text Edit and Preview. There’s also one for presentations and databases, similar to the Microsoft apps in Windows.
Fortunately, iWork apps work similarly to Microsoft in the way that they keep the previous versions of the documents.
So to recover them if ever you lost the document, you will just have to follow these steps:
The only downside to this is that you are not necessarily trying to recover deleted files Mac. This is because you still have the file, what you’re recovering is just a part of it that was lost.
The third file type you can recover is mails. You should already know that there is a built-in Mail app on every macOS device.
Within this Mail app, you will find different folders. One of these folders is Trash where you can find emails that were deleted up until weeks ago.
To recover deleted files Mac through the Trash folder, you have to follow these steps:
With this, you can easily recover emails from your Trash folder. There’s no limitation to this feature, except of course the fact that you can only recover emails that were deleted recently, which is very understandable.
The next file type that you can recover separately are songs or audio files for that matter. For this, you will use the iTunes app. This is because whenever you delete a music file, you will be given the option to either keep the file or just move it to the trash folder.
Either way, there’s a possibility that you can recover it, and here’s how:
There you will find the missing audio files that you are looking for.
However, remember that you have to delete the music file in iTunes in order to recover it with iTunes so that’s its downside.
Lastly, you can recover deleted files Mac using your Contacts app. While it may not exactly be very common for people to stress over deleted contact files, it still helps knowing that you don’t have to worry about losing contacts easily.
Here’s how you can recover your contacts:
This should recover the contact card that you last deleted. So it may not be able to recover all contacts unless you did it one by one.
Regardless, this concludes the list of ways to recover deleted files Mac.
At the end of the day, we still can’t deny the fact that the best way to preserve your files is to make sure they have their own backups. And to do this, you will have to rely mostly on Time Machine.
Time Machine, as the name suggests, is an app that has the capability of turning back time on your macOS. You have two options for creating a backup, and that is manually or automatically. Let’s start with how you can do it automatically:

You may also do it manually if you’re not fond of relying on the app too much. Here’s how you can do it:
With this, you will be able to recover deleted files Mac as long as you have a backup.
People Also ReadCan I Recover Files from a Recycle Bin?How to Recover Lost Email from Three Platforms for Free
macOS is a powerful system that allows you to effectively manage your files. However, it is still far from perfect and you will still encounter problems along the way.
The most important thing you have to remember is to always be prepared for the worst. For that reason, we recommend that you always back up your files.
You should fill your head with ways on how to recover deleted files Mac so that you can fix inevitable problems whenever you feel like it.
Leave a Comment
Comment

Technical Expertise for PC/Website Optimization
One of my passion is to develop software of my own
I write articles to share knowledge about IT technology and some experience in developing my own software, and developing my own software is one of my passions for work.
Data Recovery
FoneDog Data Recovery recovers the deleted photos, videos, audios, emails, and more from your Windows, Mac, hard drive, memory card, flash drive, etc.
Free Download Free DownloadHot Articles
 /
/
INTERESTINGDULL
/
SIMPLEDIFFICULT
Thank you! Here' re your choices:
Excellent
Rating: 4.7 / 5 (based on 95 ratings)