
By Adela D. Louie, Last updated: January 10, 2020
Do you have an SSD not showing up un Disk Management on your computer? Well in this article, we are going to show you a way on how you can that your Windows computer is not detecting your SSD so that you will be able to have this problem fixed.
If you are in a situation wherein your SSD not showing up in Disk Management, there are ways on how you can actually have this resolved. However, this will depend on the scenario or the reason as to why your SSD is not showing up. And in this post, we are going to show you how you can resolve this as per different reasons.
Here are four different ways to fix your SSD not showing up in Disk Management of your Windows computer depending on the scenario that you have.
Having spent some years on writing programs, we have created a great tool for everyone to avoid data loss.
Here is a tip: Download FoneDog Data Recovery to easily get back your lost data from a computer or an external hard drive. In case you want to fix SSD by yourself anyway, we have also gathered some basic solutions below.
Data Recovery
Recover deleted image, document, audio and more files.
Get deleted data back from computer (including Recycle Bin) and hard drives.
Recover loss data caused by disk accident, operation system crushes and other reasons.
Free Download
Free Download

Solution #1: SSD Not Showing Up in Disk Management Because the Letter is MissingSolution #2: SSD Not Showing Up in Disk Management Because it Was Not InitializedSolution #3: SSD Not Showing Up in Disk Management – File System is Not SupportedSolution #4: SSD Not Showing Up in Disk Management Due to Issues with Disk Driver
If you have the problem wherein your SSD is missing its letter or having a problem with some of your disk, then this is the reason why your Windows computer will not be able to detect it. So with that, you will be needing to key in a letter for your SSD in your Disk Management manually.
If you happen to have a new SSD and it is not showing up on your Explorer, then that means that it was not actually initialized. So, you have to initialize it first.
But if you have an old type of SSD that has the same error not showing up on your Disk Management, then you have the get your SSD connected to a different computer for you to see if you will still have the same error message. Otherwise, for you to be able to initialize your SSD on your Windows 10 PC, here is what you need to do.
If in case that both methods will not work on your end, then you have to think more. And one thing that you should think of is the file is corrupted or if it does not have the power to support the file. So if you have found out that you have a corrupted file, then what you will be needing to do is to have them recovered.
And when it comes to recovering data, there is one tool that you can use. And that is the FoneDog Data Recovery software. This is because this program has the ability to recover any of your lost files on your computer or from an external hard drive.
This program is also very easy to use all because of its very user-friendly interface. It is also been said by all of its users that it is safe to recover to your lost or corrupted data because it will not overwrite any existing that you have on your computer.
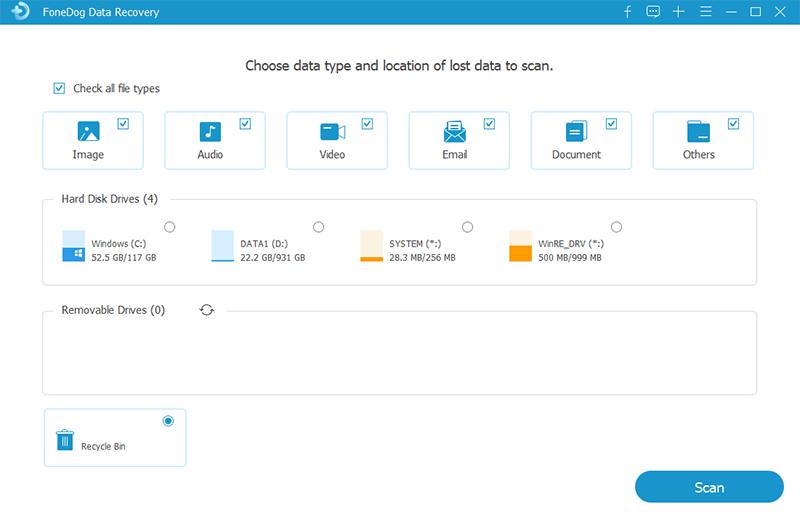
After getting the FoneDog Data Recovery software and installing it on your PC, launch it so you could start using it and recovering your corrupted files. Then when you are on the main screen, go ahead and choose Documents and then select your SSD that you are having trouble with.
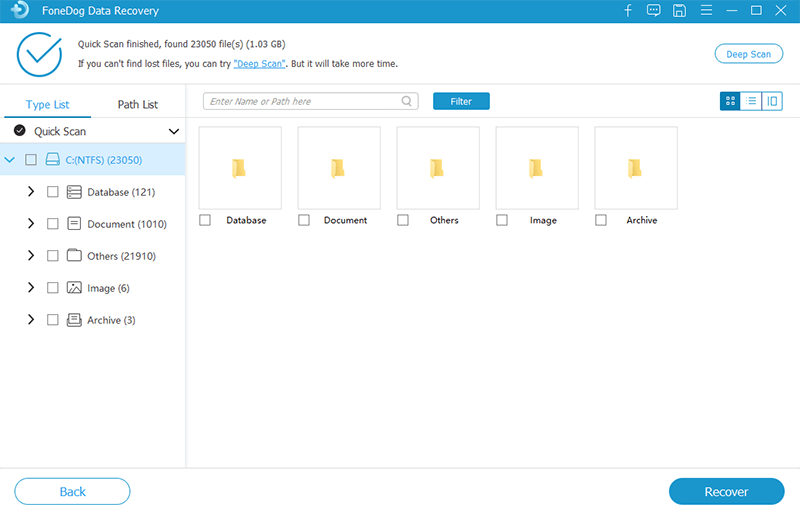
After that, simply click on the Scan button. When you click on that, the FoneDog Data Recovery software will then start on scanning your SSD through a Quick Scan process. However, if you would want to do a Deep Scan, then all you have to do is to click on it and the process will then begin. Then all you have to do now is to wait until it is over.
Though you have to remember that doing a Deep Scan on your device will take a longer time than the usual scanning time so you need to be patient.
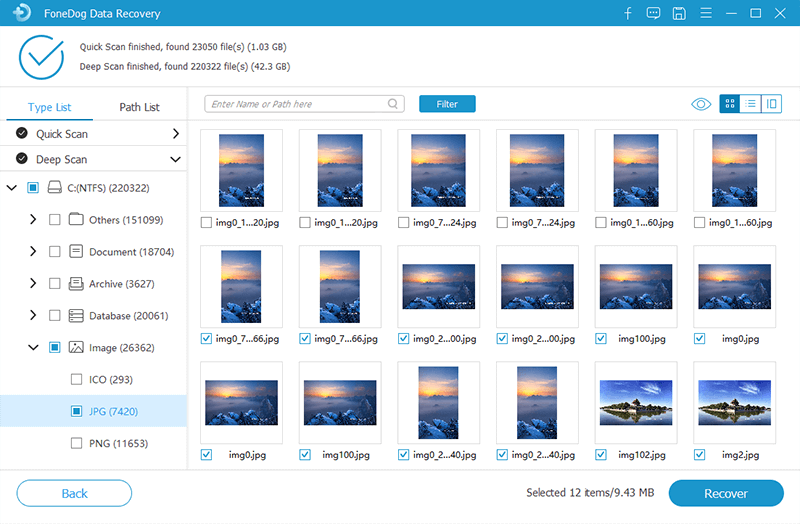
After completing the scan, you can now go ahead and click on the files on your screen for you to view them at the same time, for you to select on them. You may also use the Search field if you want a specific file that you want to restore.
After you have successfully chosen those files that you would like to restore, then go ahead and click on the Recover button. The FoneDog Data Recovery then begins to start getting back those files that you have chosen earlier.
There are also some instances wherein your SSD can be detected by your PC but it does not appear. This is because of the disk drive that is not installed properly. So what you will be needing to do is to have it reinstalled and see if this could help you solve the problem.
And once that you are done with all of the steps, simply remove your SSD and then have your system reboot. Once that your system is back up and running, have your SSD connected again for you to see whether your computer will be able to connect to your SSD.
Data Recovery
Recover deleted image, document, audio and more files.
Get deleted data back from computer (including Recycle Bin) and hard drives.
Recover loss data caused by disk accident, operation system crushes and other reasons.
Free Download
Free Download

As we all know, SSD is also very prone to having an issue such as physical damage or from a mechanical issue. So, with that, go ahead and fix everything using. And to make sure that your data is safe. You know, just making sure with everything.
Leave a Comment
Comment
Data Recovery
FoneDog Data Recovery recovers the deleted photos, videos, audios, emails, and more from your Windows, Mac, hard drive, memory card, flash drive, etc.
Free Download Free DownloadHot Articles
/
INTERESTINGDULL
/
SIMPLEDIFFICULT
Thank you! Here' re your choices:
Excellent
Rating: 4.4 / 5 (based on 102 ratings)