
By Vernon Roderick, Last updated: July 15, 2020
The Trash Bin is a special place for Mac users. For one, it’s the place where the files that they delete go to. Simply put, there they can recover the files that they accidentally deleted. However, things don’t always go the way you want.
The best example is when instead of recovering the files in the Trash, you empty it instead. And that’s perhaps why you are here now learning how to undo empty Trash Mac. Fortunately, it is definitely possible to do so. However, it won’t be as simple as you expect. You will have to first learn about how to manage files on the Trash, so let’s first discuss the basic things about the Trash Bin on Mac.
Part 1. Everything You Need to Know About the TrashPart 2. To Undo Empty Trash on Mac Using Data RecoveryPart 3. To Undo Empty Trash Mac via Mac Built-in SettingsPart 4. Bottom Line
Besides the method to undo empty Trash Mac, there are a lot of other things to know about the Trash. For one, it’s important to know the concept of how the Trash works. The Trash is basically a function on your Mac that can be considered as the Mac counterpart of Recycle Bin on Windows.
Simply put, it is a temporary sanctuary for files that are deleted. It is so that if you realize that you deleted a file that was actually important, you can get it from the Trash. However, you will find that there are some situations wherein you won’t be able to do so. The most common case is when you empty the Trash, in which case you’ll have to first learn how to undo empty Trash on Mac.
But before that, how can you avoid such issues:
Now if you weren’t able to do these and you are currently suffering from data loss, is it still possible to recover your important files? Fortunately, the answer to this is Yes. It can easily be done in many ways, although it’s not a guaranteed 100 percent chance of success. So without further ado, here’s our first option on how to do undo empty Trash on Mac.
We chose this as our first option simply because it was the easiest. It involves using a third-party software named FoneDog Data Recovery. FoneDog Data Recovery is a software created for users that are having trouble recovering their data on their computer. This includes both Windows and Mac.
Data Recovery
Recover deleted image, document, audio and more files.
Get deleted data back from computer (including Recycle Bin) and hard drives.
Recover loss data caused by disk accident, operation system crushes and other reasons.
Free Download
Free Download

The data recovery supports most file systems, including hard drives, partitions, flash drives, memory cards, and even the Trash bin. For that reason, FoneDog Data Recovery is one of the best-suited tools to undo empty Trash on Mac.
Here are the steps you need to follow if you ever decide to use this software:
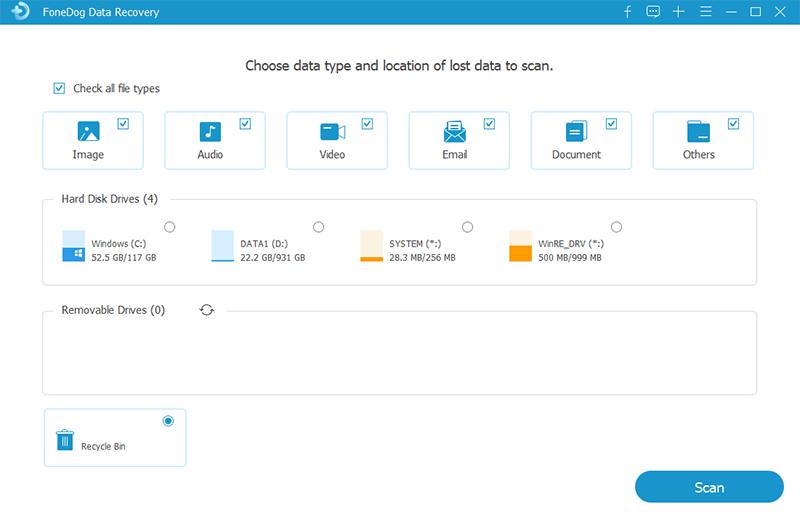
Once you download and install the software on your PC, the next step is to run the tool. The interface should show you a couple of options in each section. In the first section, you can mark the types of files that you want to recover. The next section will indicate the location of the file. In our case, you’d want to mark the Recycle Bin option, which is to say you will recover files from the Trash Bin.

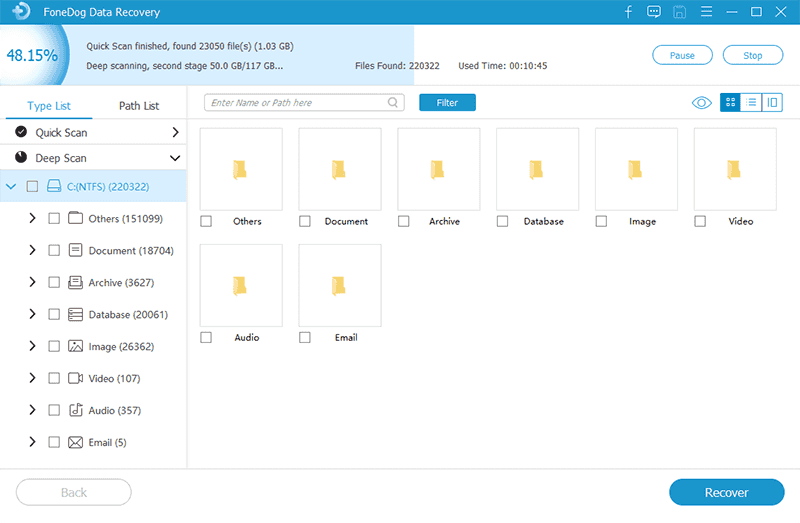
After you are done with the configurations in Step 1, click the Scan button. The tool should start the scanning process automatically. After the scanning, you’ll have the option to select the Deep Scan option, which would scan the computer further with more accurate results.

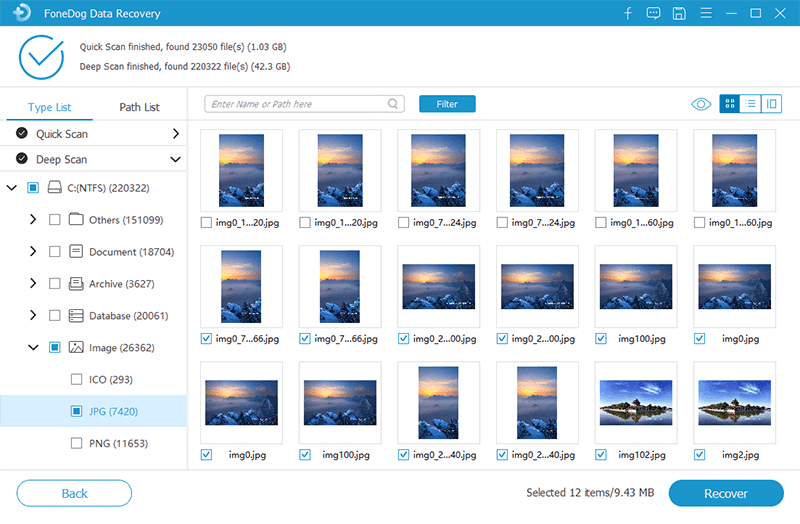
Once the scanning is done, be it from Quick Scan or Deep Scan, you’ll see a selection of items. These are files that you will be able to recover. On the left, you’ll see their corresponding locations. You can navigate through here to find your file. Then to select an item, click on the appropriate boxes.

When you’re done with selecting the files, all you have to do is click the Recover button. Then just wait for the process to complete.

Many people tend to steer away from such methods mainly due to their distrust of such tools. However, if you can’t afford to delay the recovery, this is your best option. Now if you have more time in your hands, you might want to check our other options as well.
Although we’ve already discussed our first method to undo empty Trash on Mac, you still haven’t checked whether the file really is deleted. This is a common misconception of others that try to recover their files. Just because you can’t find your files doesn’t mean they’re gone and needs to be recovered.
There are steps you need to take to ensure that your assumption was right, and that is by doing a systematic search. You may do this by simply going to the Trash bin and searching for your file. If it’s not there, don’t lose hope yet. You may also launch a session of Finder then do a search there.
If this still didn’t work, then you can use the Spotlight search or even use the Siri assistant to search for your file. Nevertheless, it’s important to remember that Mac has a lot of features for searching for files. But if the file really isn’t on your device, then the situation may be far worse than we thought.
As we’ve mentioned before, it’s crucial to first make sure if the file really is deleted. And that doesn’t only involve checking the storage device on your computer. Remember that in this era, file transfer is as easy as it gets. So it’s not so far off to say that your file was copied to another device as well.
This includes a computer, a mobile device, or a storage device like a flash drive or memory card. Either way, this would only take a while so there’s no harm trying it out. Now if even after all this, you didn’t find your file. You might be better off learning more ways to undo empty Trash on Mac.
Your Mac is capable of more things than you think. This is especially true when it comes to data recovery. Mac has all kinds of file recovery systems in place for different file types. Unfortunately, in our case today, the only file type you can easily recover are photos.
This is because the Albums app in Mac has a Recently Deleted folder where, as the name suggests, files that are recently deleted can be recovered. Here’s how you can use this:
This should bring back all the selected photos to their corresponding places. On the Recently Deleted folder, you may also notice a number indicated under the photo. These numbers are the number of days with which the photo will remain recoverable. For that reason, you may not see the photo that you want to recover because the days have already expired. If that’s the case, then let’s head to our next option to undo empty Trash Mac.
A better yet more complicated method is to use the Terminal to enter a code in order to recover your deleted files. The Terminal is Apple’s counterpart for the Command Prompt in Windows. It allows you to accomplish many tasks such as configuring your device, changing permissions, and of course, restoring files.
To do this, you will have to follow these steps:
In the right conditions, you’ll be able to recover just about any deleted file. The only downside to this is that you won’t be able to use this method if you don’t have permission to for the Terminal, which is a pretty common cause for Mac users. If that’s the case, then let’s proceed to our next method to undo empty Trash Mac.
We have the Trash against Recycle bin, the Terminal against Command Prompt. Now it’s the Finder app that is the counterpart of File Explorer on Windows. The Finder app is where you can see files in different folders. Fortunately, like File Explorer, Finder has some very useful functions available for users, and one such function is the Undo Move.
You can use this function by following these steps:
This will undo the most recent movie that you just did. If that move is the deletion of the file, then you can absolutely recover the file as if it were never deleted. However, this method is very limited since it can only undo one move. This means if you’ve emptied your Trash and did another movie after that, you won’t be able to undo empty Trash Mac.
That concludes our different methods. If these methods didn’t work for you, then you should find time to place some countermeasures to avoid this happening again.
The best preventive measure for data loss is, without a doubt, creating a backup. To create a backup on a Mac, you will have to use the Time Machine feature. This will allow you to restore files individually, or even restore an entire file system.
In your case, it would be the former. To restore from a backup, you will have to acquire a Time Machine backup disk, then follow these steps:
You can press the Space Bar key to preview the file so you can avoid making a mistake.
With this Time Machine feature, you can easily recover all kinds of files from your Mac. The only difference between this and the previous options is that it can only be done if you created a backup disk. In short, there’s a preparation that you must do, which requires you to accept the fact that data loss is inevitable and preparing is a must.
Data Recovery
Recover deleted image, document, audio and more files.
Get deleted data back from computer (including Recycle Bin) and hard drives.
Recover loss data caused by disk accident, operation system crushes and other reasons.
Free Download
Free Download

Your files are very important. That’s already a given. That is why it’s only natural to prepare for the worst that might happen to those files, that is, getting deleted. Fortunately, the Trash is there for you to save your back. Nonetheless, there are also problems with the Trash, which is when files are permanently deleted because of emptying the Trash.
As luck would have it, there are many ways to undo empty Trash Mac. Even though our methods can help you, you should still make sure to be careful next time.
Leave a Comment
Comment
Data Recovery
FoneDog Data Recovery recovers the deleted photos, videos, audios, emails, and more from your Windows, Mac, hard drive, memory card, flash drive, etc.
Free Download Free DownloadHot Articles
/
INTERESTINGDULL
/
SIMPLEDIFFICULT
Thank you! Here' re your choices:
Excellent
Rating: 4.6 / 5 (based on 95 ratings)