
By Vernon Roderick, Last updated: May 14, 2021
Every person has his own way of managing data. Those who prefer complicated but effective methods might’ve heard of Virtual Machine files. This is one of the many reasons why you might’ve started learning about VMDK files. But the thing is, you can’t learn about it easily.
So in the event that you haven’t studied about it yet and you encountered data loss, there’s a chance that you’ll be stuck resolving the issue. For that reason, we’ll be talking about VMDK Recovery. Let’s start discussing what a VMDK file is for the sake of those who haven’t fully grasped it yet.
This paper also introduces a tool FoneDog Data Recovery for VMDK recovery, which can recover all kinds of data, such as screen capture recovery, the recovery of laptop hard disk , and so on.
Part 1. What Is A VMDK File?Part 2. A Tool For VMDK RecoveryPart 3. Kernel VMDK RecoveryPart 4. VMware VMDK Recovery Tool
First of all, VMDK stands for Virtual Machine Disk File. It is a file format just like JPG for photos or MP4 for videos, except that it only exists on virtual machines. Since it is a file format, you can expect to see files to have a.VMDK file extensions. This file format is known to be one of the best among formats on a virtual machine considering how it is independent.
As for the origins, it was originally created by VMware, a company that develops virtualization products and cloud services. However, VMDK files are now open, which means anyone can use them. Perhaps the closest file format to VMDK is VHD or Virtual Hard Drive, although the two are not compatible with each other. On the other hand, these two can be converted to each of their formats.
Now that you know this, you should’ve already realized that VMDK Recovery is technical data recovery focusing on one file format, but there’s more to it than that. You can do Recovery through different methods, but most of them will require you to install a tool or software on your computer. We have three methods in particular. Let’s start off with what we recommend the most.
FoneDog Data Recover is just one of the many software out there. So why should you choose this software out of all the tools out there? For one, it has a simple interface that allows anyone, even those with no technical experience, to operate the software and do VMDK Recovery easily.
It supports most file types such as videos, photos, documents, and most importantly, VMDK files. Most file formats of these types are also supported. So how can you accomplish your goal with FoneDog Data Recovery?
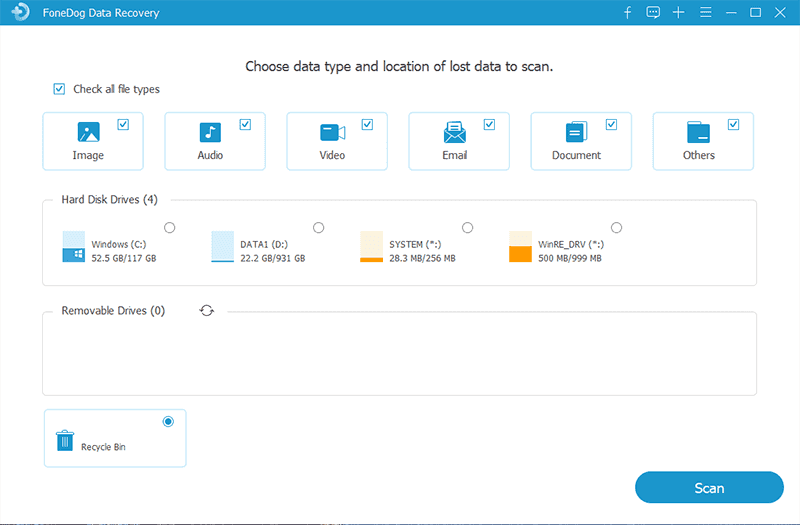
First of all, make sure the software is already set up on your computer. you can do this by downloading and installing it from the official website. Once it is up and running, you should an interface displaying the file types and storage drive. We suggest you mark Check all file types since VMDK is not indicated directly. As for the location, just select the drive where your lost files were originally located.

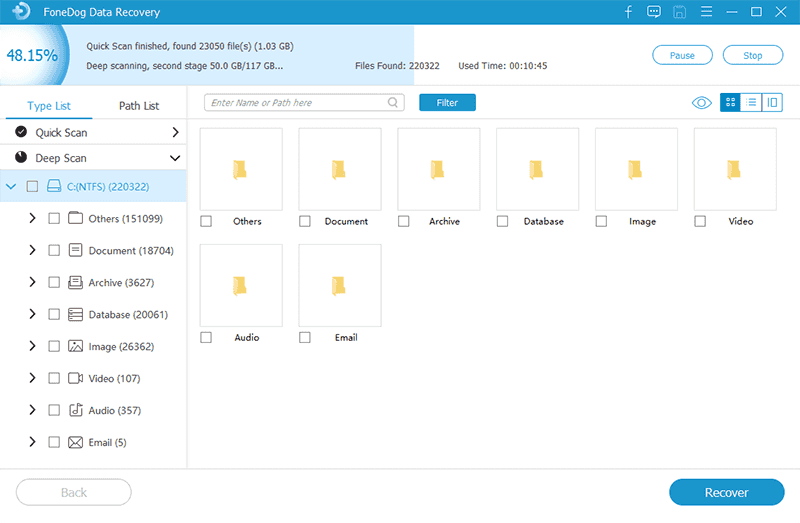
Once the configuration is done, you should click on the Scan button to start the process. It should take a while, but it definitely delivers. Quick Scan will be initiated by default, but you can choose Deep Scan after the initial scanning to get more accurate results.

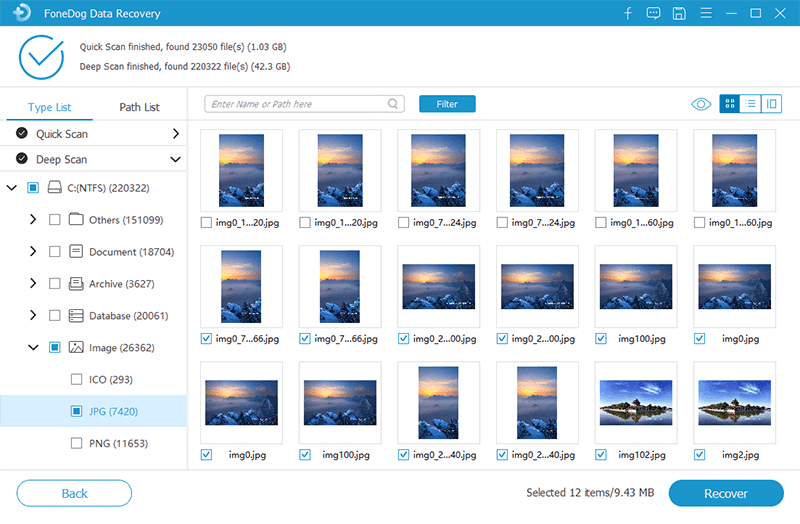
The next and third interface should look like this, with a wide selection of items. These are files you can recover, including VMDK files. Just click on which you want to recover, and click on the Recover button to start recovery.

With this, you’ll be able to do VMDK Recovery with just a few clicks. The only downside to this is that it might not be so accurate to detect all VMDK files. For that reason, you might want to use software, this time one that focuses on Recovery.
Kernel VMDK Recovery is a tool developed by KernelApps, a brand recognized for their products and services they provide for computer professionals. A redeeming feature of the software is that the platform is relatively simple. For that reason, even if you’re not too knowledgeable about recovery, you can easily use it.
That’s pretty much everything you need to know about Kerne. That should start you off as a user of this software. Now let’s head to what you’ll need when it comes to technical equipment.
Here are all the requirements that you will have to secure before using Kernel VMDK Recovery:
Take a look at some of the other features that you may find very helpful with Recovery:
This should give you an idea of what Kernel VMDK Recovery. Now here’s how you can use the software:
1. Open tool on your computer.
2. Click on the Open button at the top-left corner of the window or the Browse button at the center of the interface.

3. Now head to the log file of the VMDK file you just lost, then click on Open.
4. Click on the big Recover button at the bottom of the file path.
5. Proceed to click on Next until a loading screen appears.
6.There should be two options available. We suggest choosing the Use existing partition info option then press OK.

7.Now select the partition from the disk where the VMDK file is located, configure the settings by setting up the file system, then click on Scan.
8. Click on Next again and there should be lots of files now.
9. Select the file you want to recover then navigate to where you want to save it.
10. Lastly, click on the Recover
At that point, you would have already recovered your files. All you have to do is go to the folder you selected earlier, then find it from there. This is how you can use this VMDK Recovery software.
Although it’s a bit complicated, you can expect some great results when using this tool, is a utility developed by VMware, the original developer of VMDK files, so you can expect it to be trustworthy. This tool is usually used for two purposes. The first one is creating blocklists that store all info on your VMDK. And the second one is the VMDK Recovery.
Still, there are limits to this as well. For one, you can’t use this on ESXi of VMware. You also cannot recover multiple files at the same time. The strong point of this is that it’s very accurate. No matter how severe the damage is, the success chance is higher than usual.
Since the interface is not exactly simple, we suggest that you follow these steps carefully:
1. Launch the tool.

2. There should be a line of codes appearing. Just simply press “r” on your keyboard to go to the Restore Make sure you don’t click any other keys besides that.
3. Now head to the log file of your virtual machine, then copy the path of the VMDK file you just lost.
4. Paste the code you copied on the VMDK Recovery
5. Now press “1” on your keyboard to start the recovery process.
6. Then press “4” this time. This should save the restored VMDK file.
7. Next, you do the same with step #3, but this time you should paste the path where you want to save the recovered VMDK file.
8. Finally, press “y” on your keyboard to confirm your decision.
Once you’re done following these steps, you’ll be able to do Recovery easily. While you may think that this is a bit complicated, and surely you’ll be overwhelmed at first, it’s worth a shot if it means higher chances of VMDK Recovery.
People Also ReadHow To Recover Deleted Pictures From Computer Hard DriveexFAT Data Recovery: How To Process It In 2023?
There’s not much to know about VMDK files. You just have to understand that it is important for some people, especially experts that require the use of virtual machines. For them, knowledge of VMDK files is their lifeline.
And that’s why resolving issues should be their utmost priority, and so here we are learning about VMDK Recovery. If this helped you with your problem, feel free to notify others about it as well. After all, sharing is caring.
Leave a Comment
Comment
Data Recovery
FoneDog Data Recovery recovers the deleted photos, videos, audios, emails, and more from your Windows, Mac, hard drive, memory card, flash drive, etc.
Free Download Free DownloadHot Articles
/
INTERESTINGDULL
/
SIMPLEDIFFICULT
Thank you! Here' re your choices:
Excellent
Rating: 4.7 / 5 (based on 61 ratings)