
By Adela D. Louie, Last updated: May 17, 2018
Having a backup nowadays is really a great idea to do. This is because having a backup is more vital and a necessary thing to do because we actually tend to create and store on our computer. This is the reason as to why we have tried searching information on how you can actually backup your MacBook to iCloud.
Actually, it's also an effective solution to fix Mac running slow.
Though for many users, backing up their MacBook to iCloud is still a bit difficult. So here, we will show ways in how you can backup your MacBook to your iCloud so that whatever happens to your computer, you can easily access or restore your data anytime.
Now, I give some solution to how to backup MacBook on iCloud.
Part 1. What is iCloud Drive for Backup MacBookPart 2. Is There Any iCloud Drive App to Use to Backup MacBook?Part 3. How to Backup MacBook to iCloudVideo Guide: How to Backup and Restore Your MacBookPart 4. Other ways to backup your MacBook to icloudPart 5. Conclusion
People Also ReadHow to Selectively Backup iPhone to Computer4 Easy Ways to Backup iPhone to Mac
The iCloud drive is known as an online or virtual storage space and also a syncing service that was made by Apple for all its users. As soon as you sign up for iCloud, you will be able to get a 5GB of storage space for free. But in case that the 5GB storage space is not enough for you, then you have the option to buy more. This will include the storage of your photos as well and for your iCloud backup MacBook. If you want to upgrade your iCloud storage, all you need to do is to follow the given steps below.
-Go to your Settings
-Select iCloud
-And then choose Storage
-Select Storage Plan
-Choose the Storage Option
-And then choose Buy
-Then enter your password for you to continue the purchase.
-Here are the lists of the storage space available that you can opt to subscribe per month and its price as well.
-20GB - $0.99 per month
-200GB - for $3.99 per month
-500GB - for only $9.99 per month
-1TB - for only $19.99 every month

If you are having thoughts if there are any apps that you can need to use for iCloud Drive to work, then the answer to your question is NO. There are no iCloud Drive apps that you need to use and this goes for every device like iPhone, iPad, Mac or Windows. It may look like there is an iCloud Drive app, but there is none. However, there are apps that can work with your iCloud Drive which can actually allow its users to access iCloud drive and the file type that they can launch. Stil, we hopefully think that Apple or any third-party will be able to offer an iCloud Drive apps with access to files. But for now, there are no iCloud Drive apps, just only apps that can support iCloud Drive.
Now, since we are talking about backing up your MacBook on your iCloud, you already know how you can just simply do that. And as we all know, if you tried using one iCoud account on your Macbook and to your iPhone device, then everything that you have a backup on both your MacBook and iPhone will all be synced in just one iCloud storage. Therefore, you can easily restore them once you tried plugging in your iOS device to your MacBook. For you to do this, what we recommend you to use no other than the FoneDog Toolkit - iOS Data Backup and Restore.
The FoneDog iOS Data Backup and Restore allows you to export any backup to your computer. The FoneDog Toolkit - iOS Data Backup and Restore will allow you to restore your backup without you losing any data from your iOS device. It is also 100% secure to use because all of your information will be kept safe, we care about your privacy.
This program does not only allows you to restore any backup from your iOS device to your MacBook, but it can also help you backup your data as well. This is one alternative way for you to use if you want to backup your iOS device to your computer without using your iCloud. This way, you will not be needing to buy more iCloud storage because you can just use the FoneDog Toolkit - iOS Data Backup and Restore to backup your files or data from your iOS device. Now, in the said situation that you are using the same iCloud account on your MacBook and on your iOS device and suddenly you have lost your data, you can easily access your backup then by restoring them on your MacBook.Here is how to restore your data back on your MacBook by FoneDog Toolkit-iOS Data Backup and Restore.
Get the FoneDog Toolkit iOS Data Backup and Restore downloaded from our official website, www.fonedog.com, and have it installed on your MacBook.
Once you have successfully installed the FoneDog Toolkit - iOS Data Backup and Restore to your MacBook, go ahead and launch the program and then connect your iOS device to your MacBook using your USB cable.
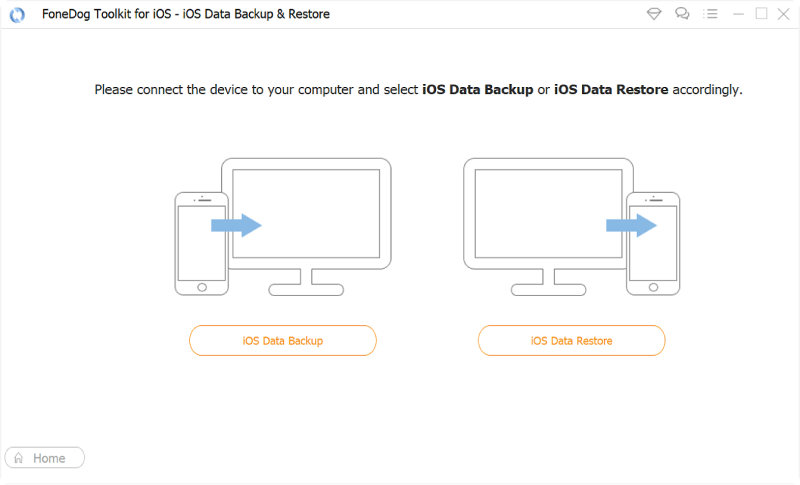
On the main interface of the program, go ahead and choose iOS Data Restore.

NOTE:
Make sure that you have downloaded the latest version of iTunes. If you do not have the latest version of iTunes, go ahead and download the newer version. Also, make sure that your iOS device is connected to your MacBook during the whole process.
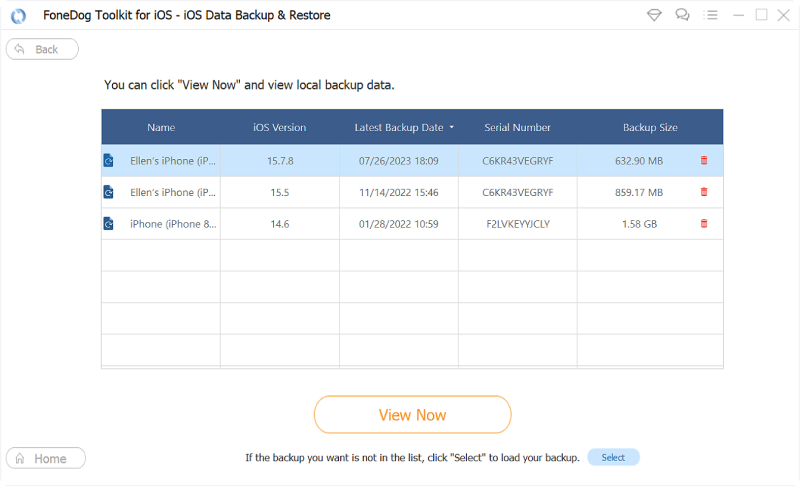
Once you have chosen iOS Data Restore, FoneDog Toolkit - iOS Data Backup and Restore will then show a list of your backup file that was made. You will be able to see where your backup file, the time, and the date it was made.
Choose the desired backup file you want to restore and then click on the "View Now" button to proceed.

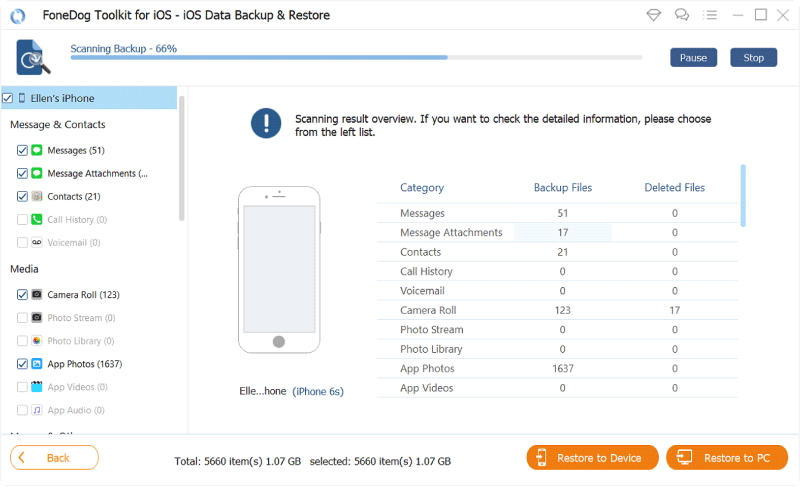
Once you have chosen the desired backup to restore on your MacBook, the FoneDog Toolkit - iOS Data Backup and Restore will then begin scanning your backup file.
You will be able to see the progress on your screen as well and you have the option to Pause the scanning processor you can click on Stop to stop the scanning process and proceed on the next step.
If you do not want to do any of the said options, then just wait until the scanning process is complete.

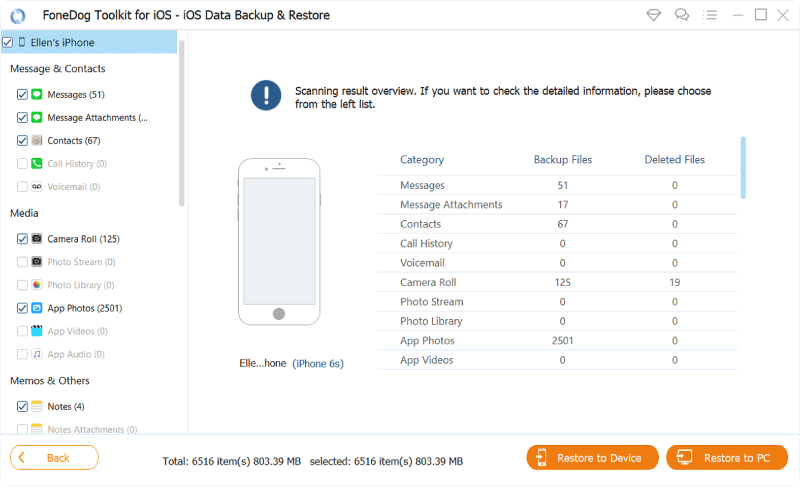
Once the scanning process is complete, you will now be able to preview all your data or files that had been scan by the FoneDog Toolkit - iOS Data Backup and Restore. Just click on the file and you can see the preview on the left side of your screen.
Now, you can selectively choose all the data that you wish to restore. Once you have chosen the data you want, just go ahead and click on the "Restore to PC" button for you to restore your selected data on your MacBook.

Using the iCloud on your Mac is just as simple as installing OS X Yosemite. Once you have installed the free update, it will then be automatically ON.
In here, you must make sure that your MacBook is running on OS X v10.7.4 or later. After that, you have to launch System Preferences found on the Apple menu located at the upper left corner of your screen. After that, select the iCloud icon.iCloud then will ask you to enter your Apple ID and password for you to log in. Click on the box wherein it says that you want to use your iCloud as a backup method for all of your information stored on your MacBook. And then click on the "Next" button.

On the next page, you have to choose then all the data that you wish to backup. Apple will provide you a 5GB of storage space once you sign up for iCloud. Considering that you only have a limited space for your storage, then you must just choose those files from your MacBook that are important like your documents and data to back up. If you want to expand your storage on your iCloud, then you can opt to subscribe or buy a larger amount of storage space.

NOTE:
By default, all the data have a check mark beside each file. You can simply uncheck all the checked files and then just select the data or files you wish to backup. As an additional information, if you want to see how much you have used up in your storage space, or if you want to upgrade your storage, just go ahead and click on "Manage" found in the lower right corner of the dialogue box and then select on "Change Storage Plan"
The iCloud Drive icon is located at the top right panel of your screen. You can select the iCloud Drive in any Save dialogue box or just by dragging your files to your iCloud Drive in the left panel of your screen. After that, you can go ahead and choose all the apps that you want to save to your iCloud Drive by clicking on the Options button beside the iCloud Drive icon.
You can select the apps of files that you want to store on your iCloud by clicking on boxes below the iCloud Drive icon.
Select "Photos" for you to back up and access your Photos on iCloud.
Choose "Mail" to sync and store all your email messages on iCloud.
Click "Contacts" to keep a copy of your contacts on iCloud.
Check "Calendars" to back up your calendars on iCloud.
Choose "Reminders" to keep a copy of your reminders on iCloud.
Select "Safari" for you to have a copy of your Safari data, like your browsing history and as well as your favorites, on iCloud.
Select "Notes" to back up your notes on iCloud.
Choose "Keychain" to share an encrypted copy of passwords and payment data across the devices signed in with your Apple ID.

NOTE:
You can also choose Photo Stream so that iCloud will be able to save the first 1000 photos that are taken in 30 days. If ever you have also use the same iCloud on your iPhone device, then automatically, your photos from your iCloud device will be saved on your iCloud as well even without having your iPhone device connected to your MacBook.
Truly, the solution of backing up Macbook to iCloud is so easy to do. And setting up iCloud on your MacBook is really that easy. Once you have set up iCloud and Automatic backup, then all your selected files that you choose to backup on your iCloud will be synced. You can also use the same iCloud on any of the iOS devices that you have. This way, you can have both data be saved on just one iClloud storage. You can also buy more storage space if you want to just in case the free 5GB storage space will not be enough. If all else fails and you want to restore some or all of your data from your iCloud backup, we highly recommend you to use the FoneDog Toolkit - iOS Data Backup and Restore. This amazing and wonderful program will help you restore your backup file to your MacBook and even to any iOS devices that you have.
And the best thing about the FoneDog Toolkit - iOS Data Backup and Restore is that during the whole process of restoring your backup file, you will not lose any of your data and that a promise! We have also made sure that all your personal data and information shall be kept safe whatever happens.The FoneDog Toolkit - iOS Data Backup and Restore do not only help you in restoring your backup file but it can also help you backup them up. You can use this program to backup your data from your iOS device so that you will not be needing to buy more storage space for your iCloud.This is such a wonderful and helpful program that you can use with the guarantee that you will not lose any data at your privacy shall be kept safe at all times.
Leave a Comment
Comment
iOS Data Backup & Restore
Back up your data to PC and selectively restore iOS data from backups.
Free Download Free DownloadHot Articles
/
INTERESTINGDULL
/
SIMPLEDIFFICULT
Thank you! Here' re your choices:
Excellent
Rating: 4.8 / 5 (based on 97 ratings)