

By Nathan E. Malpass, Last updated: October 24, 2018
With all that we have going on with our day to day lives, we got to admit that our phones help keep everything easier to manage.
It may be for communication, record keeping, schedule tracking or even with just capturing moments we want to treasure. But how do we keep all those important data safe?
You know you can easily lose them all. Your iPhone may get lost or stolen, broken into pieces or it can be something as simple as locking yourself out of your device. Then what happens next would be so frustrating.
All your much-needed data can be gone just like that. So that's why doing a regular backup of your files is important.
There are a couple of popular methods that iPhone users prefer to use when creating backup files. In this article, we will discuss the steps and how to know for sure that your iPhone is backed up.
Having concentrated on software development for some years, we have created an easy-to-use backup program for iOS users.
Here is a tip: Download FoneDog iOS Data Backup & Restore to backup your data on iOS devices in the safest way. For you to know whether the iPhone is backed up, we have gathered some useful information below.
iOS Data Backup and Restore One click to backup the whole iOS device to your computer. Allow to preview and restore any item from the backup to a device. Export what you want from the backup to your computer. No data loss on devices during the restore. iPhone Restore Won't Overwrite Your Data Free Download Free Download
Backup with iTunes and know whether previous ones already existBackup with iCloud and know how to locateCreate and recover backup for iPhone with the FoneDog ToolkitConclusion
People Also ReadUsing Other Means To Backup iPhone Without iCloudHow to Fix Not Enough Space to Backup iPhone?
When using iTunes it actually creates a backup of stored data on your iPhone and this is done while it syncs your device. To check on the list of backups available on iTunes.
Go to the "Devices" option which will display all previously synced devices and backups that includes the date it was created. The files though will be directly saved on your PC's system drive.
If you want to change the storage location manually it would involve advance command prompt usage or a third party app if you want it done automatically. To search for your backup files here's how to do it.
(This is applicable to Windows 7, 8, and 10)
Method 1: Go to your File Explorer copy and paste this to the address box: \Users\(username)\AppData\Roaming\Apple Computer\MobileSync\Backup \, then press on enter
Method 2: You can also use the search bar. It differs depending on which OS version you have.
For version 7, the windows icon which is the "Start" button found at the bottom of the screen is the one you would need to click to show you the search bar.
For Windows 8 you would need to click the magnifying glass icon.
Then for Windows 10 same as mentioned for version 7, click on the "Start" icon then type %appdata% in the search box. You would be shown the following which you would need to access Apple Computer > Mobile Sync > Backup.
Important Note: Let's say you just performed a reset on your iPhone and all data has been wiped out you might want to refrain from plugging it immediately to your computer to avoid initiating the backup process from iTunes. You wouldn't want to back up a device with nothing on it.

Step 1: Open up iTunes then plug your iPhone to your computer (use the original USB cable that came with your device and make sure that you have the latest version of iTunes installed)
Step 2: Your iPhone should appear under "Devices" once it has been detected. When you click on your device it will show you the summary page.
Step 3: From the summary page tick the box that says "This Computer" then click on "Back Up Now".
Step 4: This will now initiate the backup process and would take a couple of minutes depending on the number of files stored on your iPhone.
Important Note: There should be enough disk space on your computer. Also, using iTunes to backup files is a manual process so you would need to do it on a regular basis.
The good thing about using iCloud is once you set it up it automatically backs up your data as long as you are connected to a stable internet network and have your iPhone plugged into a power source.
All backups created are stored on your iCloud drive. You initially get 5GB of free storage but if you have files that are larger than that then you would need to purchase extra storage that will cost you extra each month.
To do an automatic backup with iCloud:
Step #1: Go to Settings > iCloud > iCloud Backup
Step #2: Connect your iPhone to a power source. (It is advised that your screen is locked during this time)
Step #3: Connect to a WiFi network
To do a manual back up you just need to go to Settings>iCloud>iCloud Backup then hit on Back up Now. This will initiate the process and should complete in a couple of minutes.
You can check your last backup created on the same page once it has completed. Make sure you stay connected to the internet to avoid any errors with the backup process.
Here's how you can locate your iCloud backup

iPhone users have always turned to either iTunes or iCloud to create backups for their important data. There are downsides though when using the two platforms.
With iTunes, you are limited in terms of the type of data you can back up. It would only allow you to back up photos, videos, and apps (it will not include app data). Meaning if you plan to have that transferred or restored to another device it will not be as complete as it was on your iPhone.
Now with regards to using iCloud the limit comes with the storage space. You are only allotted 5GB of free storage but with iPhone's having the storage capacity of up to 128GB that won't be enough and eventually would compel you to spend extra to get more storage.
Not really ideal if you want to save yourself from spending too much on just storage allowance each month.
These are just a few reasons why the developers of the FoneDog Toolkit created the software. It gives you the convenience of doing so much more.
It is safe and secure and works with both Windows and Mac OS, and even supports all iOS models and iOS versions.
No need to worry about what type of device you have. And you won't even need to be worried about data loss or overwrite everytime you want to do a restore of your backup files.
Here are the steps on how to use the Data Backup and Restore feature of the FoneDog Toolkit.
Step 1: Download the toolkit from the official website then follow the easy steps to complete the installation. Connect your iPhone then launch the software.
Step 2: Once the toolkit detects your device select "iOS Data Backup and Restore" from the main menu.
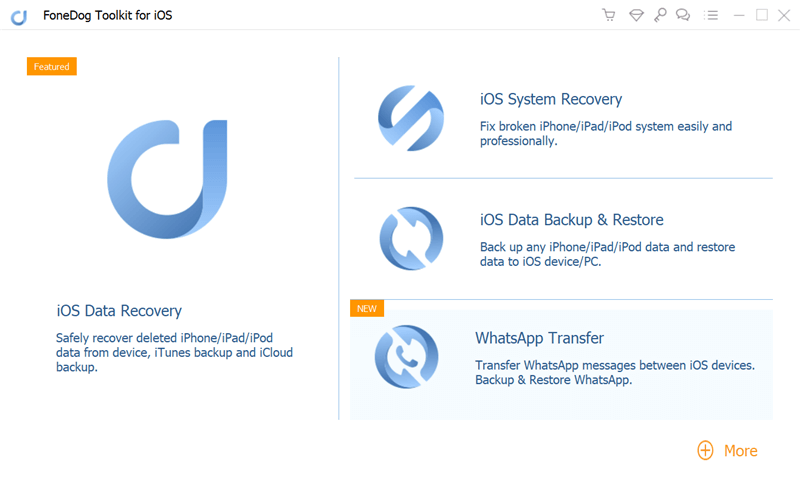
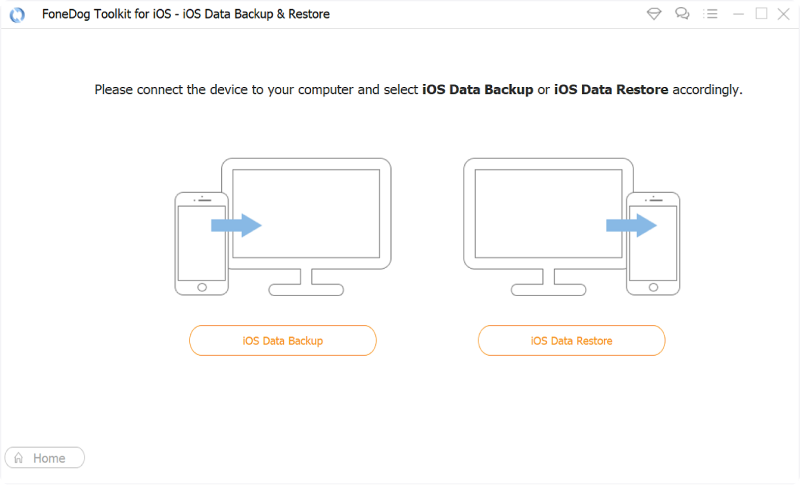
Step 3: Next thing the toolkit will show you is a page with executable actions, you would now need to select "iOS Data Backup".
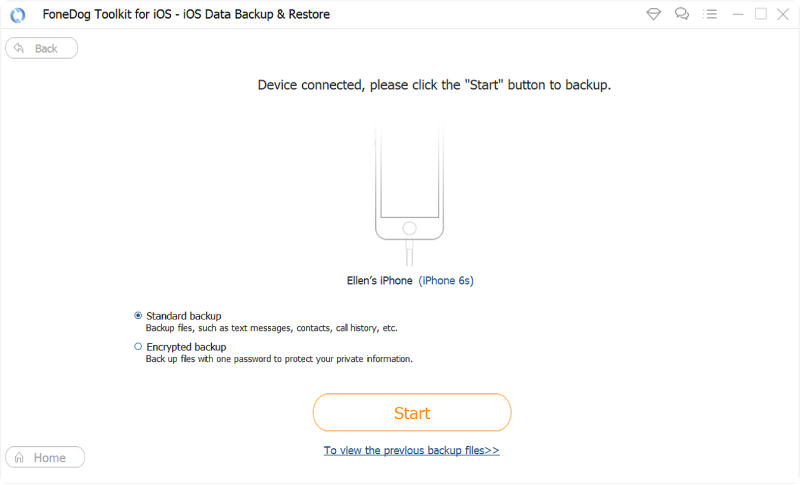
Step 4: You would now be brought to the next screen which will allow you to experience one of the many cool features of the toolkit.
This part of the process you would be prompted to select what type of back up you would like to create. You can either go with a "Standard" type or one that would allow you to set up a password to protect any sensitive information that may be included in your files.
This is what you would call an "Encrypted" backup. It adds another layer of security for your peace of mind. Once you have made your choice click on "Start".
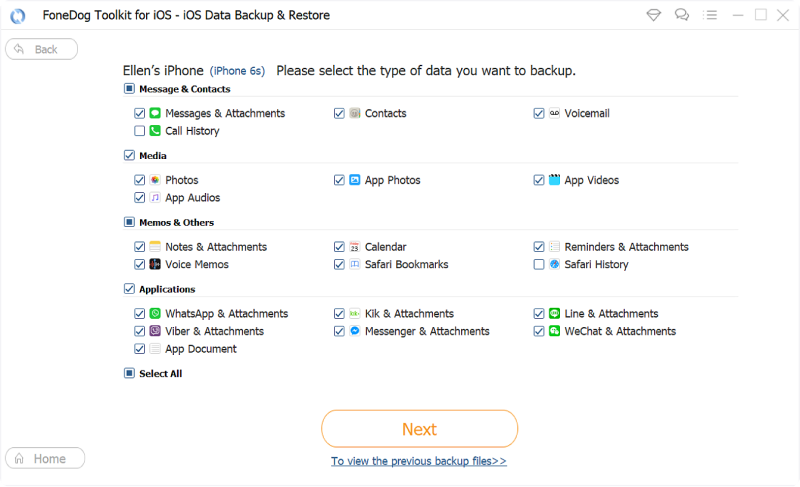
Step 5: After clicking "Start" the toolkit will now show you all files available for backup which are categorized for easy viewing.
Select the ones that you would like to backup (that is if you don't want a whole bunch of data you no longer need). Once done choosing click on "Next".
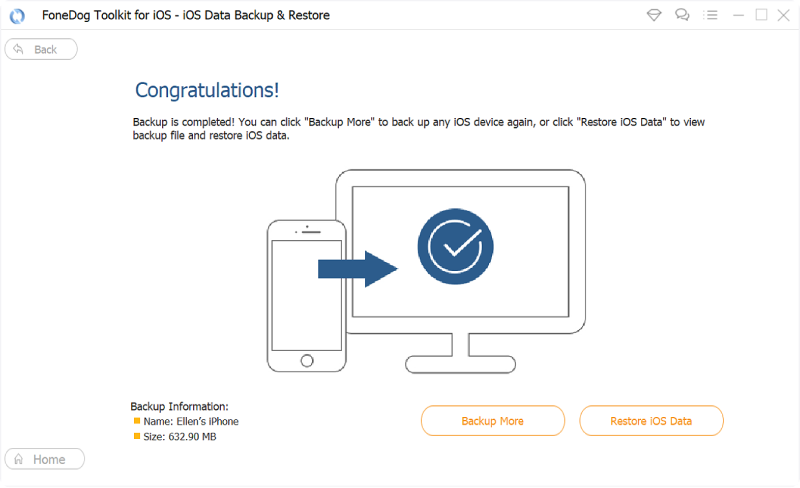
Step 6: FoneDog will now commence the backup process which would take a few minutes to complete. You just need to wait for the prompt that the toolkit has completed the backup.
It will show you the name and size of the file that was created. It will also give you the option to add more data to backup or restore files to either your PC or another device.
Step 1: On the main dashboard of the toolkit you would now need to select "iOS Data Restore" from the "iOS Data Backup and Restore" feature.

Step 2: The next step would be the FoneDog Toolkit showing you a page that contains a list (if you have created several) of backup files available for transfer. By default the most recent one created would be the first one displayed.
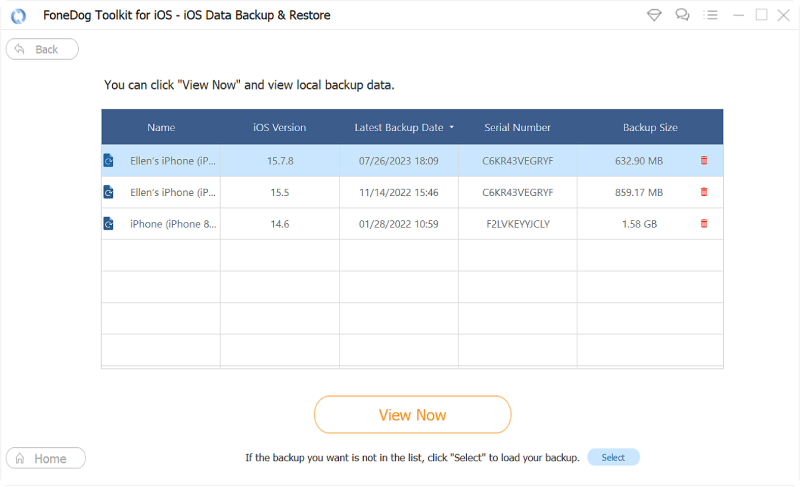
Step 3: Click on "View Now" to prompt the toolkit to initiate a scan of the file. There is a progress bar that shows how far along the scan is and you also have the option to pause or stop the process midway.
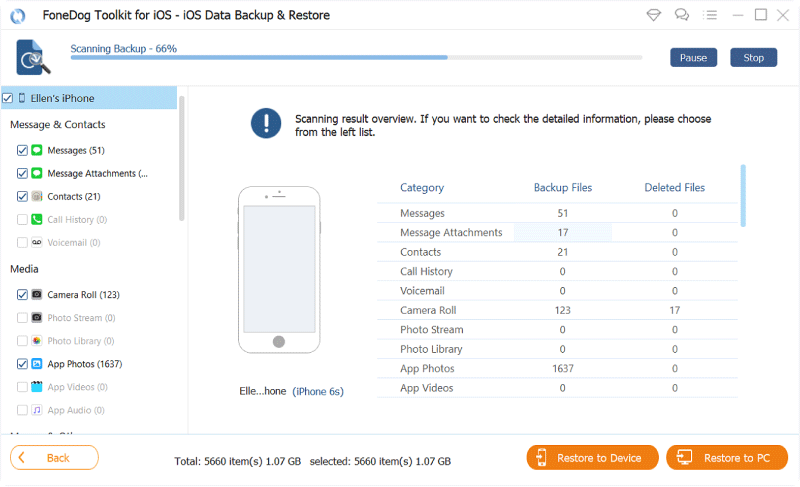
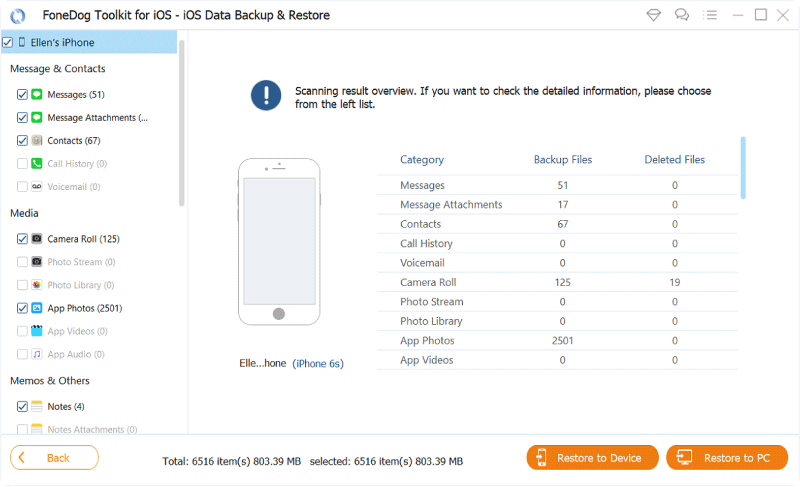
Step 4: Once the scan is completed you would be shown a more detailed view of all the files in the backup. Again, it is categorized for you to easily review it one by one.
You can now further filter the data you want to be restored or transferred. Carefully select which ones you'd like to restore then proceed to choose whether to save it on your PC or transfer it to another device.
Important Note: The FoneDog Toolkit also has a feature called the "iOS Data Recovery" tool that would allow you to view iPhone backup files on Mac or Windows.
It can let you view backup files no matter which platform you used, may it be via iTunes or iCloud. So even if you can't locate it on your own try as you may just use the Data Recovery feature of the toolkit then you can easily view all backups that are available.
There are so many data that we accumulate over time that creating a backup is very much advised nowadays. We wouldn't want to lose anything that holds value to us.
May it be a picture of your newborn's first smile or an SMS that came from your husband that is deployed. Call it sentimental but these are stuff that is worth keeping and what better way to do so than using the FoneDog Toolkit-iOS Data Backup and Recovery.
We can never tell what may happen. Your iPhone may get stolen, it may get broken or you may have locked yourself out. The worst part is you will be left thinking about how to get back all those precious files from your device.
That's where the toolkit comes in. It allows you to create a backup of all the files on your iPhone. And when I say all that means even app data and documents are included.
If you would like to have it restored or just simply go over the data you've backed up you can do it easily with the toolkit. It guarantees you safety, security, and success each time you use it.
Download it today and put your mind at ease that no matter what happens to your iPhone the toolkit will save the day.
Leave a Comment
Comment
iOS Data Backup & Restore
Back up your data to PC and selectively restore iOS data from backups.
Free Download Free DownloadHot Articles
/
INTERESTINGDULL
/
SIMPLEDIFFICULT
Thank you! Here' re your choices:
Excellent
Rating: 4.6 / 5 (based on 63 ratings)