FoneDog Screen Recorder
FoneDog Screen Recorder
Special Offer
Special Offer


By Nathan E. Malpass, Last updated: March 20, 2025
Smartphones store our contacts, messages, photos, and much more. If you're an iPhone user who also relies on a Mac, you probably want a hassle-free way to keep your contacts synchronized between these devices. Fortunately, the process on how to transfer contacts from iPhone to Mac is a straightforward one, and we're here to guide you through it.
In this article, we'll walk you through several methods to transfer your contacts from your iPhone to your Mac, ensuring that you have easy access to your important contacts on both devices. Whether you prefer using iCloud, iTunes, or third-party tools, we've got you covered. So, let's dive in and ensure your contacts are always at your fingertips, no matter which Apple device you're using.
Part 1. 4 Ways to Transfer Contacts from iPhone to MacPart 2. One-Click to Transfer Contacts from iPhone to MacPart 3. Summary
How to transfer contacts from iPhone to Mac? While manual copying of contacts may not be the most convenient method, it's essential to understand it for situations where other options aren't available. This method involves transferring contacts individually or in small batches from your iPhone to your Mac.
Keep in mind that this approach is time-consuming and can be error-prone, but if you're in a pinch and need to transfer a handful of contacts, here's how to do it:
Step 1: Export Contacts from iPhone
Step 2: Import Contacts to Mac
Step 3: Repeat for Each Contact
Repeat the above steps for each contact you want to transfer. It's a time-consuming process, especially if you have many contacts, but it works for small-scale transfers.
While this method is functional for transferring a few contacts, it's impractical for large contact lists. For more efficient and automated options, we recommend exploring other methods covered in this article, such as using iCloud or third-party tools, which will make the process faster and more convenient. Stay tuned for the next section, where we'll delve into the iCloud method for contact transfer.
AirDrop is a quick and convenient way to transfer contacts from iPhone to your Mac wirelessly. It's a particularly suitable method if you have a small number of contacts to transfer. Here's how to transfer contacts from iPhone to Mac using AirDrop:
Step 1: Enable AirDrop on Your Mac and iPhone
Before you start, ensure that both your iPhone and Mac have AirDrop enabled.
On your Mac:
On your iPhone:
Step 2: Share Contacts from iPhone to Mac
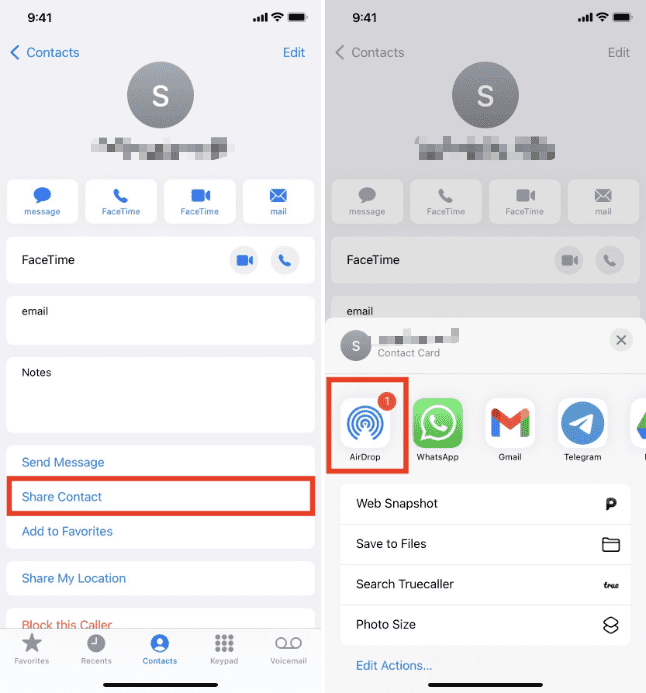
Step 3: Confirm Contact Transfer on Mac
On your Mac, a notification will appear, indicating that a contact is being transferred via AirDrop. Confirm the transfer by clicking "Accept" or "Save." The contact will be added to your Mac's Contacts app.
Step 4: Repeat for Additional Contacts
Repeat these steps for each contact you want to transfer from your iPhone to your Mac.
Using AirDrop is a straightforward and wireless method to transfer individual contacts or small groups of contacts quickly. However, it may not be the most efficient choice for transferring a large number of contacts, as it can be time-consuming when done individually. For bulk transfers, consider other methods like using iCloud or third-party tools, which we'll cover in later sections of this article.
Another way to transfer contacts from your iPhone to your Mac is by sending the contact as an email attachment. This method is simple and works well for transferring individual contacts or a few contacts at a time. Here's how to transfer contacts from iPhone to Mac:
Step 1: Open the Contacts App on Your iPhone
Unlock your iPhone and open the "Contacts" app.
Step 2: Select the Contact to Transfer
Scroll through your contacts list and tap on the contact you want to transfer.
Step 3: Share the Contact via Email
Step 4: Compose an Email
Step 5: Access the Email on Your Mac
Step 6: Download and Import the Contact on Your Mac
Step 7: Repeat for Additional Contacts
Repeat these steps for each contact you want to transfer. This method is suitable for transferring a few contacts at a time, but it may become cumbersome for larger contact lists.
For more efficient and automated contact transfers, especially when dealing with a large number of contacts, you may want to explore methods like using iCloud or third-party tools. These methods can simplify the process and save you time when transferring your entire contact list from your iPhone to your Mac. We'll cover these methods in the upcoming sections of this article.
Syncing your iPhone contacts with iCloud is a highly efficient and convenient method for transferring all your contacts from your iPhone to your Mac. It ensures that your contact information remains up-to-date across all your Apple devices. You can also back up the contacts on iPhone using iCloud. Here's how to transfer contacts from iPhone to Mac using iCloud:
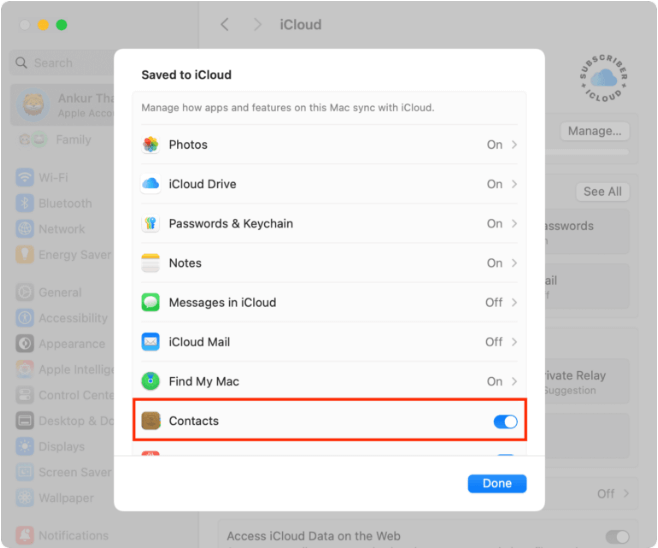
Step 1: Ensure iCloud is Enabled on Your iPhone and Mac
On your iPhone:

On your Mac:
Step 2: Trigger a Manual Sync on Your iPhone
This will manually initiate a sync with iCloud, ensuring that your iPhone's contacts are up to date in the cloud.
Step 3: Check iCloud Sync on Your Mac
Step 4: Verify Your Contacts on Mac
Once the sync is complete, your iPhone contacts will be available in the Contacts app on your Mac. You should see all your contacts seamlessly transferred.
The advantage of using iCloud to sync contacts is that it keeps your contacts in harmony across all your Apple devices. Any changes or additions you make to your contacts on your iPhone will automatically propagate to your Mac and vice versa.
This method is highly recommended for those who use multiple Apple devices and want a hassle-free way to ensure contact consistency. It's especially useful when you have a substantial number of contacts to manage across different devices.
While methods like iCloud and AirDrop are convenient for transferring contacts from an iPhone to a Mac, they may not be suitable for all scenarios, especially when you want more control, flexibility, and additional features. FoneDog iOS Data Backup & Restore is a versatile, iPhone 15 supported, and reliable third-party tool that provides a comprehensive solution for transferring contacts and managing your iOS data. Here's why it's an excellent choice:
iOS Data Backup and Restore
One click to backup the whole iOS device to your computer.
Allow to preview and restore any item from the backup to a device.
Export what you want from the backup to your computer.
No data loss on devices during the restore.
iPhone Restore Won't Overwrite Your Data
Free Download
Free Download

Why Choose FoneDog iOS Data Backup & Restore:
How to Use FoneDog iOS Data Backup & Restore to Transfer Contacts from iPhone to Mac:

FoneDog iOS Data Backup & Restore offers a seamless and efficient way to transfer contacts from your iPhone to your Mac while providing additional data management capabilities. Whether you want to keep your contacts safe with regular backups or need to transfer them for various purposes, this tool is a valuable asset for iOS users.
Transferring contacts from your iPhone to your Mac is a fundamental task for users who want seamless access to their contact information across multiple Apple devices. In this comprehensive guide, we explored several methods, each offering its own advantages and suitability for different scenarios.
In summary, the choice of the best method for transferring contacts from iPhone to Mac depends on your specific needs and preferences. Whether you prefer manual methods, wireless options like AirDrop, or comprehensive solutions like iCloud and third-party tools, ensuring your contact information is accessible on your Mac is crucial for efficient communication and data management across your Apple ecosystem.
Leave a Comment
Comment

iPhone/Android Devices’ Maintenance Expert
Staying home, listening to music, writing tech articles
Many people asked me to repair their mobile phones so I have a lot of experience in mobile phone repair, and I know a lot about Android or Apple phones.
iOS Data Backup & Restore
Back up your data to PC and selectively restore iOS data from backups.
Free Download Free DownloadHot Articles
 /
/
INTERESTINGDULL
/
SIMPLEDIFFICULT
Thank you! Here' re your choices:
Excellent
Rating: 4.7 / 5 (based on 88 ratings)