

By Nathan E. Malpass, Last updated: November 13, 2023
Whether it's a snapshot of a family gathering, a breathtaking landscape, or a candid shot with friends, photos hold a special place in our hearts. However, the digital world is not without its pitfalls, and it's not uncommon for photos to get accidentally deleted. When this happens, it can feel like you've lost a piece of your personal history.
But here's the question that haunts many: Can you recover permanently deleted photos? Fortunately, the answer isn't always a definitive "no". In this article, we will explore the possibilities and techniques for retrieving those precious memories that you thought were lost forever. We'll take you through various methods and tools that may just help you reunite with your deleted photos.
So, if you've ever wondered whether it's possible to turn back time in the digital realm and recover your lost snapshots, read on to find out.
Part #1: How Can You Recover Permanently Deleted Photos on Android?Part #2: How Can You Recover Permanently Deleted Photos on iOS?Part #3: Best Tool on How Can You Recover Permanently Deleted Photos on iOS: FoneDog iOS Data Recovery
Losing photos on your Android device can be a heart-wrenching experience, especially if they hold sentimental value. However, if you've been diligent about using Google Drive to back up your photos, you might have a lifeline to recover those cherished images. In this section, we'll guide you through the process of using Google Drive to potentially retrieve your permanently deleted photos.
Step #1: Open Google Drive
Launch the Google Drive app on your Android device. If you don't have it installed, you can download it from the Google Play Store.
Step #2: Sign In to Your Google Account
Sign in with the Google account that you used to back up your photos. This should be the same account associated with the device where the photos were originally stored.
Step #3: Access the "Trash"
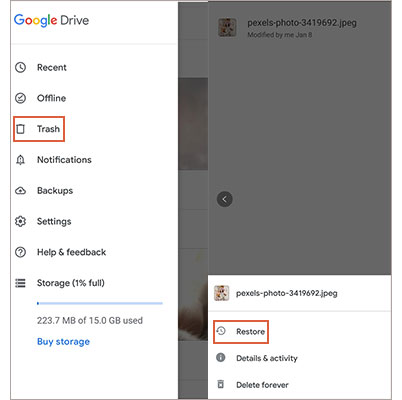
In the Google Drive app, tap the three horizontal lines (menu icon) in the top-left corner to open the sidebar. Then, select "Trash" from the list of options.
Step #4: Locate and Restore Deleted Photos
Scroll through the items in your Trash folder to find the photos you want to recover. Deleted photos are usually retained here for a specific period (usually 60 days) before being permanently deleted. If you find the deleted photos, select them by tapping on the checkboxes next to each photo.
Step #5: Restore Photos
After selecting the photos you want to recover, tap the "Restore" option. This will move the selected photos back to their original location in Google Photos, making them accessible in your gallery once again.
Step #6: Check Google Photos
Open the Google Photos app to confirm if your recovered photos are now available in your gallery. If they are, congratulations! You've successfully used Google Drive to recover your permanently deleted photos.
Keep in mind that Google Drive retains deleted items for a limited time, so it's crucial to act swiftly when you realize you've deleted important photos. Additionally, this method works if you have previously enabled Google Photos backup on your Android device. If you haven't set up automatic backups, it's a good time to enable this feature to safeguard your photos from future mishaps.
If you own an Android device from manufacturers like Samsung, LG, or Huawei, you may have access to a manufacturer-specific cloud service. These services often provide backup and synchronization options that can help you recover permanently deleted photos.
In this section, we'll focus on how can you recover permanently deleted photos using Samsung Cloud as an example, but the general process is similar for other manufacturer-specific cloud services.
Step #1: Access Samsung Cloud
Open the Settings app on your Android device.
Step #2: Navigate to Cloud and Accounts
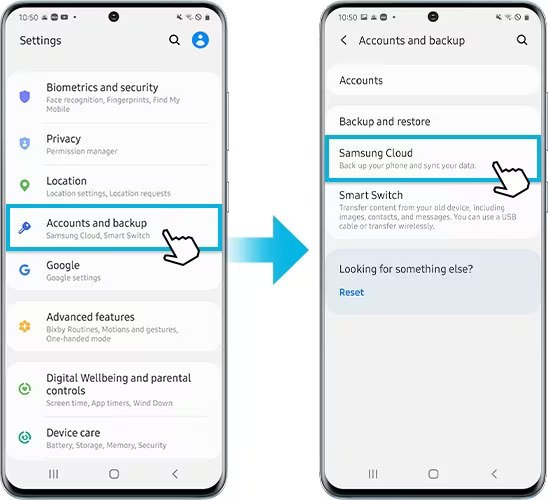
Scroll down and select "Cloud and Accounts" or a similar option, depending on your device.
Step #3: Open Samsung Cloud
Tap on "Samsung Cloud" or the respective manufacturer's cloud service if you're using a different brand.
Step #4: Sign In
Sign in with your Samsung account credentials. If you haven't created a Samsung account, you'll need to do so to access the cloud service.
Step #5: Access Backup Settings
In the Samsung Cloud settings, locate the "Backup and Restore" option or something similar.
Step #6: Restore Deleted Photos
Look for an option related to "Restore Data" or "Restore Photos". Select this option to initiate the recovery process.
Step #7: Choose Photos to Restore
You should see a list of available backups. Choose the backup that contains the photos you want to recover. These backups typically include a timestamp, so select the one closest to the date when you accidentally deleted the photos.
Step #8: Confirm and Restore
After selecting the backup, you may have the option to choose specific types of data to restore. Make sure to select "Photos" or a similar category. Then, confirm your selection and start the restoration process.
Step #9: Check Your Gallery
Once the restoration process is complete, open your device's gallery app to see if your permanently deleted photos have been successfully recovered. They should now be available in your gallery.
Please note that the availability and features of manufacturer-specific cloud services may vary depending on your device brand and model. Be sure to explore the cloud service settings and options on your device to access the most relevant instructions for your specific case. Additionally, it's essential to regularly back up your data to these cloud services to prevent data loss in the future.
If you've been diligent about creating backups with iCloud, there's a good chance you can recover your permanently deleted photos. In this section, we'll guide you through the process of restoring your photos from an iCloud backup.
Step #1: Check Your iCloud Backup
Before proceeding, make sure you have a recent iCloud backup that contains the photos you want to recover. You can check this by going to "Settings" on your iOS device, tapping your name at the top, then select "iCloud", and finally, "Manage Storage" > "Backups".
Step #2: Erase Your Device (Optional)
If you're sure your iCloud backup contains the deleted photos, and you're willing to restore your entire device to the state of the backup, you can proceed with this step. Keep in mind that this will remove all data on your device, so make sure you have a recent backup. To do this, go to "Settings" > "General" > "Reset" > "Erase All Content and Settings". Confirm the action by entering your passcode.
Step #3: Set Up Your Device
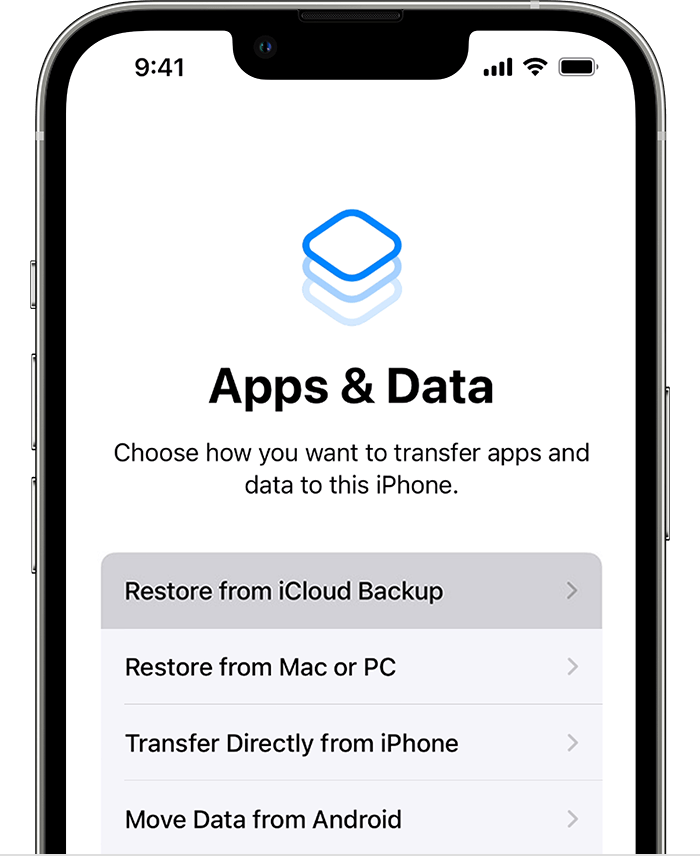
After erasing your device (or if you choose not to erase it), proceed with the initial setup as if it were a new device. When you reach the "Apps & Data" screen, select "Restore from iCloud Backup".
Step #4: Sign In to iCloud
Sign in to your iCloud account using the Apple ID associated with the iCloud backup containing your deleted photos.
Step #5: Choose a Backup
You will see a list of available iCloud backups. Select the backup that you're confident contains the photos you want to recover. Be sure to check the date of the backup to make sure it's the right one.
Step #6: Restore
Your device will now begin restoring from the selected iCloud backup. This process may take some time, depending on the size of the backup and your internet connection. Ensure your device is connected to Wi-Fi and plugged into power to prevent interruptions.
Step #7: Check Your Photos
Once the restoration process is complete, open the Photos app on your iOS device. Check to see if your permanently deleted photos have been successfully recovered and are now available in your photo library.
If you've been backing up your iOS device using iTunes on your computer, you can potentially recover permanently deleted photos by restoring from an iTunes backup. This method is useful when your iCloud backup is not available. Here's how can you recover permanently deleted photos by iTunes backup:
Step #1: Connect Your Device to Your Computer
Use a USB cable to connect your iOS device to the computer that you've used for iTunes backups in the past.
Step #2: Open iTunes
Launch the iTunes application on your computer if it doesn't open automatically when your device is connected.
Step #3: Trust This Computer
If prompted, unlock your iOS device and tap "Trust This Computer". This allows your computer to access your device's data.
Step #4: Select Your Device
In iTunes, click on the device icon that appears in the upper-left corner of the window. This icon represents your connected iOS device.
Step #5: Choose the Backup to Restore
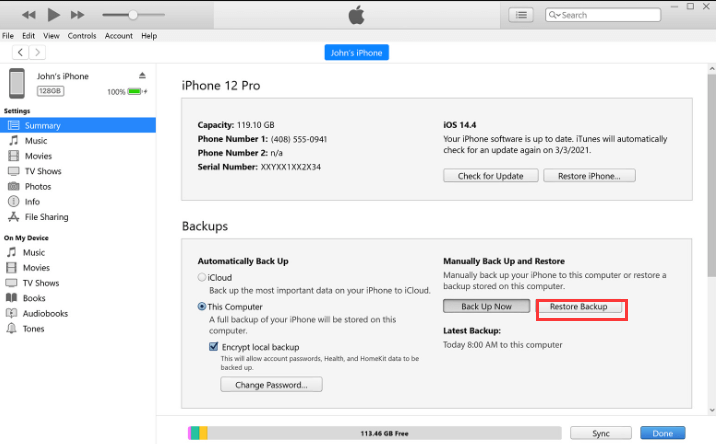
On the device summary page, under the "Backups" section, you'll see the option to "Restore Backup". Click on this option.
Step #6: Select the Relevant Backup
You'll be presented with a list of your iTunes backups, along with their timestamps. Choose the backup that you believe contains the deleted photos you want to recover. Ensure the backup date aligns with when the photos were on your device.
Step #7: Confirm and Begin the Restoration
Click the "Restore" button. iTunes will start the restoration process, which may take some time depending on the size of the backup.
Step #8: Wait for Completion
Your device will restart during the process. Wait for the restoration to finish. Do not disconnect your device until the process is complete.
Step #9: Check Your Photos
Once the restoration is done, unlock your iOS device and open the Photos app. Check if your permanently deleted photos have been successfully recovered and are now accessible in your photo library.
If you have been using your Mac to sync and back up your iOS device, you can potentially recover permanently deleted photos using Finder. This method is similar to using iTunes but applies to macOS Catalina (10.15) and later versions. Here's how to recover deleted photos using Finder on your Mac:
Step #1: Connect Your iOS Device
Connect your iOS device to your Mac using a USB cable.
Step #2: Open Finder
Launch Finder on your Mac if it doesn't open automatically upon connecting your device.
Step #3: Trust This Computer
If prompted on your iOS device, unlock it and tap "Trust This Computer" to establish a connection.
Step #4: Select Your Device
In Finder, you should see your iOS device listed in the left sidebar under "Locations". Click on your device to select it.
Step #5: Choose "Restore Backup..."
On the device summary page, under the "General" tab, you'll find the option to "Restore Backup". Click on this option.

Step #6: Select the Relevant Backup
A window will appear displaying your available backups along with their timestamps. Choose the backup that you believe contains the deleted photos you want to recover. Ensure the backup date aligns with when the photos were on your device.
Step #7: Confirm and Begin the Restoration
Click the "Restore" button. Finder will start the restoration process, which may take some time depending on the size of the backup.
Step #8: Wait for Completion
Your device will restart during the process. Allow the restoration to finish. Do not disconnect your device until the process is complete.
Restoring from a Finder backup will replace the current data on your iOS device with the data from the selected backup. Ensure that you have a recent backup made with Finder that includes the deleted photos you wish to recover. If you don't have a suitable backup, consider exploring other recovery options or preventive measures to safeguard your data in the future.
While methods like restoring from iCloud, iTunes, or Finder are reliable for recovering deleted photos on iOS devices, sometimes you may need a specialized tool to handle more complex data recovery scenarios. One of the highly regarded tools for iOS data recovery is FoneDog iOS Data Recovery. In this section, we'll introduce you to FoneDog iOS Data Recovery and how to use it to recover permanently deleted photos on your iOS device.
iOS Data Recovery
Recover photos, videos, contacts, messages, call logs, WhatsApp data, and more.
Recover data from iPhone, iTunes and iCloud.
Compatible with latest iPhone and iOS.
Free Download
Free Download

FoneDog iOS Data Recovery is a powerful and user-friendly iPhone 15-supported software designed specifically for recovering lost or deleted data from iOS devices. It can help you retrieve not only photos but also various other types of data, including contacts, messages, videos, and more. Whether you want to save your lost photos due to the newest iOS update issues, or other reasons, FoneDog iOS Data Recovery can be a lifesaver.
Here’s how can you recover permanently deleted photos using the tool:
Go to the official FoneDog website and download the iOS Data Recovery tool for your macOS or Windows computer. Install the software and launch it.
Use a USB cable to connect your iOS device (iPhone, iPad, or iPod touch) to your computer. When prompted, click "Trust" on your iOS device to establish a connection.

In the FoneDog iOS Data Recovery interface, you'll find several recovery modes. For recovering permanently deleted photos, choose "Recover from iOS Device".
Click the "Start Scan" button to begin scanning your iOS device for deleted photos and other data.

Once the scanning process is complete, you'll see a list of recoverable items, including deleted photos. Preview the photos to ensure they are the ones you want to recover.
Select the photos you wish to recover and click the "Recover" button. Choose a destination on your computer to save the recovered photos.
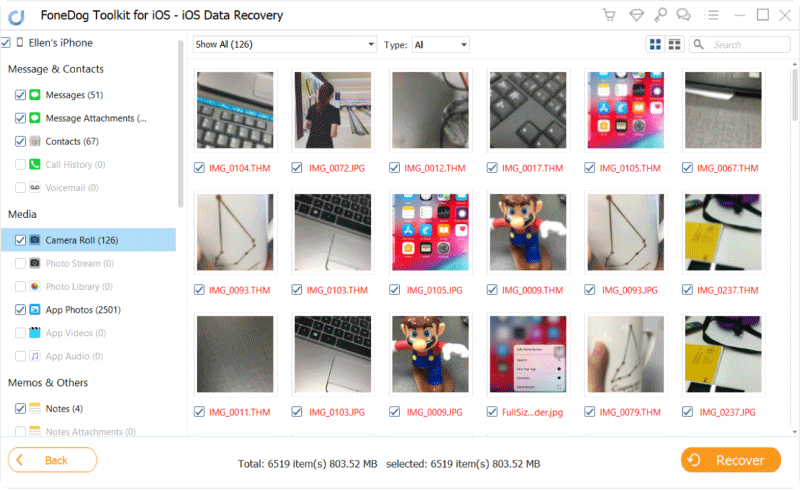
After the recovery process is complete, you can open the folder on your computer where the recovered photos were saved. You can now access and transfer them back to your iOS device if needed.
FoneDog iOS Data Recovery is an iPhone 15-supported tool that simplifies the process of recovering permanently deleted photos and offers a higher chance of success, even when traditional methods like iCloud or iTunes backups are not available or up-to-date. It's a valuable tool to have in your toolkit for iOS data recovery, especially when your photos hold significant sentimental value.
People Also ReadULTIMATE GUIDE: How to Recover Deleted Photos from FacebookThe Best Deleted Photo Recovery App in 2023 [UPDATED]
Leave a Comment
Comment
iOS Data Recovery
3 Methods to recover your deleted data from iPhone or iPad.
Free Download Free DownloadHot Articles
/
INTERESTINGDULL
/
SIMPLEDIFFICULT
Thank you! Here' re your choices:
Excellent
Rating: 4.6 / 5 (based on 100 ratings)