

By Nathan E. Malpass, Last updated: September 25, 2023
There may come a time when you want to download some photos from iCloud to a different PC or mobile, share them with loved ones, or simply back them up for safekeeping. That's where this guide comes in handy.
The process on how to download photos from iCloud might sound like a daunting task, especially if you're not tech-savvy. But fear not! We've put together this step-by-step guide to help you navigate the process with ease, regardless of whether you're using an iPhone, iPad, Mac, or PC.
By the end of this article, you'll have all the knowledge you need to effortlessly retrieve your treasured memories from the cloud and have them at your fingertips whenever you want. So, let's dive in and learn how to download photos from your iCloud like a pro!
Part #1: How to Download Photos from iCloudPart #2: The Best Tool on How to Download Photos from iCloud: FoneDog iOS Data RecoveryConclusion
If you prefer using a web browser to access your iCloud photos, or if you're on a computer that doesn't have the iCloud app installed, downloading photos from iCloud.com is a convenient option. Follow these simple steps how to download photos from iCloud to get your photos from the cloud to your device:
Launch your preferred web browser on your computer and navigate to iCloud.com. Ensure that you're using a compatible browser, such as Safari, Chrome, Firefox, or Edge.
Log in to your iCloud account using your Apple ID and password. Make sure you use the same Apple ID that's associated with the photos you want to download.
Once you're logged in, you'll see the iCloud dashboard. Click on the "Photos" icon, which resembles a multi-colored flower.
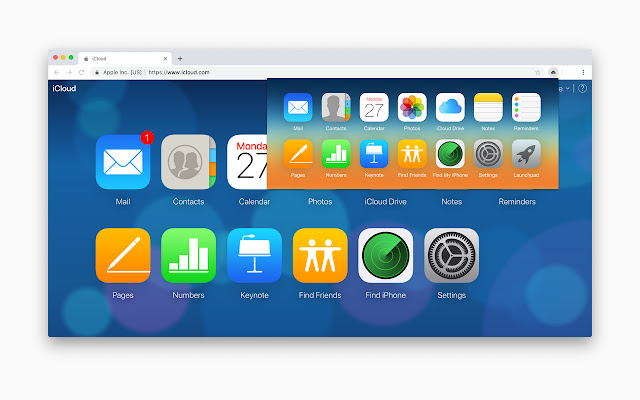
Inside the Photos section, you'll find all your iCloud photos organized by date and location. You can navigate through your albums or use the search bar to find specific photos.
To select individual photos, click on them one by one. To download multiple photos at once, hold down the "Ctrl" key (or "Command" key on Mac) and click on the photos you want to download. Alternatively, you can click the "Select Photos" button in the top-right corner and then click on the photos.
Once you've selected the photos, click the download icon, represented by a cloud with a downward arrow. Your selected photos will be packaged into a ZIP file for easy downloading.
Choose a location on your computer where you want to save the ZIP file containing your photos. Click "Save" or "Download", depending on your browser.
Locate the downloaded ZIP file and extract its contents. You'll now have access to the downloaded photos on your computer, ready to view, edit, or share as you like.
Downloading photos from iCloud.com is a straightforward way to access your pictures on a computer without the need for additional software.
If you want to download photos from iCloud and restore them to your Apple device, such as an iPhone or iPad, you can achieve this by restoring an iCloud backup. Here's how to download photos from iCloud backup:
Ensure that your device is connected to a Wi-Fi network and has enough battery life or is plugged in to prevent interruptions during the restoration process. Make sure your device has been set up as new or reset to factory settings if needed.
Turn on your device or perform a factory reset if you haven't already. Follow the initial setup prompts until you reach the "Apps & Data" screen.
On the "Apps & Data" screen, select the "Restore from iCloud Backup" option. You'll be prompted to sign in with your Apple ID and password.
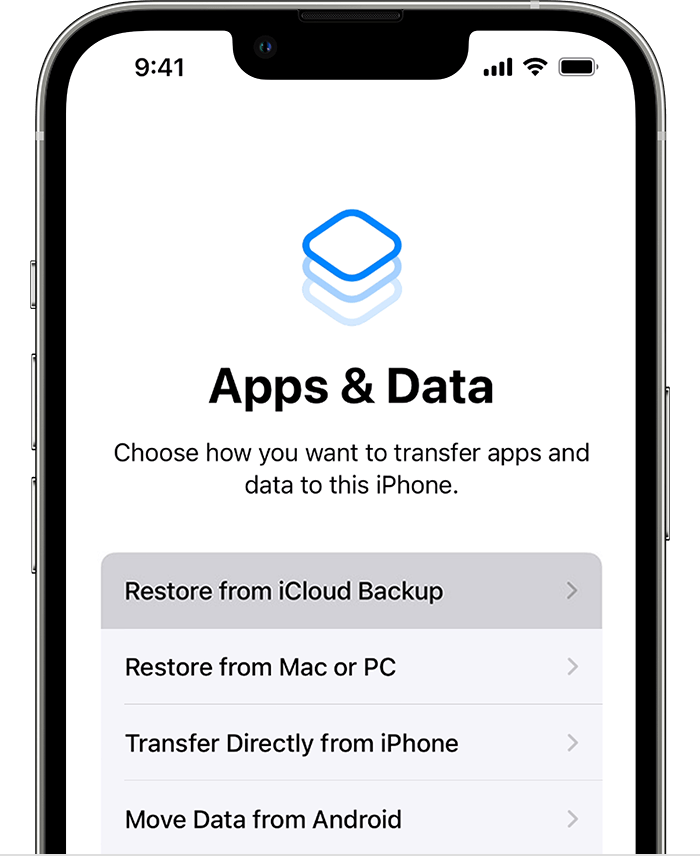
After signing in, your device will display a list of available iCloud backups. Choose the backup that contains the photos you want to download. Consider the date of the backup to ensure you're restoring the correct one.
The restoration process will begin, and your device will restart. The time required for this process depends on the size of the backup and your internet connection speed. Ensure your device remains connected to Wi-Fi and plugged in during this time.
Once the restoration is complete, your device will restart again. Follow the on-screen instructions to complete the setup process.
After the setup is finished, your device will contain all the photos and data from the selected iCloud backup. You can now access your photos as they were when the backup was made.
It's important to note that restoring from an iCloud backup will replace all existing data on your device with the data from the backup. Therefore, ensure you have a recent backup that includes the photos you want before using this method.
By following these steps, you can effortlessly download photos from iCloud and have them available on your Apple device. This method is particularly useful if you've lost photos or need to recover your entire device's content from an earlier state.
If you prefer to download photos from iCloud directly to your Apple device, such as an iPhone or iPad, the iCloud app provides a seamless way to access your photos. Here's how to download photos from iCloud using the iCloud app:
First, ensure that your device is signed in to the correct iCloud account. To do this, go to "Settings" on your device, tap your name at the top of the screen, and then tap "iCloud". Make sure that "Photos" is enabled under the list of apps using iCloud.
On your device, locate and open the Photos app. This app is where you'll access your iCloud photos.
In the Photos app, tap the "Photos" tab at the bottom of the screen. This will display your entire photo library, including both photos stored on your device and those in your iCloud account.
Browse through your photos to find the ones you want to download. You can tap on individual photos to select them. To select multiple photos, tap the "Select" option in the top right corner of the screen, then tap on the photos you want to download.
Once you've selected the photos, tap the share icon (usually represented by a square with an arrow pointing up). From the sharing options, select "Save [X] Photos". The selected photos will be downloaded to your device's local storage.
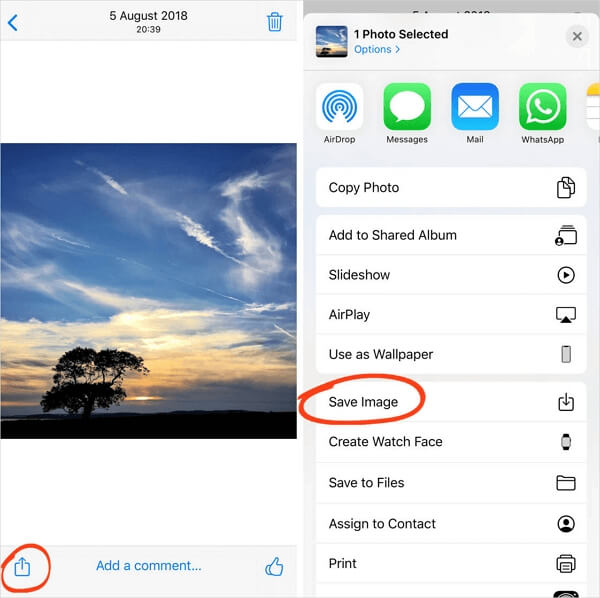
You can now access the downloaded photos directly from your device's Photos app. They will be stored in your device's camera roll or in the "Recents" album.
Using the iCloud app on your Apple device is a convenient way to access and download your iCloud photos without the need for a computer. It allows you to have your photos readily available on your device for viewing, sharing, and editing.
While the methods mentioned earlier are built-in options for downloading photos from iCloud, there are third-party tools that can offer additional features and flexibility. One such iPhone 15-supported tool that stands out is FoneDog iOS Data Recovery, which provides a user-friendly interface and various recovery modes, including "Recover from iCloud Backup File".
iOS Data Recovery
Recover photos, videos, contacts, messages, call logs, WhatsApp data, and more.
Recover data from iPhone, iTunes and iCloud.
Compatible with latest iPhone and iOS.
Free Download
Free Download

In this section, we will focus on how to use the "Recover from iCloud Backup File" mode to download photos from iCloud using FoneDog iOS Data Recovery.
Here are the steps on how to download photos from iCloud using the tool:
Begin by downloading and installing FoneDog iOS Data Recovery on your computer. Launch the program once the installation is complete.
In the main interface of FoneDog iOS Data Recovery, select the "Recover from iCloud Backup File" mode. You will be prompted to sign in to your iCloud account using your Apple ID and password.
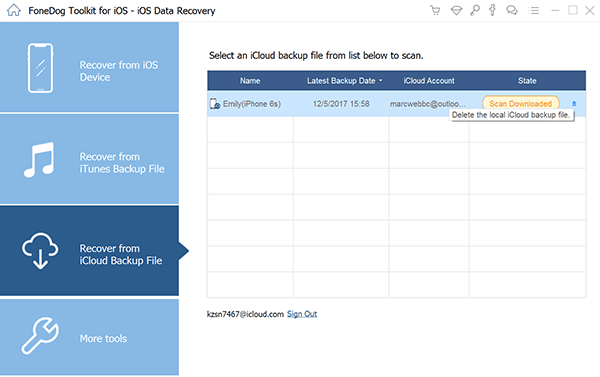
After signing in, FoneDog iOS Data Recovery will display a list of iCloud backups associated with your Apple ID. Select the backup that contains the photos you want to download and click "Download".
The software will start scanning the selected iCloud backup for data, including photos. This process may take some time, depending on the size of the backup and your internet connection speed.
Once the scan is complete, you'll see a preview of the data found in the iCloud backup, including photos. You can browse through the photos and select the ones you want to download.
After selecting the desired photos, click the "Recover" button. FoneDog iOS Data Recovery will prompt you to choose a location on your computer to save the downloaded photos. Select a folder, and the software will start downloading the photos from iCloud to your computer.
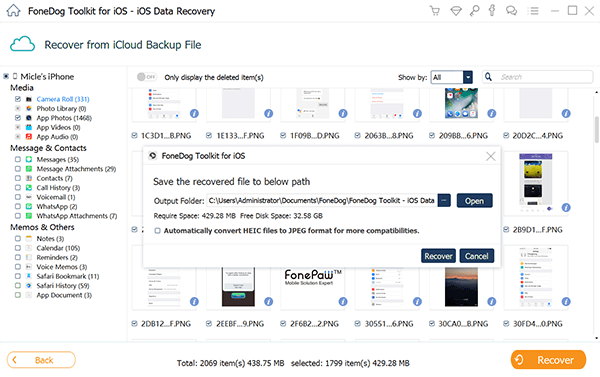
Once the download is complete, you can access the downloaded photos on your computer in the specified folder. From there, you can transfer them to your iPhone or any other device as needed.
FoneDog iOS Data Recovery's "Recover from iCloud Backup File" mode offers a straightforward and efficient way to download photos from iCloud. It allows you to selectively choose the photos you want to recover and provides a secure and organized way to access your iCloud data.
Whether you're looking to recover lost photos or want to restore your iPhone from iCloud backup, FoneDog iOS Data Recovery is a valuable tool in your arsenal.
People Also ReadDetailed Guide: How to Restore iCloud Backup on iPhone 6s2023 Guide: How to Extract Line Messages from iCloud Backup?
In this comprehensive guide, we've explored various methods on how to download photos from iCloud, ranging from built-in options to third-party tools like FoneDog iOS Data Recovery. Whether you prefer the simplicity of iCloud.com, the convenience of the iCloud app on your Apple device, or the added features of a specialized tool, you now have the knowledge to choose the method that best suits your needs.
With these methods at your disposal, you can confidently download photos from iCloud, ensuring that your precious memories are readily accessible and secure. Whether you're preserving your photographic history or simply transferring images to another device, the ability to manage your iCloud photos effectively is a valuable skill in the digital age.
Leave a Comment
Comment
iOS Data Recovery
3 Methods to recover your deleted data from iPhone or iPad.
Free Download Free DownloadHot Articles
/
INTERESTINGDULL
/
SIMPLEDIFFICULT
Thank you! Here' re your choices:
Excellent
Rating: 4.8 / 5 (based on 109 ratings)