By Nathan E. Malpass, Last updated: August 8, 2023
Water damage can be a nightmare for iPhone owners, leading to a range of issues, from unresponsive screens to complete device failure. Whether it took a dive in the pool or had an unfortunate encounter with a spilled beverage, acting quickly is vital to increase the chances of successful recovery.
In this article, we will guide you through essential steps on how to fix water damaged iPhone devices and bring it back to life. By following these proven methods, you'll be equipped with the knowledge to minimize damage and restore functionality, ensuring your cherished iPhone remains a loyal companion.
Part #1: How to Know If Your iPhone Has Been Damaged by Water?Part #2: What to Do When iPhone Has Water Damage?Part #3: How to Retrieve Data from A Water Damaged iPhone?Conclusion
Part #1: How to Know If Your iPhone Has Been Damaged by Water?
Before we jump into “How to fix water damaged iPhone”, let’s clear up something first. Water damage to an iPhone can occur in various ways, such as accidental submersion, exposure to moisture, or contact with liquids. Identifying whether your iPhone has suffered water damage is crucial for taking immediate action and preventing further complications. Here are some signs to look out for:
- Non-responsive or erratic behavior: If your iPhone becomes unresponsive to touch, freezes frequently, or exhibits unusual behavior like randomly opening apps or typing on its own, it could be a sign of water damage.
- Water indicators: iPhones are equipped with liquid contact indicators (LCIs) that change color when exposed to water or moisture. You can find these indicators in the charging port, headphone jack, and SIM card tray. If the LCI has turned red or pink, it suggests water damage.
- Display issues: Water damage often affects the iPhone’s display. Look for blurry or distorted screens, lines or spots on the display, or a completely black or white screen.
- Battery problems: Water damaged iPhones may experience rapid battery drainage, difficulty in charging, or failure to charge altogether.
- Audio and speaker malfunctions: If you notice muffled or distorted sound during calls, poor audio quality from the speakers, or no sound at all, water damage could be the culprit.
- Overheating: Excessive heat generated by your iPhone, even during normal usage, may indicate water damage. This could be a result of short circuits caused by the presence of water or moisture inside the device.

If you observe any of these signs, it's crucial to take immediate action to prevent further damage. In the next section, we'll explore the essential steps to fix water damage on your iPhone effectively.
Part #2: What to Do When iPhone Has Water Damage?
How to fix water damaged iPhone? “First aid” is important. When your iPhone has been exposed to water or liquid, taking prompt action can significantly increase the chances of successful recovery. Here are the essential steps to follow:
- Power Off Immediately: The first and most crucial step is to power off your iPhone immediately. Press and hold the power button until the “Slide to Power Off” option appears, and then slide to turn it off. This helps prevent further damage that could be caused by short circuits.
- Do Not Charge or Plug-In: Avoid connecting your iPhone to a charger or any other external device. Charging a water damaged device can cause additional harm and increase the risk of a short circuit. It’s important to disconnect any cables or accessories connected to the device.
- Remove Sim Card and Accessories: Open the SIM card tray using the SIM removal tool or a paperclip, and carefully remove the SIM card. Additionally, detach any accessories, such as cases or covers, to expose the device to air and facilitate drying.
- Dry with Absorbent Material: Gently pat your iPhone dry using a soft, lint-free cloth. Avoid rubbing or applying excessive pressure, as it can push the liquid further into the device. Pay extra attention to ports, buttons, and the headphone jack.
- Use Rice or Desiccants: Place your iPhone in a container filled with packets of desiccant or you can also use uncooked rice. These can help to absorb moisture and can also expedite the drying process. Seal the container and leave it for at least 24 to 48 hours.

It's worth noting that while desiccants and rice can aid in drying, they may not completely fix internal damage caused by water exposure. For a more thorough and professional repair, it's advisable to seek assistance from an authorized service provider or a specialized repair center.
Remember, every second counts when it comes to water damage, so act swiftly and follow these steps to maximize the chances of reviving your iPhone. In the next section, we'll explore further options for repairing a water damaged iPhone and preventing future incidents.
Part #3: How to Retrieve Data from A Water Damaged iPhone?
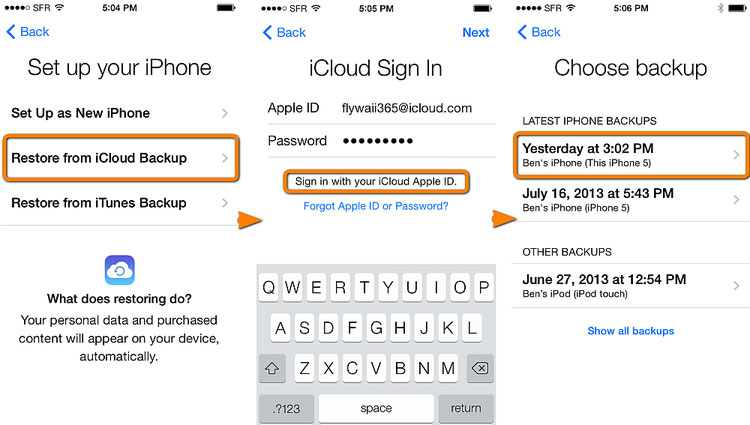
Method #1: Using iCloud Backups
Losing access to the data on your water damaged iPhone can be distressing, especially if you haven't backed up your device recently. However, if you had enabled iCloud backups, there's a chance to retrieve your data. Follow these steps on how to fix water damaged iPhone from an iCloud backup:
- Assess the Condition: Before attempting data recovery, ensure that your iPhone is dry and has undergone the necessary drying process as mentioned earlier. It’s essential to make sure the device is in a stable condition to avoid further damage.
- Access Another Device: To retrieve your data, you’ll need access to another iPhone, iPad, or computer. If you have an extra device, make sure it is connected to a stable Wi-Fi network and has a sufficient battery or power source.
- Sign In to iCloud: On the alternate device, sign in to iCloud using your Apple ID and password, which should be the same as the one used on the water damaged iPhone.
- Restore from iCloud Backup: Once signed in, navigate to the iCloud settings or the iCloud backup section, depending on the device you’re using. Locate the option to restore from an iCloud backup and select the most recent backup available.
- Follow on-screen Instructions: The restoration process will begin, and your device will download and install the selected iCloud backup. Make sure to stay connected to a stable Wi-Fi network and keep the device charged during this process.
- Retrieve Data: Once the restoration is complete, your data, including contacts, photos, messages, and other supported content, should be available on the alternate device. You can now transfer the data to your new iPhone or store it securely.
It's important to note that this method requires an active iCloud backup and may not retrieve all data if you haven't backed up your device regularly. Additionally, iCloud backups do not include certain types of data, such as app data and settings, which may need to be reconfigured manually.
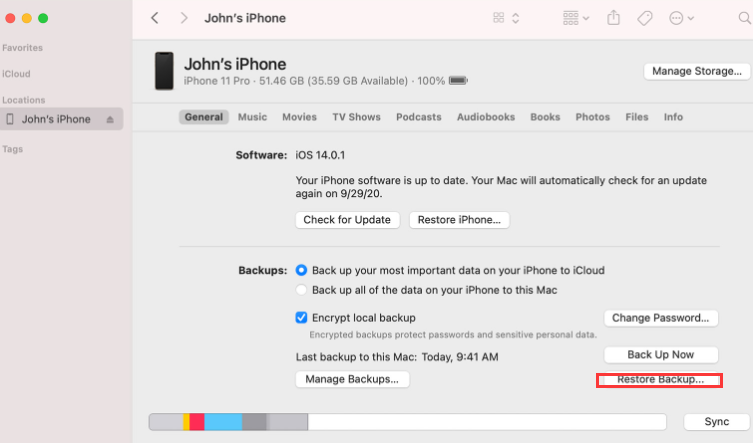
Method #2: Using iTunes
If your iCloud backup files have been gone for no reason and you have been regularly backing up your water damaged iPhone using iTunes on your computer, you can attempt to retrieve your data using this method.
Follow these steps on how to fix water damaged iPhone from an iTunes backup:
- Verify Device and iTunes Version: Ensure that you have the latest version of iTunes installed on your computer. Also, make sure your computer is authorized to access your iTunes account. Connect your water damaged iPhone to the computer using a USB cable.
- Trust the Computer: If prompted on your iPhone to “Trust This Computer”, follow the on-screen instructions and enter your device passcode if necessary.
- Launch iTunes: Open iTunes on your computer. If iTunes doesn’t open automatically upon connecting your iPhone, manually launch the application.
- Select Your Device: In iTunes, locate and select your water damaged iPhone. It should appear as an icon or under the “Devices” section.
- Choose Backup: Under the “Summary” tab, you’ll find the “Backups” section. Here, select “Restore Backup”.
- Select the Desired Backup: A list of available backups will be displayed. Choose the most recent backup or the one containing the data you wish to retrieve.
- Begin the Restoration: Click on the “Restore” button, and iTunes will initiate the restoration process. Keep your iPhone connected to the computer throughout the process.
- Retrieve Data: After the restoration is complete, your data, including contacts, photos, messages, and other supported content, should be available on your iPhone.
It's important to note that restoring from an iTunes backup will overwrite the existing data on your iPhone. Therefore, if you have used your device after the water damage occurred and created new data, it will be replaced by the data from the backup.
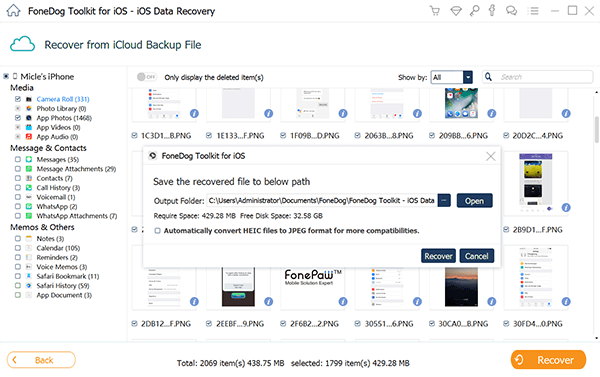
Method #3: Using FoneDog iOS Data Recovery
In addition to the built-in methods like iCloud and iTunes, FoneDog iOS Data Recovery is a third-party software that offers a comprehensive solution for data recovery from water damaged iPhones. With its user-friendly interface and powerful features, FoneDog iOS Data Recovery provides an alternative option for retrieving data from your water damaged iPhone.
iOS Data Recovery
Recover photos, videos, contacts, messages, call logs, WhatsApp data, and more.
Recover data from iPhone, iTunes and iCloud.
Compatible with latest iPhone and iOS.
Free Download
Free Download

Here's how to fix water damaged iPhone with FoneDog iOS Data Recovery:
- Download and Install FoneDog iOS Data Recovery: Visit the official website of FoneDog iOS Data Recovery and download the software compatible with your computer’s operating system. Install the software following the on-screen instructions.
- Launch FoneDog iOS Data Recovery: Open FoneDog iOS Data Recovery on your computer after installation. You will see different recovery modes available.
- Select “Recover from iCloud” Mode: From the main interface of FoneDog iOS Data Recovery, choose the “Recover from iCloud” mode. This mode allows you to retrieve data directly from your iCloud backup.
- Sign in to iCloud Account: You will be prompted to sign in to your iCloud account using your Apple ID and password. FoneDog iOS Data Recovery ensures the security and privacy of your data during this process.
- Scan iCloud Backup: Once signed in, FoneDog iOS Data Recovery will display a list of iCloud backups associated with your account. Select the relevant backup that contains the data you wish to recover and click on the “Download” button.
- Choose Data Types: In the next window, you can select the specific types of data you want to recover. FoneDog iOS Data Recovery provides options such as contacts, messages, photos, videos, call history, and more. Choose the desired data types and click on the “Next” button to proceed.
- Preview and Recover Data: After the scanning process is complete, FoneDog iOS Data Recovery will present a preview of the recoverable data. You can selectively choose the files you want to recover. Once you’ve made your selections, click on the “Recover” button to retrieve the data from your iCloud backup.
- Save Recovered Data: Specify the destination on your computer where you want to save the recovered data. It’s recommended to choose a location that is easily accessible. Click on the “Recover” button to initiate the data recovery process.
People Also ReadHow to Recover iPhone Photos: Restore Your Precious MemoriesStellar Data Recovery for iPhone: Review Top Alternatives
Conclusion
FoneDog iOS Data Recovery offers a straightforward and efficient method on how to fix water damaged iPhone using the "Recover from iCloud" mode. It provides an alternative solution for restoring your iPhone without iTunes. So go ahead to try it out!


 /
/
