

By Nathan E. Malpass, Last updated: February 29, 2024
Whether it's capturing a candid moment with friends, preserving a breathtaking sunset, or documenting a special family event, our photos hold sentimental value that's beyond measure. But what happens when we accidentally delete these photos, and worse, empty the 'Recently Deleted' folder, believing they're gone forever?
Don't despair! This article will be your guiding light in the world of digital photo recovery. We'll delve into the techniques and tools you need on how to recover deleted photos after deleting from Recently Deleted Album. So, if you've ever wondered how to see your recently deleted photos—you're in the right place.
Part #1: How to Recover Deleted Photos after Deleting from Recently Deleted Album on AndroidPart #2: How to Recover Deleted Photos After Deleting from Recently Deleted Album on iOSConclusion
Losing precious photos from your Android device can be distressing, but fear not – there are methods to recover them, even after they've been removed from the 'Recently Deleted' album. In this first method, we'll explore how to leverage the power of Google Drive to potentially bring your deleted photos back to life.
Step #1: Check Your Google Drive Backup
Before you begin the recovery process, it's essential to confirm whether you've been backing up your photos to Google Drive. Android devices often offer the option to automatically back up your photos, which can be a lifesaver in situations like this.
Here's how to check:
Step #2: Restore Photos from Google Drive
If your photos are backed up in Google Drive, you can easily retrieve them:

Step #3: Check Your Google Photos Library
Now that you've restored your deleted photos from the Trash, they should reappear in your Google Photos library. Open the Google Photos app and navigate to the library to confirm that your precious memories are back where they belong.
Remember, Google Drive and Google Photos work hand-in-hand to safeguard your photos, so it's crucial to enable automatic backups to prevent future data loss.
If you own an Android device from manufacturers like Samsung, Vivo, or other major brands, you might have access to their proprietary cloud services. These cloud platforms often offer data backup and recovery features, including the restoration of deleted photos. Let's explore how to recover deleted photos after deleting from Recently Deleted Album, while using Cloud service:
Step #1: Access Your Manufacturer's Cloud Service
First, make sure you have an account with your device manufacturer's cloud service (e.g., Samsung Cloud, Vivo Cloud, Huawei Cloud, etc.), and that you've been actively using it to back up your data.
Step #2: Log In to Your Cloud Account
Open the cloud service app on your Android device. Sign in using your registered credentials (usually your email and password).
Step #3: Navigate to the Photo Backup Section
Once you're logged in, look for the section dedicated to photo backup or recovery. This might be labeled as "Photos", "Gallery", or something similar, depending on your device manufacturer's interface.
Step #4: Restore Deleted Photos
Follow the specific instructions provided by your manufacturer's cloud service to recover deleted photos. The process may vary slightly from one service to another, but it typically involves selecting the photos you want to restore and confirming the restoration process.
Step #5: Check Your Gallery
After the restoration process is complete, check your device's gallery app to confirm that your deleted photos have been successfully recovered.
Step #6: Ensure Future Backup Settings
To prevent future data loss, ensure that your device is set to automatically back up your photos to the manufacturer's cloud service. This way, you'll have a safety net in case you accidentally delete photos in the future.
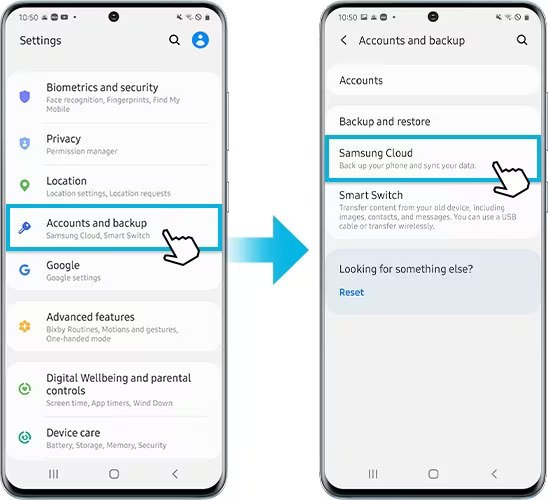
Remember that the availability and functionality of manufacturer-specific cloud services may vary, so consult your device's user manual or the manufacturer's website for detailed instructions tailored to your device.
If you're an iPhone or iPad user, the iCloud backup system can be your savior when it comes to recovering deleted photos. iCloud regularly backs up your device's data, including photos, so you can restore them if needed. Here's how to recover deleted photos from iCloud backup:
Step #1: Verify iCloud Backup
Before proceeding, ensure that you have an iCloud backup that contains the photos you want to recover. Follow these steps to check:
Step #2: Erase and Restore Your Device (Optional)
If you're certain that your iCloud backup contains the photos you want to recover and they're not currently on your device, you can perform a device restore. Be aware that this process erases the content on your device and restores it from the selected iCloud backup. If you're not comfortable with this option, proceed to Step 3.
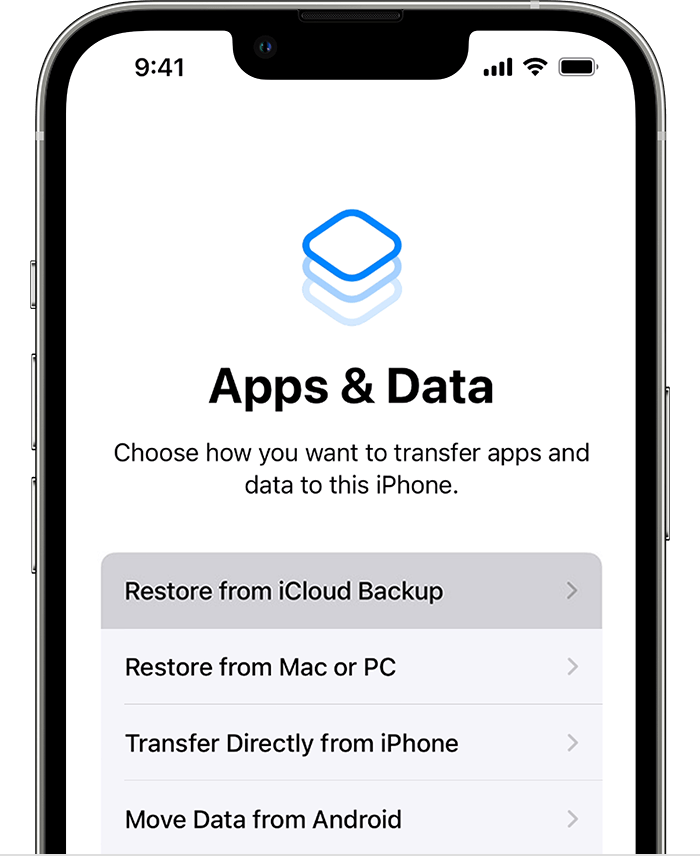
Step #3: Recover Photos Without Erasing Your Device
If you'd rather not erase your device, you can recover photos from iCloud without performing a full device restore:
Step #4: Check Your Photo Library
After following the steps, check your device's Photo app to ensure that the deleted photos have been successfully recovered.
Remember that iCloud provides a convenient way to back up and restore your photos, but you need to have an active iCloud backup containing the photos you want to recover. If you don't, or if your backup doesn't include the desired photos, consider using other methods like third-party software or contacting Apple Support for further assistance.
You might ask, what if the iCloud backups are gone for no reason? No worries, still have a chance. If you've been using iTunes to back up your iOS device, you can recover deleted photos from your backups. Here's how to recover deleted photos after deleting from Recently Deleted Album, by the use of iTunes:
Step #1: Connect Your iOS Device to Your Computer
Use a USB cable to connect your iPhone or iPad to your computer. Open iTunes (or Finder on macOS Catalina and later) if it doesn't open automatically.
Step #2: Select Your Device in iTunes or Finder
In iTunes, your device should appear in the upper-left corner. In Finder, it will appear in the left sidebar. Click on your device to select it.
Step #3: Choose a Backup
In iTunes, you'll see a summary page for your device. Under the "Backups" section, you'll see the "Restore Backup" button. In Finder, you'll see a similar option on the device page. Click "Restore Backup". A window will appear, displaying a list of available backups. Select the backup that contains the photos you want to recover. Look at the backup dates to help you choose the right one.
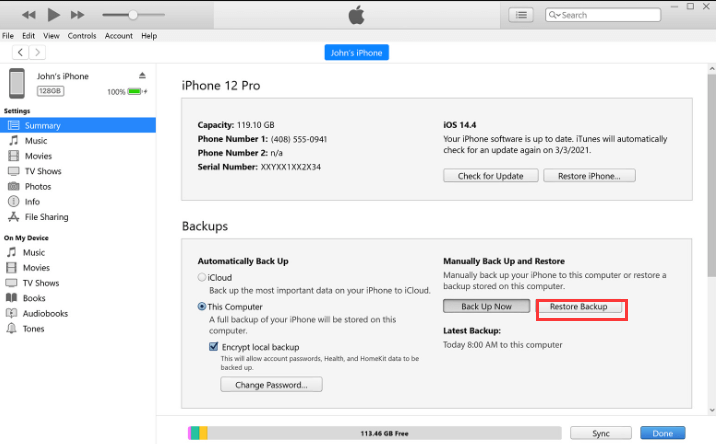
Step #4: Start the Restore Process
Click "Restore" to begin the restoration process. iTunes (or Finder) will erase your device and restore it from the selected backup. This process may take some time, depending on the size of the backup.
Step #5: Wait for the Restore to Complete
Once the restore process is finished, your device will restart. You'll see a "Welcome to iPhone/iPad" screen. Follow the on-screen setup instructions, including signing in with your Apple ID and setting up your device preferences.
Step #6: Check Your Photo Library
After completing the setup, open your Photos app to check if the deleted photos have been successfully recovered. The photos from the selected backup should now be available in your library.
It's important to note that using iTunes to restore your device from a backup will replace all current data on your device with the data from the backup. Make sure to choose a backup that contains the photos you want to recover, and be aware that any data created or modified after the backup date will be lost.
If you have been backing up your iOS device to your Mac using Finder (macOS Catalina and later), you can use this method to restore deleted photos from a local backup. Here's how to do it:
Step #1: Connect Your iOS Device to Your Mac
Connect your iPhone or iPad to your Mac using a USB cable. Open Finder on your Mac if it doesn't open automatically upon connection.
Step #2: Select Your Device in Finder
In the Finder sidebar, you should see your iOS device listed under "Locations". Click on your device to select it.
Step #3: Choose a Backup to Restore
In the device window, you'll see a summary of your device, including options like "General", "Music", "Movies", etc. Click on the "General" tab. Under the "Backups" section, you'll see the "Restore Backup" button. Click on it.
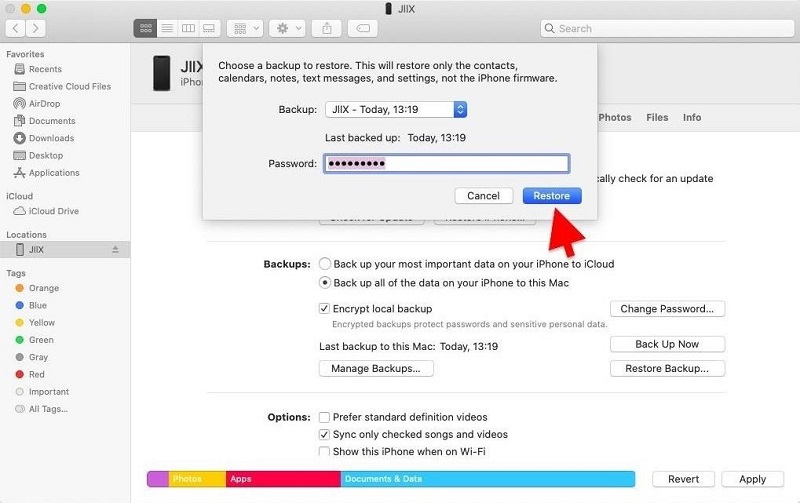
Step #4: Select the Backup
A window will appear displaying the available backups stored on your Mac. Choose the backup that contains the photos you want to recover. Pay attention to the backup dates to ensure you select the correct one.
Step #5: Start the Restore Process
Click the "Restore" button to initiate the restoration process. Finder will erase your iOS device and restore it from the selected backup. This process may take some time, depending on the size of the backup.
Step #6: Complete the Setup
Once the restore process is completed, your iOS device will restart. You'll see a "Hello" screen, prompting you to complete the initial setup.
Step #7: Check Your Photo Library
After completing the setup, open the Photos app on your iOS device to check if the deleted photos have been successfully recovered. The photos from the selected backup should now be available in your library.
Remember that using Finder to restore your device from a backup will replace all current data on your device with the data from the backup. Be sure to choose a backup that contains the photos you want to recover, and keep in mind that any data created or modified after the backup date will be lost.
Above you learned how to recover deleted photos after deleting from Recently Deleted Album. If you're unable to recover your deleted photos from iCloud, iTunes, or local backups, or if you don't have a backup available, you can turn to third-party iOS data recovery software like FoneDog iOS Data Recovery.
iOS Data Recovery
Recover photos, videos, contacts, messages, call logs, WhatsApp data, and more.
Recover data from iPhone, iTunes and iCloud.
Compatible with latest iPhone and iOS.
Free Download
Free Download

This software is designed to help you recover deleted photos and other data directly from your iOS device. Here's how to use it:
Step #1: Download and Install FoneDog iOS Data Recovery
Visit the FoneDog iOS Data Recovery website and download the software for your Mac or Windows computer. Install and launch the software.
Step #2: Connect Your iOS Device to Your Computer
Use a USB cable to connect your iPhone or iPad to your computer. Once your device is connected, the software should recognize it.
Step #3: Choose the Recovery Mode
In the FoneDog iOS Data Recovery software, you will find various recovery modes. Choose the appropriate mode for your situation. In this case, select "Recover from iOS Device" since you want to recover deleted photos directly from your device.
Step #4: Scan Your iOS Device
Click the "Start Scan" button to begin scanning your iOS device for deleted data, including photos. The scanning process may take some time, depending on the amount of data on your device. Be patient and allow the software to complete the scan.

Step #5: Preview and Recover Deleted Photos
Once the scan is complete, the software will display a list of recoverable data categories. Click on "Photos" to preview the deleted photos. Select the photos you want to recover. Click the "Recover" button to save the selected photos to your computer.
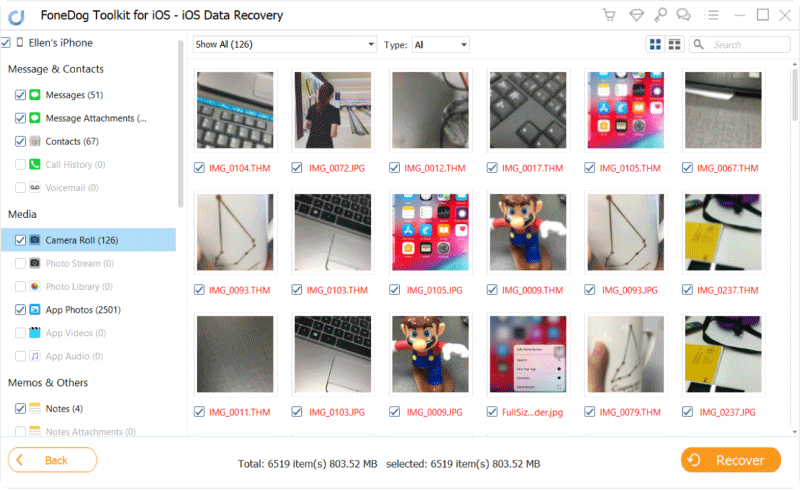
Step #6: Check the Recovered Photos
Navigate to the folder on your computer where the recovered photos were saved and open them to verify that your deleted photos have been successfully recovered.
FoneDog iOS Data Recovery is an iPhone 15-supported tool that provides a convenient way to recover deleted photos directly from your iOS device, even if you don't have a backup available. However, please note that some of these software solutions may have limitations or may require a purchase or a free trial with limited functionality. Always follow the software's instructions carefully to ensure a successful recovery.
People Also ReadiOS Update Deleted Photos, How to RecoverHow Can We Recover Deleted Photos from iPhone X
In conclusion, how to recover deleted photos after deleting from Recently Deleted Album? Whether you use Google Drive, your device manufacturer's cloud service, iTunes, Finder, or third-party software like FoneDog iOS Data Recovery, the key is to act swiftly and choose the method that best suits your situation.
Remember to regularly back up your data to prevent future data loss, and always follow the recommended steps and precautions for a successful photo recovery. Your cherished memories are worth the effort!
Leave a Comment
Comment
iOS Data Recovery
3 Methods to recover your deleted data from iPhone or iPad.
Free Download Free DownloadHot Articles
/
INTERESTINGDULL
/
SIMPLEDIFFICULT
Thank you! Here' re your choices:
Excellent
Rating: 4.6 / 5 (based on 87 ratings)