
By Nathan E. Malpass, Last updated: June 28, 2023
Photos disappearing from your iPhone can be a heartbreaking experience. Whether it's due to accidental deletion, software issues, or a device malfunction, the thought of losing precious memories captured in those images can be overwhelming. Fortunately, there are methods and tools available that can help you on how to recover iPhone photos and regain those cherished moments.
In this article, we will explore various techniques and strategies to recover your iPhone photos safely and efficiently. From utilizing built-in features to third-party software solutions, we'll guide you through the step-by-step process to ensure a successful photo recovery. Whether you're using the latest iPhone model or an older version, our comprehensive guide will cater to your specific needs and help you retrieve your valuable photos.
Don't let the fear of losing your iPhone photos dampen your spirits. With the right knowledge and tools at your disposal, you can restore your precious memories and keep them close to your heart. Let's delve into the world of iPhone photo recovery and bring those special moments back to life!
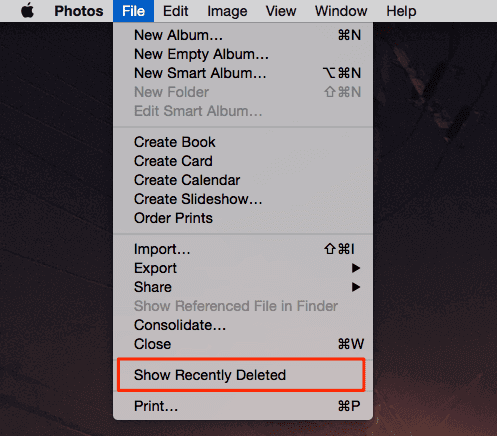
When it comes to implementing how to recover iPhone photos, we need to figure out where these deleted pictures go on your iPhone. The first place to check is the "Recently Deleted" album. This album acts as a safety net, holding onto your deleted photos for a specific period before permanently removing them. Follow these steps to retrieve your photos:

Note: The duration for which photos remain in the "Recently Deleted" album before permanent deletion varies. In most cases, photos are stored for 30 days, but it's essential to act quickly to increase the chances of successful recovery.
The "Recently Deleted" album is an excellent initial option for recovering recently deleted photos, but it does have its limitations. If your photos were deleted more than 30 days ago, or if they were permanently deleted from the "Recently Deleted" album, you'll need to explore alternative methods for recovery. In the next section, we'll discuss additional techniques and tools you can use to retrieve your iPhone photos effectively.
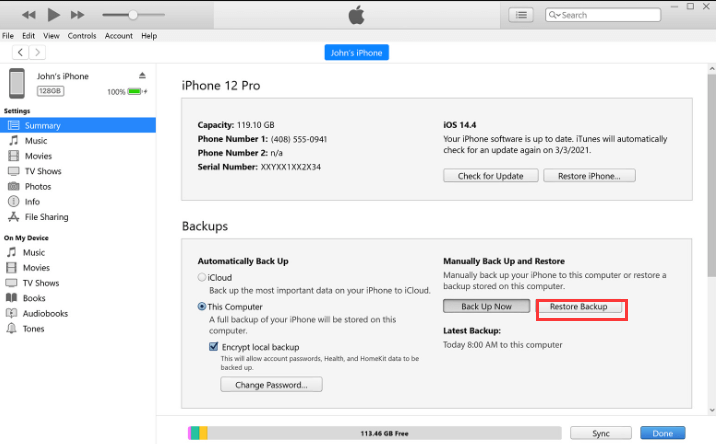
This is another method on how to recover iPhone photos. If you have been backing up your iPhone to iTunes regularly, you may be able to recover deleted photos from a previous backup. Follow these steps to retrieve your photos using iTunes:

Note: If you encrypt your iTunes backups and have set a password, you will be prompted to enter the password during the restore process.
If you have been using iCloud to back up your iPhone, there's a good chance that you can implement how to recover iPhone photos using an iCloud backup. Here's how you can do it:

It's important to note that the iCloud backup you choose for restoration will replace all the existing data on your iPhone, including photos taken after the backup was made. Therefore, it's crucial to back up any recent data before initiating the restore.
If the deleted photos are not found in the iCloud backup or if you don't have an iCloud backup available, don't worry. There are still other methods you can try to recover your deleted iPhone photos. In the next section, we'll explore alternative options for photo recovery.
If you have a Mac computer running macOS Catalina or later, you can use Finder to implement the process on how to recover iPhone photos. Follow these steps:

Using Finder on Mac provides a convenient way to retrieve deleted photos from your iPhone without the need for additional software. However, it's important to note that this method is only applicable to Mac computers running macOS Catalina or later.
Remember to regularly back up your iPhone to avoid permanent loss of your valuable photos. In the next section, we'll discuss some general tips and precautions for iPhone photo recovery to maximize your chances of success.
The best way on how to recover iPhone photos is through the use of this tool we will recommend here. FoneDog iOS Data Recovery is a reliable and user-friendly software designed specifically to recover various types of data from iPhones, including photos.
iOS Data Recovery
Recover photos, videos, contacts, messages, call logs, WhatsApp data, and more.
Recover data from iPhone, iTunes and iCloud.
Compatible with latest iPhone and iOS.
Free Download
Free Download

It offers a simple and efficient solution for users to retrieve their deleted or lost photos from iPhone devices. With its intuitive interface and powerful recovery capabilities, FoneDog iOS Data Recovery has gained popularity among iPhone users worldwide.
Here are the steps to recover photos from an iPhone using FoneDog iOS Data Recovery:
Download and install FoneDog iOS Data Recovery on your computer. Launch the software after installation.
Connect your iPhone to the computer using a USB cable. Ensure that you trust the computer on your iPhone if prompted.
Once your iPhone is detected by the software, you will see various recovery modes. Choose the "Recover from iOS Device" option to proceed.
Click on the "Start Scan" button to initiate the scanning process. FoneDog iOS Data Recovery will scan your iPhone's storage for deleted photos.
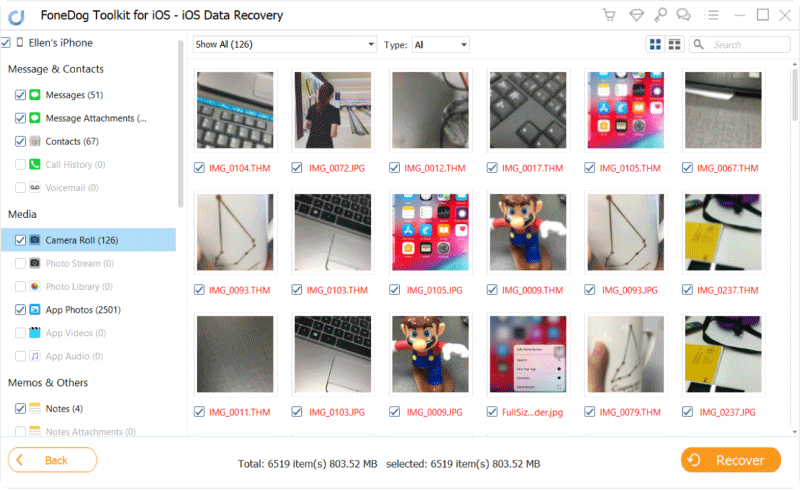
After the scan is complete, you will see a list of recoverable photos. You can preview them one by one and select the photos you want to recover.
Once you have chosen the photos you wish to recover, click on the "Recover" button. Select a destination folder on your computer to save the recovered photos.
FoneDog iOS Data Recovery will begin the recovery process and retrieve the selected photos from your iPhone. Once the process is complete, you can access the recovered photos on your computer.

It's worth noting that FoneDog iOS Data Recovery also offers other useful features, such as recovering data from iTunes and iCloud backups, fixing iOS system issues, and selectively restoring data from backups. The software provides a comprehensive solution for data recovery needs on iPhones.
A1: Yes, you can still attempt to recover deleted iPhone photos even without a backup. You can use FoneDog iOS Data Recovery. While the chances of successful recovery are higher with a backup, you can use third-party data recovery software or consult professional data recovery services to retrieve your photos directly from your iPhone's internal storage.
A2: By default, photos remain in the Recently Deleted album on your iPhone for 30 days. After this period, they are permanently deleted from your device. It's important to act promptly and recover the photos before they are automatically removed.
A3: If you don't have an iCloud backup, there are still other methods to recover deleted iPhone photos. You can use iTunes backups if you have been regularly backing up your device to your computer. Alternatively, you can explore third-party data recovery software or seek professional assistance to recover your photos.
A4: To prevent losing iPhone photos, it's crucial to regularly back up your device. Enable iCloud Photo Library to automatically sync and back up your photos to the cloud. Additionally, consider using third-party cloud storage services or manually transferring photos to your computer for extra backup.
A5: When attempting to recover iPhone photos, it's important to avoid overwriting the deleted data. To minimize the risk, avoid taking new photos or adding new data to your iPhone until the recovery process is complete. This will help ensure that the deleted photos have a higher chance of being successfully recovered.
Above it’s the Q&A of “ How to recover iPhone photos”. Remember, the success of photo recovery depends on various factors, such as the time since the deletion, available backups, and the specific circumstances of the data loss. It's always recommended to act quickly and consult professionals or trusted software solutions if you encounter difficulties in recovering your iPhone photos.
People Also ReadTop 3 and The Best iPhone Photo Extractor in 2023!Top 4 iPad Photo Recovery Software in 2023!
Leave a Comment
Comment
iOS Data Recovery
3 Methods to recover your deleted data from iPhone or iPad.
Free Download Free DownloadHot Articles
/
INTERESTINGDULL
/
SIMPLEDIFFICULT
Thank you! Here' re your choices:
Excellent
Rating: 4.7 / 5 (based on 87 ratings)