FoneDog Screen Recorder
FoneDog Screen Recorder
Special Offer
Special Offer


By Nathan E. Malpass, Last updated: March 10, 2025
Losing photos on your iPhone can be frustrating, especially when they are permanently deleted. Whether they were accidentally removed or lost due to a system malfunction, there’s still a chance to recover them and breathe life back into your cherished moments if you have a backup. How to recover permanently deleted photos on iPhone with backup? In this guide, we will walk you through multiple methods to recover permanently deleted photos on your iPhone using backups. Let’s explore these options to get your images back!
Method 1. Recover Deleted Photos from iPhone via iCloudMethod 2. Recover Deleted Photos from iPhone via iTunesMethod 3. Recover Deleted Photos from iPhone via FinderMethod 4. Recover Deleted Photos from iPhone via FoneDog (Best Way)Summary
How to recover permanently deleted photos on iPhone with backup? Losing your precious photos doesn't have to be the end of the story. If you've been diligent about backing up your iPhone to iCloud, you're in luck. Apple's cloud storage service offers a straightforward way to recover permanently deleted photos. Follow these steps to bring back those cherished memories:
Step 1: Check Your iCloud Backup
Before you start the restoration process, ensure that you have a recent iCloud backup that contains the photos you want to recover. To check:
Step 2: Factory Reset Your iPhone (Optional)
If you've already deleted the photos and need to recover them, you may want to start with a clean slate. To do this, you can factory reset your iPhone:
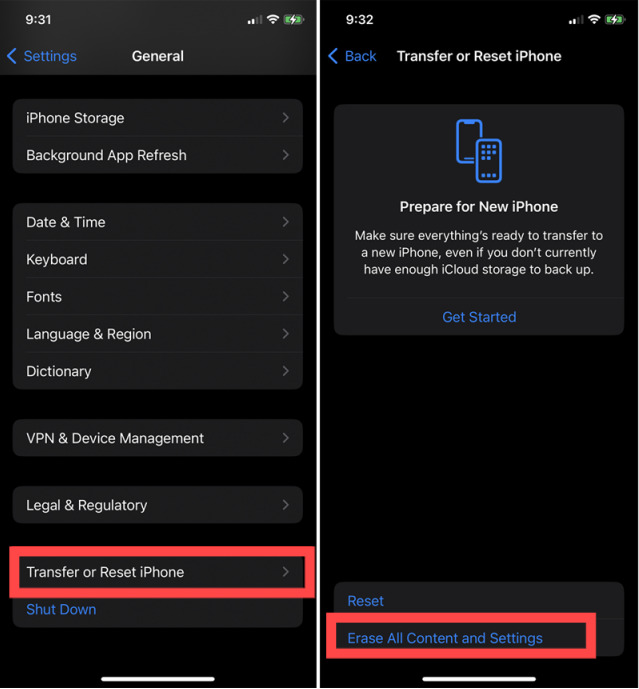
Step 3: Restore from iCloud Backup
Now that you've confirmed your backup and, if necessary, wiped your iPhone, it's time to restore from iCloud:
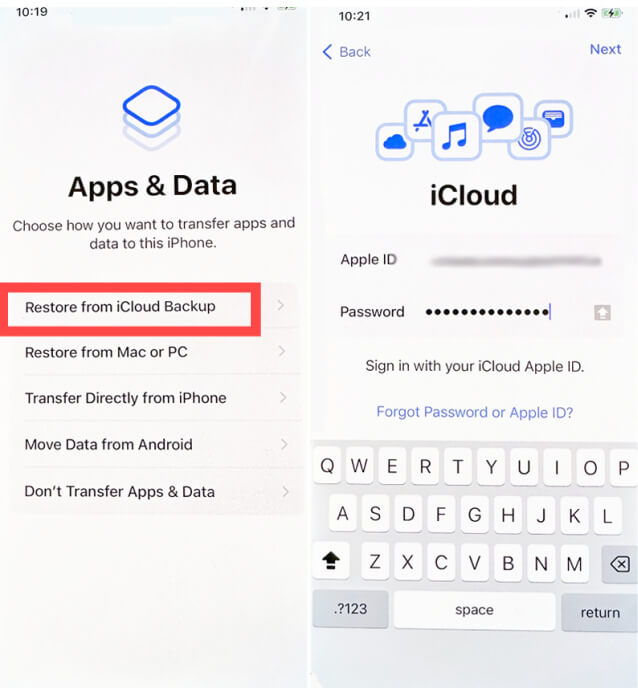
Step 4: Wait for Photos to Download
Once the restoration is complete, your deleted photos should start downloading automatically. Depending on the size of your backup and the speed of your internet connection, this may take some time.
Step 5: Check Your Photos App
After the download, open your Photos app to check if your deleted photos have been successfully recovered. They should now be back in their respective albums.
Congratulations! You've successfully recovered permanently deleted photos from your iPhone using iCloud backup restoration. But what if you've been using iTunes for backups? Don't worry; we'll cover that in Method 02.
How to recover permanently deleted photos on iPhone with backup? If you've been diligently backing up your iPhone using iTunes, you can still recover permanently deleted photos. Follow these steps to bring back your cherished memories:
Step 1: Connect Your iPhone to Your Computer
Start by connecting your iPhone to the computer that you used for your iTunes backups using a USB cable.
Step 2: Open iTunes
Launch the iTunes application on your computer. Ensure that you are using the latest version of iTunes to avoid any compatibility issues.
Step 3: Trust This Computer
If you haven't connected your iPhone to this computer before, you may need to "Trust This Computer" on your iPhone. Follow the on-screen prompts to establish trust.
Step 4: Locate Your Device
Once your iPhone is recognized by iTunes, click on the device icon that appears in the upper left corner of the iTunes window. This will take you to your device's summary page.
Step 5: Choose "Restore Backup..."
In the "Summary" tab, you will see a section labeled "Backups." Under the "Manually Back Up and Restore" section, click on "Restore Backup..."
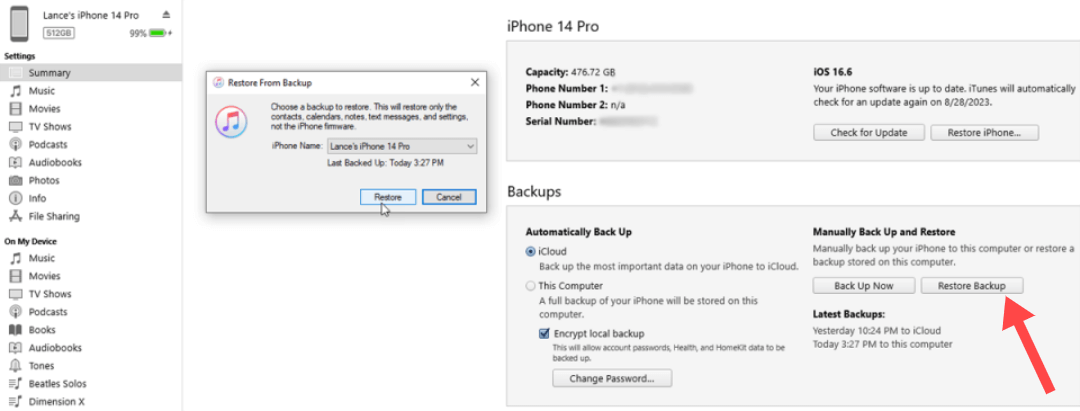
Step 6: Select the Backup Containing Your Photos
A window will appear listing the available backups. Choose the backup that you believe contains the photos you want to recover. Be sure to select a backup from a date when the photos were still on your device.
Step 7: Begin the Restoration
Click the "Restore" button and let iTunes do its work. This process may take some time, depending on the size of the backup and your computer's performance.
Step 8: Wait for Completion
Once the restoration process is complete, your iPhone will reboot. After it restarts, your deleted photos should be back on your device.
Step 9: Verify Your Photos
Open the Photos app on your iPhone to ensure that the deleted photos have been successfully recovered. They should now be accessible in your albums.
That's it! You've successfully recovered permanently deleted photos from your iPhone using an iTunes backup restoration. Whether you used iCloud or iTunes, having a backup can be a lifesaver when it comes to preserving your precious memories.
How to recover permanently deleted photos on iPhone with backup? If you prefer to use a Mac computer and have been backing up your iPhone using Finder (macOS Catalina and later), you can recover permanently deleted photos following these steps:
Step 1: Connect Your iPhone to Your Mac
Connect your iPhone to your Mac using a USB cable. Ensure that your Mac is running macOS Catalina or later, as earlier versions use iTunes for backups.
Step 2: Open Finder
Open a Finder window on your Mac. You can do this by clicking on the Finder icon in your dock or by pressing Command + N.
Step 3: Locate Your iPhone
In the Finder window, you should see your iPhone listed in the sidebar under "Locations." Click on your iPhone to select it.
Step 4: Choose "Restore Backup..."
In the iPhone window, you'll see various tabs at the top. Click on the "General" tab, and then under the "Backups" section, click on the "Restore Backup..." button.
Step 5: Select the Backup with Your Photos
A window will appear listing the available backups. Choose the backup that you believe contains the photos you want to recover. Be sure to select a backup from a date when the photos were still on your device.
Step 6: Start the Restoration
Click the "Restore" button to initiate the restoration process. Your Mac will copy the selected backup back to your iPhone. This may take some time, depending on the size of the backup and the speed of your computer.
Step 7: Wait for Completion
Once the restoration process is complete, your iPhone will restart. After it restarts, check the Photos app on your iPhone to confirm that the deleted photos have been successfully recovered.
By following these steps using Finder on your Mac, you can recover permanently deleted photos from your iPhone with ease. Having a backup in Finder ensures that you have a safety net to protect your precious memories.
If you don’t have a backup or your backup doesn’t include the photos you need, third-party tools like FoneDog iOS Data Recovery can help. FoneDog is designed to recover deleted data directly from your iPhone, even if it's permanently deleted from the Photos app. In this part of our guide, we'll introduce you to this handy tool and show you how to use it to retrieve your precious memories.
FoneDog iOS Data Recovery is not limited to photos; it can recover a wide range of data types, including messages, contacts, videos, notes, and more. This versatility makes it a comprehensive solution for various data loss scenarios. Even iPhone contacts disappearing randomly, it can help you.
How to recover permanently deleted photos on iPhone with backup? Here's how to use FoneDog:
Step 1: Download and Install FoneDog iOS Data Recovery
Start by downloading and installing the FoneDog iOS Data Recovery tool on your computer. It's compatible with both Windows and Mac.
iOS Data Recovery
Recover photos, videos, contacts, messages, call logs, WhatsApp data, and more.
Recover data from iPhone, iTunes and iCloud.
Compatible with latest iPhone and iOS.
Free Download
Free Download

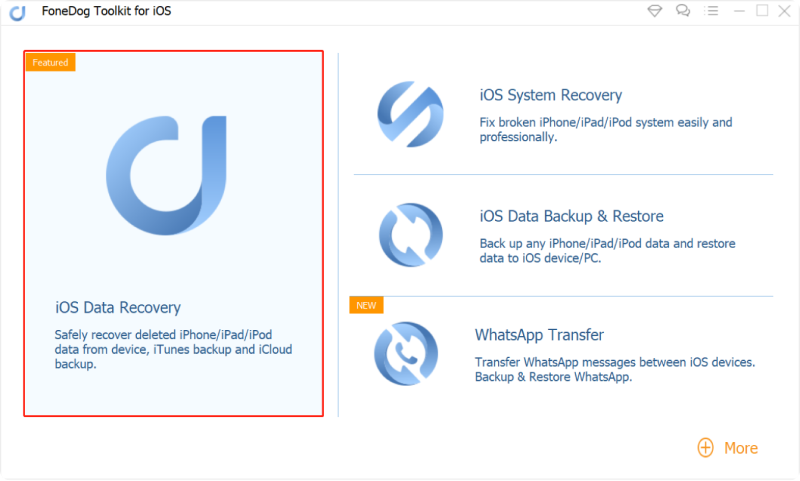
Step 2: Launch the Software and Connect Your iPhone
Launch the FoneDog iOS Data Recovery tool and connect your iPhone to your computer using a USB cable. Once your device is detected, select "Recover from iOS Device" from the left-hand menu.
Step 3: Scan Your iPhone for Deleted Data
Click the "Start Scan" button to begin scanning your iPhone for deleted data, including photos. The software will thoroughly analyze your device to recover lost or deleted files.
Step 4: Preview and Recover Your Photos
After the scan is complete, you can preview the recoverable photos in the software interface. Select the photos you want to recover, and then click the "Recover" button. Choose a location on your computer to save the recovered photos.
If you do have a backup but want to use FoneDog iOS Data Recovery to access it, follow these steps:
Step 1: Launch FoneDog iOS Data Recovery
Open the FoneDog iOS Data Recovery tool and select "Recover from iTunes Backup File" or "Recover from iCloud Backup File," depending on where your backup is stored.
Step 2: Choose and Scan the Backup
Select the relevant backup from the list and click "Start Scan." The software will extract data from your chosen backup.
Step 3: Preview and Recover Your Photos
Once the scan is complete, you can preview the recoverable photos and choose the ones you want to restore. Click "Recover" and select a location on your computer to save the recovered photos.
FoneDog iOS Data Recovery provides a reliable solution for recovering permanently deleted photos from your iPhone, even if you don't have a backup. It's a valuable tool for safeguarding your cherished memories and ensuring they're never lost for good.
How to recover permanently deleted photos on iPhone with backup? If your photos are permanently deleted but you have a backup, you have a few good options to get them back. If you don't have a backup or the backup doesn’t include the deleted photos, FoneDog provides an alternative to recover deleted data directly from your device.
Leave a Comment
Comment

iPhone/Android Devices’ Maintenance Expert
Staying home, listening to music, writing tech articles
Many people asked me to repair their mobile phones so I have a lot of experience in mobile phone repair, and I know a lot about Android or Apple phones.
iOS Data Recovery
3 Methods to recover your deleted data from iPhone or iPad.
Free Download Free DownloadHot Articles
 /
/
INTERESTINGDULL
/
SIMPLEDIFFICULT
Thank you! Here' re your choices:
Excellent
Rating: 4.5 / 5 (based on 80 ratings)