

By Nathan E. Malpass, Last updated: May 29, 2018
What is iTunes alternative? Well, this article will give you the best answer to this issue. keep reading and find out by yourself!
Some about iTunes!
Any Apple user knows about iTunes. It is a software developed by the company to easily manage your iDevice. Aside from being a library where you can store music and videos, you can also download, play and stream media files with it.
It has also been developed wherein you can purchase ebooks which are pretty handy for bookworms who are now more on the technical side that carry iPads instead of actual books. It is also a great tool to backup that data from your device.
This proves to be handy not only if you just want to have a copy but also for purposes like when you lock yourself out, you device crashes or is broken and even when it is stolen and you want to be able to retrieve the important files you had on it.
Part 1: Some Downside from iTunes BackupPart 2: Backing up Your iOS Device Contents via iTunes.Part 3: Recovering Backed up Data via iTunesVideo Guide: What is the Best Tool for iTunes AlternativePart 4: Get Your Deleted Files Back from Your iDevice with the FoneDog ToolkitPart 5: Got your iTunes Backup? Recover Deleted Files Backed Up and RestoredPart 6: Lost Your Files? Find and Extract with the FoneDog Toolkit via iCloudPart 7: Conclusion
Encounter error sometimes you don't want
There would also be instances that you would encounter errors with iTunes that are not easily fixed, and to be honest quite frustrating.
Imagine this you are in the middle of syncing your iDevice to iTunes then an error message pops up only to make you stop with what you're doing and have you go through a whole lot just to get it going again. One of the most common error messages is error no.
54 with the message "The iTunes Library file [iPhone] cannot be synced. An unknown error occurred (-54)." This normally indicates that you are not able to sync music or pictures on your iOS device with iTunes.
There are certain fixes that you can try on your own to try to get over this hurdle. We won't dwell deeper into this for now but you can check our other articles that cover and discusses further this particular situation.
You may ask: Where is iTunes Backup Stored

Can’t preview the files created before
Although iTunes is probably your best option for backing up your data it does have a bit of a downside to it. For one let's say you have a lot of photos and videos stored on your phone and you want to create a backup copy.
iTunes will be able to backup most of it but when it comes to the ones you have in iCloud and synced files those will not be included. Also, you won't have a way to preview your backup in iTunes.
So when you want to make sure which ones are in the backup file created you would have to extract it first to check it one by one. Too much of a hassle really.
The app doesn’t back up app itself
Your app data gets backed up but not the actual app itself. What iTunes does is it creates a reference link to the App that was installed on the iDevice you backed up so that you would be able to get it automatically restored.
It would allow your new device to detect the previous apps that were backed up so that you can easily set it up.
But what if you just want to simply create a backup to secure your important data. Let us give you the step by step process to go through.
If you have access to your computer then this would work well (don't have a MAC? don't fret it works on Windows computers too). If you haven't synced your iDevice previously then you shouldn't be too concerned if you are not using your own computer.
Step 1: Plug in your iDevice to your computer using the cable that came along with it when you purchased it.
Step 2: Launch the iTunes app and after the device gets recognized it is important that you download the necessary updates if there is a need for it. So better check the Help Menu on the app to make sure.
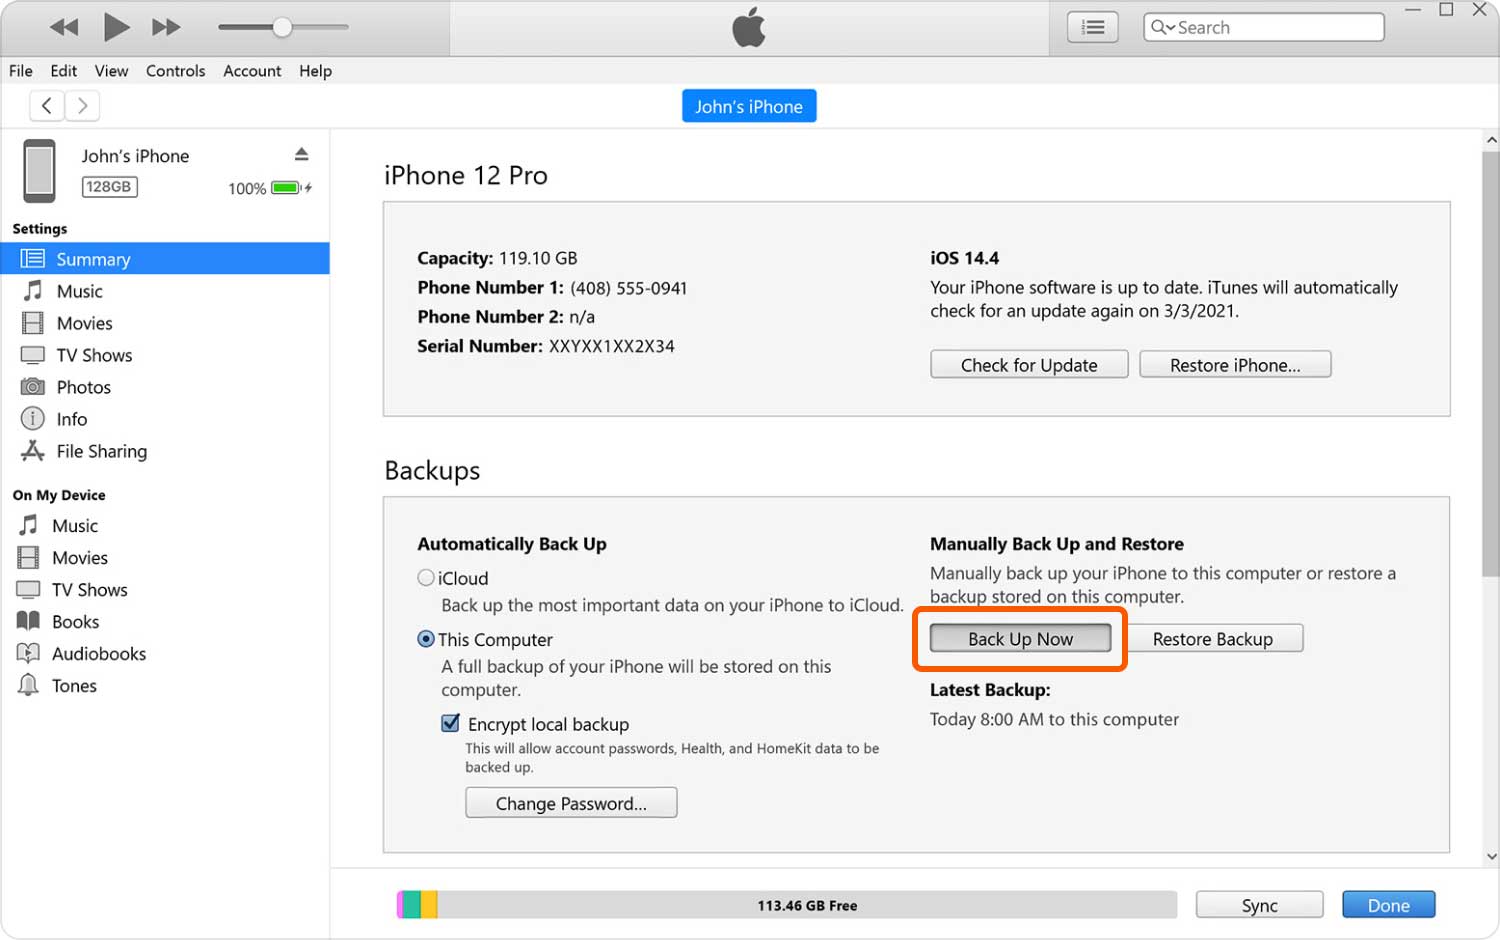
Step 3: The "Back Up Now" option can be found on the summary page. Click on it to begin the backup process.
Step 4: If you have large content that you are backing up from your device then it would definitely take some time to complete so for now wait. Once it is done you can check that file that was created by going to the "iTunes Preferences" option then select "Devices", here you would see the information regarding the latest back up that was created.
Above we provided the instructions on how to back up your device now let's go through the sequence of how to restore the data back up you created.
Important Note: You have to make sure that your iTunes has the latest update to avoid any unforeseen errors.
Step 1: Switch off your device.
Step 2: Connect it to the same computer you synced it to while you were creating your backup file. While plugging it in hold the home button until the Apple logo appears and you confirm that you see the screen that indicates you are in recovery mode, then you can release the button.
Step 3: You would then see the "Back Up Now" selection and the list of files available for you to restore. Check the latest one created before continuing with the process.
Step 4: Wait for the restoration to complete. Once it is done your device would restart. Wait for it to sync with your computer then you can unplug it once it finishes.
Pepple also like: The Best Guide: Retrieve Contacts from iTunes

The video guide shows you the best tool for the iTunes alternative, want to know more? Click on the video and watch to master the usage of the tool.
The FoneDog Toolkit-iOS Data Recovery is your Best iTunes Alternative by Far. Above we mentioned some of the disadvantages of using iTunes as your data backup go to and not to bad mouth this Apple feature, just like anything out there, it has pros and cons. One thing that we can guarantee you is that even if the FoneDog Toolkit-iOS Data Recovery is not perfect it would outperform iTunes in some of its aspects.
If let's say you would like to transfer files from one device to another, with iTunes you cannot preview and selectively choose which files you would like to backup but with the FoneDog Toolkit-iOS Data Recovery not only will you be able to pick out the ones you would like to keep and backup you can also put your mind at ease that there will be no data overwrite that will happen.
Your current settings and data won't be touched when you perform a restore with the FoneDog Toolkit-iOS Data Recovery.
Excited to try it out. Read on the to find out how easy and convenient the toolkit is to use.
Important Note: Before running the FoneDog Toolkit for iTunes Alternative make sure that your iTunes is of the latest version does not launch it at the same time to avoid syncing it automatically. Or better yet disable the automatic sync on its settings.
Step 1: Download the software and after you are done with the installation process launch the program. You can now connect your device using the cable that came with it. On the left side of the screen you would see options for this part you would need to select "Recover from iOS Device" then click on "Start Scan"

Step 2: Next thing that will happen is that the FoneDog Toolkit will now scan your iDevice for any deleted file which would take a couple of minutes so best to wait it out. If there are tons of data on your device you can actually pause the scan once you found the deleted file you are looking for.
Once it completes the scan you will now see all data that was found listed which you can now review to select which ones you would like to recover.
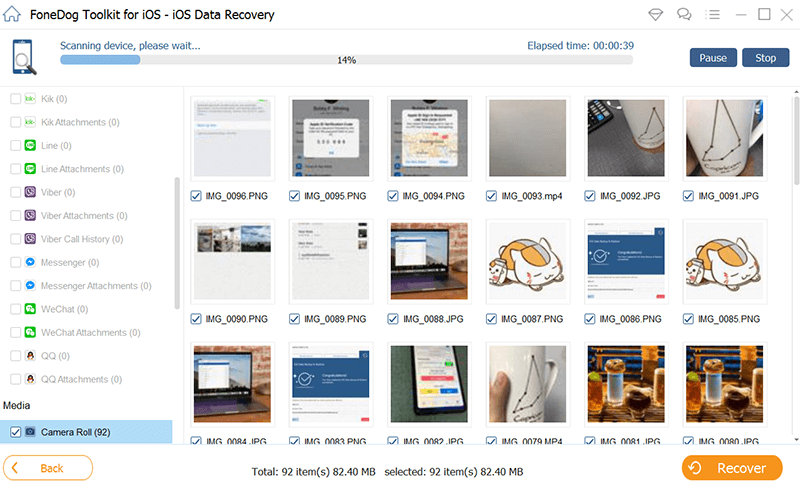
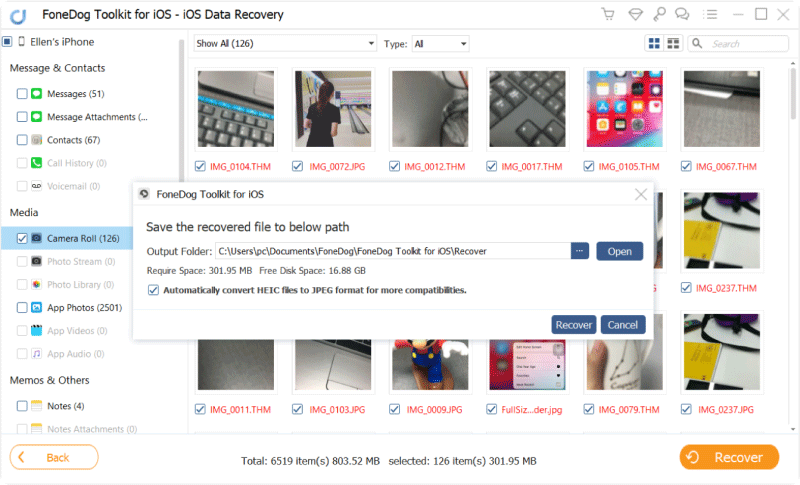
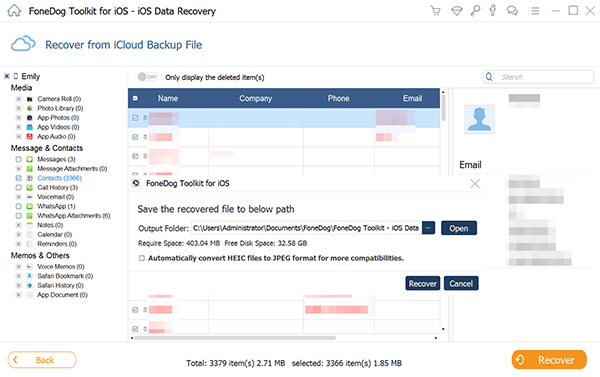
Step 3: Once you have made your selection click on the "Recover" button then choose where the folder destination will be to put your recovered files in. You can either choose to restore it to your PC or in this case your device directly.
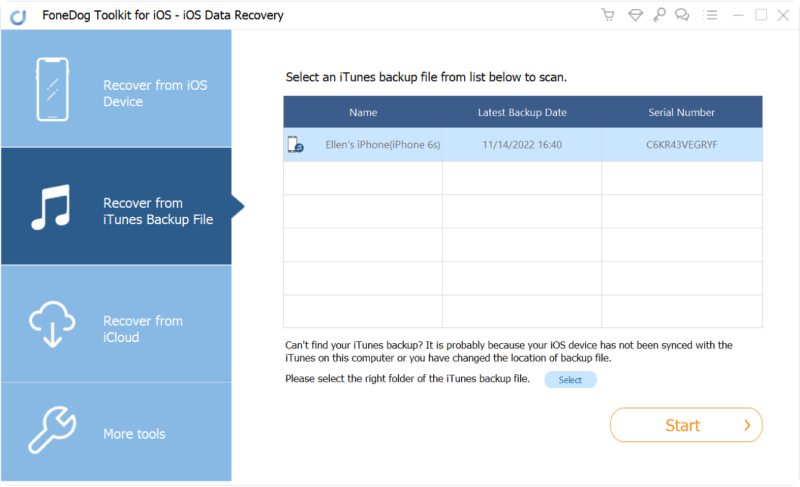
1: Launch the FoneDog Toolkit then go to iOS Data Recovery. On the next screen select "Recover from iTunes Backup File".
If you have several backup files on your computer the FoneDog Toolkit will detect all of it to make it easy for you to choose which one you need. Once you've made your choice click on "Start Scan" to begin the scanning process.
2: The scan may take a while because the FoneDog Toolkit-iOS Data Recovery will extract all the data available from the backup file you chose. Once finished you will see all the results categorized for your convenience.
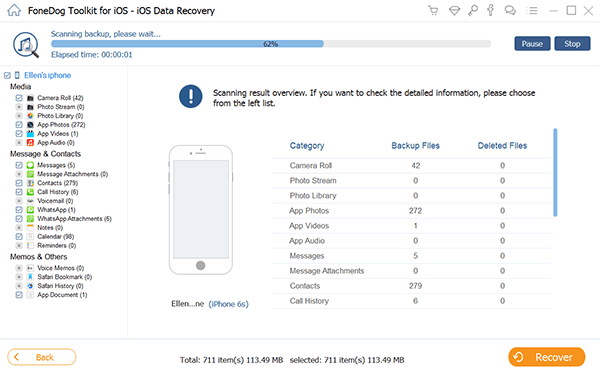
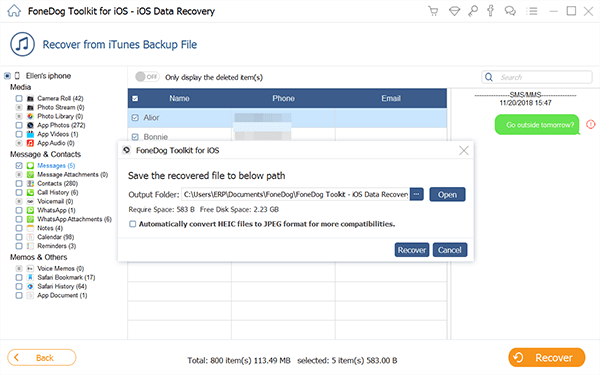
3: A Great feature of the FoneDog Toolkit-iOS Data Recover is that unlike iTunes you can preview the files that were scanned and make your selection one by one based on what you prefer. Once you have made your choice click on the "Recover" button.
Important Note: To be allowed to access your iCloud backup using the FoneDog Toolkit make sure to disable the two-step verification or two-factor authentication on your iDevice. Also, make sure that your internet connectivity is stable so that you won't experience any interruption and errors while going through the process.
#1: When you launch the program on your computer you would see the "Recover from iCloud Backup File" option on the left side, click on it. On the next screen, you will see the iCloud login page, enter your credentials to proceed. You won't need to worry about the FoneDog Toolkit storing your account information. We value your privacy and take it seriously.
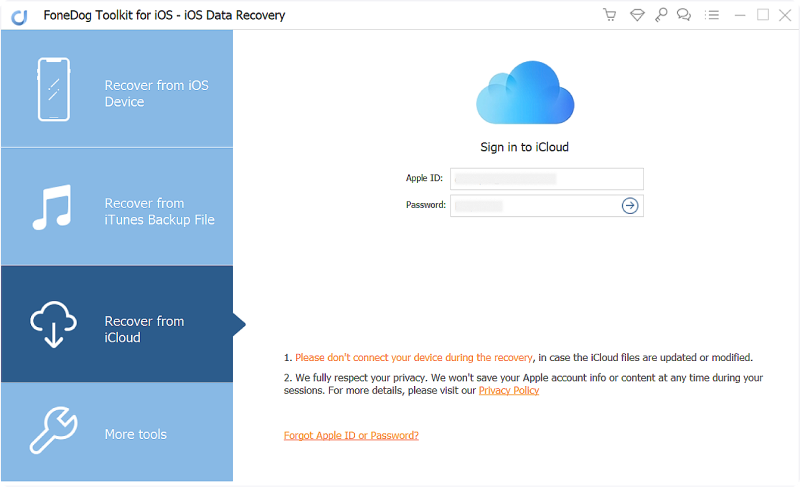
Tip: You just need to keep your network open to gain access to your iCloud backup file, meaning you would need to connect your iDevice to your computer.
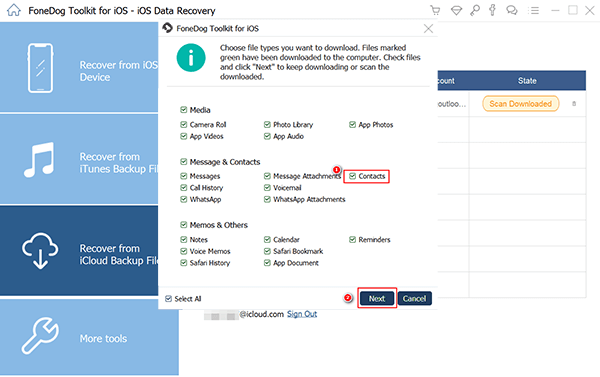
# 2: Once logged in you would be able to see all the files that have been backed up and stored in your account. You can now choose which one you would like to recover. Click on the "Download" button. On the next screen, you would be able to select the ones you would like to download in order to filter it out and lessen the amount of time that it would take to complete the iCloud recovery scan. When you click "Next" it would now begin the scan.
# 3: It may take a while to complete but not too long that you would get bored out of your wits. Once the scan completes you would be able to preview all the data available in your back up file. You can now select one by one whichever you would like to recover. After your done with your selection click "Recover" the data on your computer.
There are a lot of third-party apps out there that you may find to be an alternative to iTunes but the FoneDog Toolkit-iOS Data Recovery is by far the best in terms of success rate and efficiency. Plus who doesn't want the ability to be able to get back deleted files (may it be by accident or by some unknown error)?
Have we failed to mention the FoneDog Toolkit-iOS Data Recovery also works like a charm with the latest iOS 11 devices which includes the iPhone X, iPhone 8 and iPhone 8 Plus? So even if you have deleted files like photos, contacts, text messages and even Whats App conversations after the iOS 11 update, you can put your mind at ease that you have a way to recover them using the FoneDog Toolkit-iOS Data Recovery.
Leave a Comment
Comment
iOS Data Recovery
3 Methods to recover your deleted data from iPhone or iPad.
Free Download Free DownloadHot Articles
/
INTERESTINGDULL
/
SIMPLEDIFFICULT
Thank you! Here' re your choices:
Excellent
Rating: 4.7 / 5 (based on 78 ratings)