FoneDog Screen Recorder FoneDog Screen Recorder
Special Offer Special Offer
Only Only
$4.49 $4.49
to get a ONE-month license to get a ONE-month license
Sale ends in xx days Sale ends in xx days
Buy Now
sale

A Step-by-Step Guide on How to Restore iPad from iTunes

By Nathan E. Malpass, Last updated: August 22, 2023

Has your iPad encountered a critical error, suffered from a data loss, or simply become unresponsive? Don't worry, there's a reliable solution at hand. You can restore iPad from iTunes software. iTunes, the trusted multimedia management software from Apple, offers a powerful tool for restoring your iPad to its previous working state.

Whether you're facing a software glitch, want to recover deleted files, or need to erase everything from your iPad, iTunes provides a straightforward process to restore your device. In this article, we will walk you through the step-by-step instructions on how to restore your iPad from iTunes, ensuring a hassle-free experience and giving you peace of mind. So, let's dive in and bring your iPad back to life!

Part #1: What Is the Benefit of Restoring Your iPad from iTunes?Part #2: What to Do Before You Restore iPad from iTunes: Necessary PrerequisitesPart #3: How to Restore iPad from iTunesPart #4: The Best Tool to Restore from iTunes without Factory ResettingConclusion

Part #1: What Is the Benefit of Restoring Your iPad from iTunes?

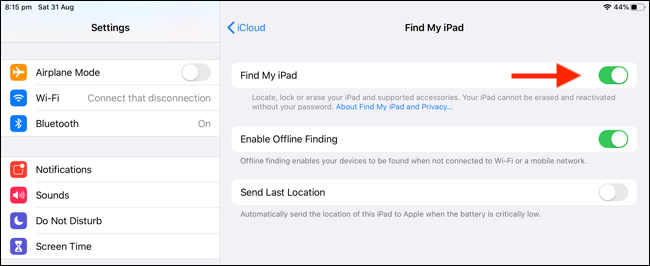
There are some reasons why you may want to restore iPad from iTunes. Especially when you can not restore iPad using iCloud backups. Restoring your iPad to its factory state using iTunes can be a powerful solution for a variety of reasons. Let's explore some common scenarios where restoring your iPad becomes necessary:

Resolving Software Issues:

Over time, your iPad may start experiencing software glitches, freezing, or crashes that impact its performance. These issues can be frustrating and hinder your overall user experience. By restoring your iPad from iTunes, you can wipe out any software-related problems and start afresh with a clean operating system installation.

Data Loss And Recovery:

Accidental deletion of important files or a system crash can lead to data loss on your iPad. Fortunately, restoring your iPad from an iTunes backup can help recover lost data, including contacts, photos, videos, messages, and app data. By restoring to a previous backup, you can retrieve your valuable information and ensure it remains intact.

Selling Or Passing on Your iPad:

If you're planning to sell or hand down your iPad to someone else, it's crucial to remove all personal data and ensure a clean slate. Remember to restore iPad from iTunes to its factory state and erases all your personal information, accounts, and settings, safeguarding your privacy and providing a fresh start for the new owner.

Performance Optimization:

Over time, your iPad may accumulate temporary files, unnecessary apps, and fragmented data, which can slow down its performance. By restoring your iPad to its factory state, you eliminate the clutter, remove unwanted apps, and improve overall system responsiveness, giving your device a performance boost.

Troubleshooting Persistent Issues:

If you've exhausted other troubleshooting methods and still encounter persistent issues on your iPad, restoring from iTunes can often be the last resort. It helps to eliminate complex or unknown problems by reinstalling the iOS software from scratch, giving you a clean slate to work with.

Part #2: What to Do Before You Restore iPad from iTunes: Necessary Prerequisites

Before you proceed to restore iPad from iTunes, there are a few essential prerequisites that you need to consider. These steps ensure a smooth restoration process and help safeguard your data. Let's take a look at what you should do before initiating the restore:

  1. Backup Your iPad: Restoring your iPad erases all data and settings, so it’s crucial to create a backup of your device before proceeding. Backing up your iPad ensures that you can easily restore your personal data, including photos, contacts, messages, and app data after the restoration is complete. You can create a backup using iCloud or iTunes itself. If you're able to access iTunes backup data, an iTunes backup is recommended.
  2. Update iTunes to the Latest Version: To ensure compatibility and a seamless restoration process, make sure you have the latest version of iTunes installed on your computer. Open iTunes and navigate to the Help menu to check for updates. Follow the instructions to install any available updates before proceeding with the restore.
  3. Disable Find My iPad: It’s important to disable the Find My iPad feature before initiating the restoration. This security feature prevents unauthorized access to your device and can interfere with the restore process. To turn off Find My iPad, go to Settings on your iPad, tap on your Apple ID at the top, select iCloud, and then toggle off the Find My iPad option. You may be prompted to enter your Apple ID password for verification.
  4. Connect Your iPad to Your Computer: Use the appropriate USB cable to connect your iPad to the computer that has iTunes installed. Make sure to use a reliable cable and connect it directly to a USB port on your computer. Avoid using USB hubs or extensions, as they may cause connectivity issues during the restore process.
  5. Disable Passcode and Touch/Face ID: For a hassle-free restoration, it’s recommended to disable any passcode, Touch ID, or Face ID authentication on your iPad. This ensures that the restore process can proceed smoothly without any authentication interruptions. Head to Settings, select Face ID & Passcode or Touch ID & Passcode and choose Turn Passcode Off.

Before You Restore iPad from iTunes: Necessary Prerequisites

By completing these necessary prerequisites, you're now ready to initiate the restoration process using iTunes. Taking these steps ensures that your data is backed up, your device is ready for the restore, and any potential hindrances are addressed. In the next part of this article, we will guide you through the step-by-step process of restoring your iPad from iTunes.

Part #3: How to Restore iPad from iTunes

Now that you have completed the necessary prerequisites, you're ready to restore iPad from iTunes. Follow the step-by-step instructions below to initiate the restoration process:

  1. Launch iTunes: Open the iTunes application on your computer. Ensure that you have the latest version installed. If prompted, sign in with your Apple ID.
  2. Connect Your iPad: Use a USB cable to connect your iPad to the computer. Make sure to use a reliable cable and connect it directly to a USB port on your computer.
  3. Trust the Computer: If this is the first time you’re connecting your iPad to the computer, you may need to trust the computer on your iPad. Unlock your iPad and, when prompted, tap “Trust” on the iPad’s screen to establish the connection.
  4. Select Your iPad: In iTunes, you should see your iPad icon appear near the top-left corner of the window. Click on the icon to access your device’s Summary page.
  5. Backup (Optional): Before proceeding with the restore, it’s highly recommended to create a backup of your iPad. Under the “Backups” section, click on “Back Up Now” to initiate a manual backup. This step ensures that you can restore your personal data after the restoration process is complete.
  6. Restore iPad: In the Summary tab of your iPad’s page, you will find the “Restore iPad” button. Click on it to begin the restoration process. A prompt will appear, asking if you want to proceed with the restore. Click “Restore” to confirm.
  7. iTunes Restore Process: iTunes will now proceed to restore your iPad to its factory settings. It will erase all data and settings on your device. Ensure that you have a stable internet connection as iTunes may need to download the latest iOS software during the restore process.
  8. Set Up Your iPad: Once the restore process is complete, your iPad will restart and display the “Hello” screen, indicating that it has been restored successfully. Follow the on-screen instructions on your iPad to set up your device as a new iPad or restore it from a backup.
  9. Restore from Backup (Optional): If you created a backup earlier, you will have the option to restore your personal data during the setup process. Choose the appropriate backup from iTunes and follow the prompts to restore your apps, settings, and data.
  10. Complete the Setup: After the restore and optional data restoration, complete the setup process on your iPad by following the on-screen instructions. You may be prompted to sign in with your Apple ID, configure settings, and enable features such as iCloud, Siri, and App Store downloads.

Restore iPad from iTunes

By following these steps, you can successfully restore your iPad from iTunes. Whether you're troubleshooting issues, recovering data, or preparing your device for sale, the restore process helps bring your iPad back to its factory state, providing a fresh start.

Part #4: The Best Tool to Restore from iTunes without Factory Resetting

Experiencing data loss on your iPad can be a distressing situation. However, there is a solution that can help you recover your lost files without the need to reset your iPad. FoneDog iOS Data Recovery is a reliable software tool that specializes in recovering various types of data from iOS devices, including iPads.

iOS Data Recovery Recover photos, videos, contacts, messages, call logs, WhatsApp data, and more. Recover data from iPhone, iTunes and iCloud. Compatible with latest iPhone and iOS. Free Download Free Download FoneDog iOS Data Recovery

Here’s how to use the tool to restore iPad from iTunes:

  1. Download and Install FoneDog iOS Data Recovery: Visit the official website of FoneDog iOS Data Recovery and download the software compatible with your computer’s operating system. Follow the on-screen instructions to install it.
  2. Launch FoneDog iOS Data Recovery: After installation, launch the FoneDog iOS Data Recovery software on your computer.
  3. Connect Your iPad to the computer: Use a USB cable to connect your iPad to the computer. Ensure that the FoneDog iOS Data Recovery software detects your device.
  4. Choose Recovery Mode: FoneDog iOS Data Recovery offers three recovery modes: “Recover from iOS Device,” “Recover from iTunes Backup File,” and “Recover from iCloud Backup File.” Select the appropriate mode based on your situation.
  • If you want to recover directly from your iPad, choose “Recover from iOS Device”.
  • If you have previously created an iTunes backup, choose “Recover from iTunes Backup File”.
  • If you have an iCloud backup, choose “Recover from iCloud Backup File”.
  1. Scan Your iPad for Lost Data: After selecting the recovery mode, FoneDog iOS Data Recovery will start scanning your iPad or the selected backup file to find the lost data. The scanning process may take some time, depending on the size of the data.
  2. Preview and Select the Desired Files: Once the scanning is complete, FoneDog iOS Data Recovery will display a list of recoverable files. You can preview them and select the specific files you want to recover. You can choose categories like photos, videos, messages, contacts, etc.
  3. Start Data Recovery: After selecting the desired files, click on the “Recover” button to initiate the data recovery process. Choose a location on your computer where you want to save the recovered files.

The Best Tool to Restore from iTunes without Factory Resetting

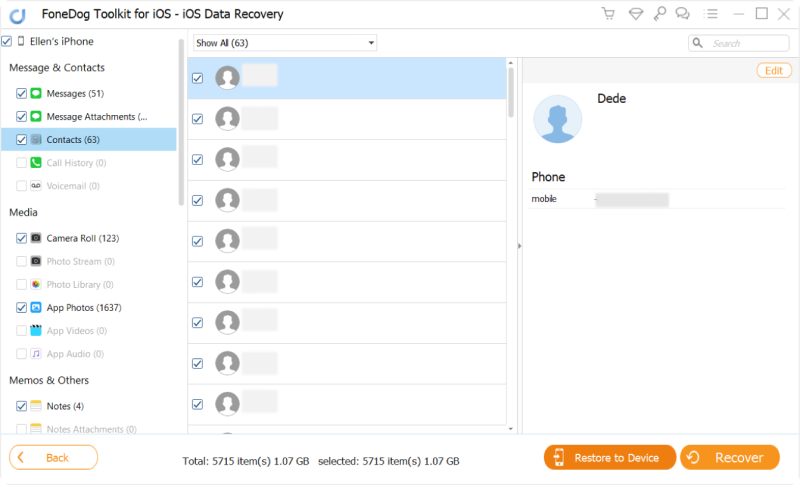
Using FoneDog iOS Data Recovery provides a convenient alternative to resetting your iPad when faced with data loss. By leveraging its powerful features, you can recover your valuable files without erasing your device's data and settings.

Remember, it's crucial to act promptly when data loss occurs to increase the chances of successful recovery. Avoid using your iPad extensively to prevent overwriting the lost data and consider using FoneDog iOS Data Recovery as soon as possible.

People Also Read2023 Guide: How to Recover Lost iPad Bookmarks?Top 4 iPad Photo Recovery Software in 2023!

Conclusion

In conclusion, FoneDog iOS Data Recovery offers a reliable and efficient solution for recovering lost data from your iPad or iOS device. By utilizing this tool to restore iPad from iTunes, you can avoid the need to reset your iPad and regain access to your valuable files.

Leave a Comment

Comment

Comment ()
author image

Nathan E. Malpass

iPhone/Android Devices’ Maintenance Expert

Staying home, listening to music, writing tech articles

Many people asked me to repair their mobile phones so I have a lot of experience in mobile phone repair, and I know a lot about Android or Apple phones.

iOS Data Recovery logo

iOS Data Recovery

3 Methods to recover your deleted data from iPhone or iPad.

Free Download Free Download

How Do You Like This Article?

Check icon/ Check icon

INTERESTINGDULL

Check icon/ Check icon

SIMPLEDIFFICULT

Thank you! Here' re your choices:

Rate This Article: Excellent

Rating: 4.5 / 5 (based on 108 ratings)

iOS Data Recovery logo

iOS Data Recovery

3 Methods to recover your deleted data from iPhone or iPad.

Free Download Free Download

FoneDog uses cookies to ensure you get the best experience on our website. Click here to learn more.