FoneDog Screen Recorder
FoneDog Screen Recorder
Special Offer
Special Offer


By Nathan E. Malpass, Last updated: May 30, 2024
Switching to a new Samsung device can be an exciting experience, but the task of transferring all your important data and files can often seem daunting. While Samsung's Smart Switch application is a convenient tool for data transfer, there are times when it might not be available or suitable for your needs. Perhaps you're facing compatibility issues, or you simply prefer an alternative method.
Fear not! In this comprehensive guide, we'll walk you through the process on how to transfer data from Samsung to Samsung without Smart Switch. Whether you're upgrading to the latest Samsung Galaxy device or simply want to share your data with a friend or family member, we've got you covered. By the end of this article, you'll be equipped with the knowledge and tools to make the transition smooth and hassle-free. Let's get started!
Part 1. How to Transfer Data from Samsung to Samsung without Smart SwitchPart 2. How to Transfer Data from Samsung to Samsung without Smart Switch Using FoneDog Phone TransferPart 3. Summary
Samsung Cloud offers a convenient and secure way to back up and restore your data when switching to a new Samsung device. This method is particularly useful if you've been regularly backing up your data to Samsung Cloud. Here's how to transfer your data seamlessly:
Ensure that your old Samsung device is connected to a Wi-Fi network and has been previously configured to back up data to Samsung Cloud. You can check this in the device settings under "Accounts and Backup."
Open the "Settings" app on your source Samsung device. Scroll down and select "Accounts and Backup." Tap on "Samsung Cloud" and then "Backup settings." Choose the data types you want to back up, such as contacts, photos, videos, and more. Tap "Back up now" to initiate the backup process. Make sure your device remains connected to Wi-Fi until the backup is complete.

Power on your new Samsung device and go through the initial setup. When prompted, sign in with the same Samsung account that you used for the backup on your source device.
During the setup process of your new Samsung device, you'll be asked if you want to restore data from a previous device. Select "Restore." Choose the most recent backup from your old Samsung device. Select the types of data you want to restore (e.g., contacts, photos, apps). Tap "Restore now" to begin the data transfer.
The time it takes to complete the transfer depends on the amount of data you're restoring. Ensure that your new device stays connected to Wi-Fi and has sufficient battery life to avoid interruptions.
Once the transfer is finished, go through your new Samsung device to make sure all your data has been successfully restored. You should find your contacts, photos, apps, and more exactly as they were on your old device.
Using Samsung Cloud Backup Restoration is a straightforward and reliable way to transfer your data without Smart Switch. However, it's essential to maintain regular backups on your old device to ensure a smooth transition to your new Samsung device.
Transferring data via email is a quick and effective method, especially for individual photos, files, or videos. Follow these steps to send your data from one Samsung device to another using email:
On your source Samsung device, open the email application of your choice. This could be the Samsung Email app, Gmail, Outlook, or any other email app you have set up.
Tap the "Compose" or "New" button to create a new email message.
In the recipient field, enter the email address associated with your new Samsung device. Ensure it is correct to avoid sending your data to the wrong recipient.
Look for an attachment icon (usually depicted as a paperclip) in your email app and tap it. Browse your device's storage to select the photos, files, or videos you want to transfer. Once you've selected the data you want to send, tap "Attach" or a similar option to add the files to your email.
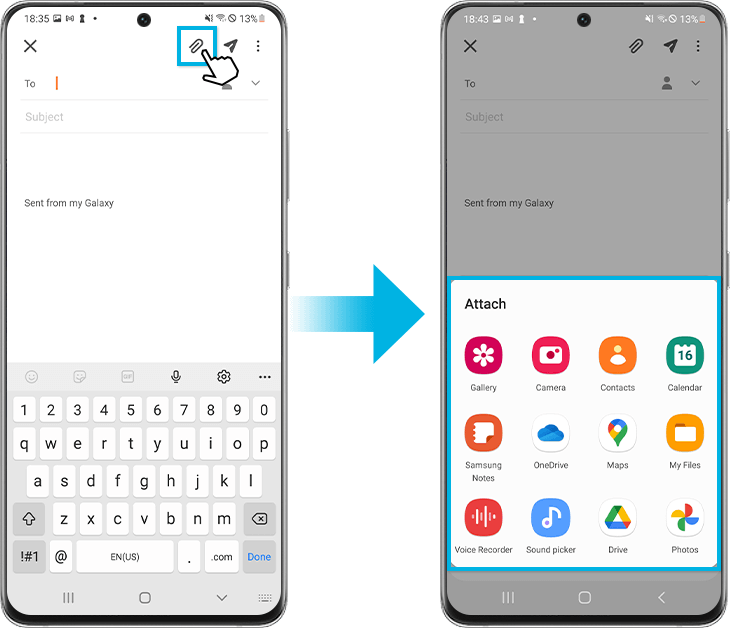
You can add a subject and message to the email if desired, but this is optional.
Tap the "Send" button to send the email with the attached files to your new Samsung device's email address.
On your new Samsung device, open the email app and check your inbox for the email you just sent. Open the email, and you'll find the attached files.
Open the email with the attached files on your new device. Download the attached files to your new device's storage. Depending on the file type, you can save them to the appropriate folders (e.g., photos to the Gallery, documents to Documents, videos to Videos).
This method is excellent for sending specific files quickly. However, it may not be the most efficient option for transferring a large volume of data due to email attachment size limitations. In such cases, consider using cloud storage services like Google Drive, Dropbox, or OneDrive, which allow you to upload your files and access them from both devices with ease.
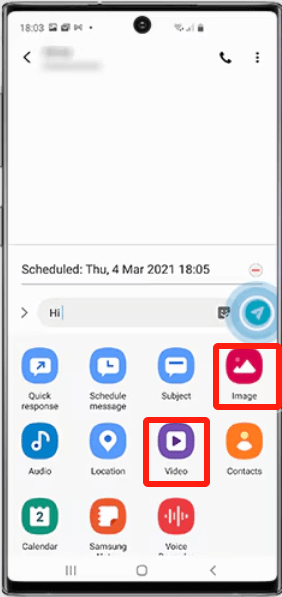
Messaging apps are a convenient way to transfer photos, files, and videos from one Samsung device to another, especially when you want to send multiple items at once. Follow these steps to use messaging apps for data transfer:
Select a messaging app that you and the recipient have installed and are comfortable using. Popular options include WhatsApp, Facebook Messenger, Telegram, and Signal.
On your source Samsung device, open the chosen messaging app.
Begin a conversation with the recipient, which, in this case, would be yourself or the other Samsung device you want to transfer data to. If you haven't already, you may need to add the recipient's contact or phone number.
Look for an attachment icon, typically represented as a paperclip or camera icon, and tap it. Select the photos, files, or videos you want to transfer from your device's storage.
After attaching the files, tap the "Send" or "Share" button to send the data to the recipient.
On your new Samsung device, open the same messaging app and navigate to the conversation where you sent the data.
Tap on the received photos, files, or videos to download them to your new device's storage. Depending on the file type, you can save them to the appropriate folders (e.g., photos to the Gallery, documents to Documents, videos to Videos).
Using messaging apps for data transfer is convenient and efficient, especially for sharing files with friends, family, or yourself on another device. However, keep in mind that some messaging apps may have limitations on the size and type of files you can send, so larger files may require an alternative method, such as cloud storage or a USB connection.
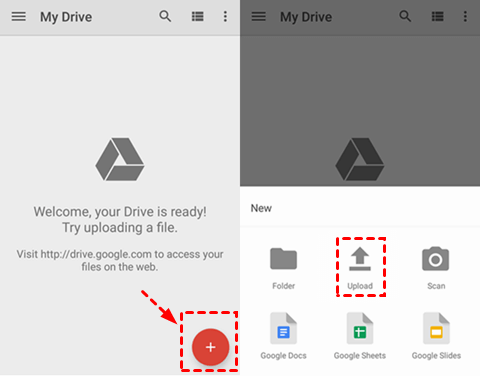
Google Drive is an excellent cloud storage service that allows you to store and share files easily. You can use it to transfer photos, files, and videos from one Samsung device to another. Here's how:
Ensure that Google Drive is installed on both your source and target Samsung devices. You can download it from the Google Play Store if it's not already installed.
Open the Google Drive app on your source Samsung device. Sign in with your Google account or create one if you don't have an account already.
Tap the "+" or "Add" button in the Google Drive app. Select the type of data you want to upload (e.g., Photos, Files, Videos). Browse your device's storage and select the items you want to transfer. Tap the "Upload" button to upload the selected data to your Google Drive account.
On your new Samsung device, open the Google Drive app. Sign in with the same Google account you used on your source device.
In the Google Drive app on your new device, navigate to the files or folders you uploaded from your source device. Tap on the files you want to transfer. Tap the download icon to save the files to your new device's storage.
Depending on the file type, you may need to move the downloaded files to the appropriate folders on your new Samsung device (e.g., photos to the Gallery, documents to Documents, videos to Videos).
Google Drive provides a convenient and efficient way to transfer data between Samsung devices, and it's especially useful for larger files and when you want to access your files from anywhere. Just ensure you have a stable internet connection while uploading and downloading files from Google Drive.
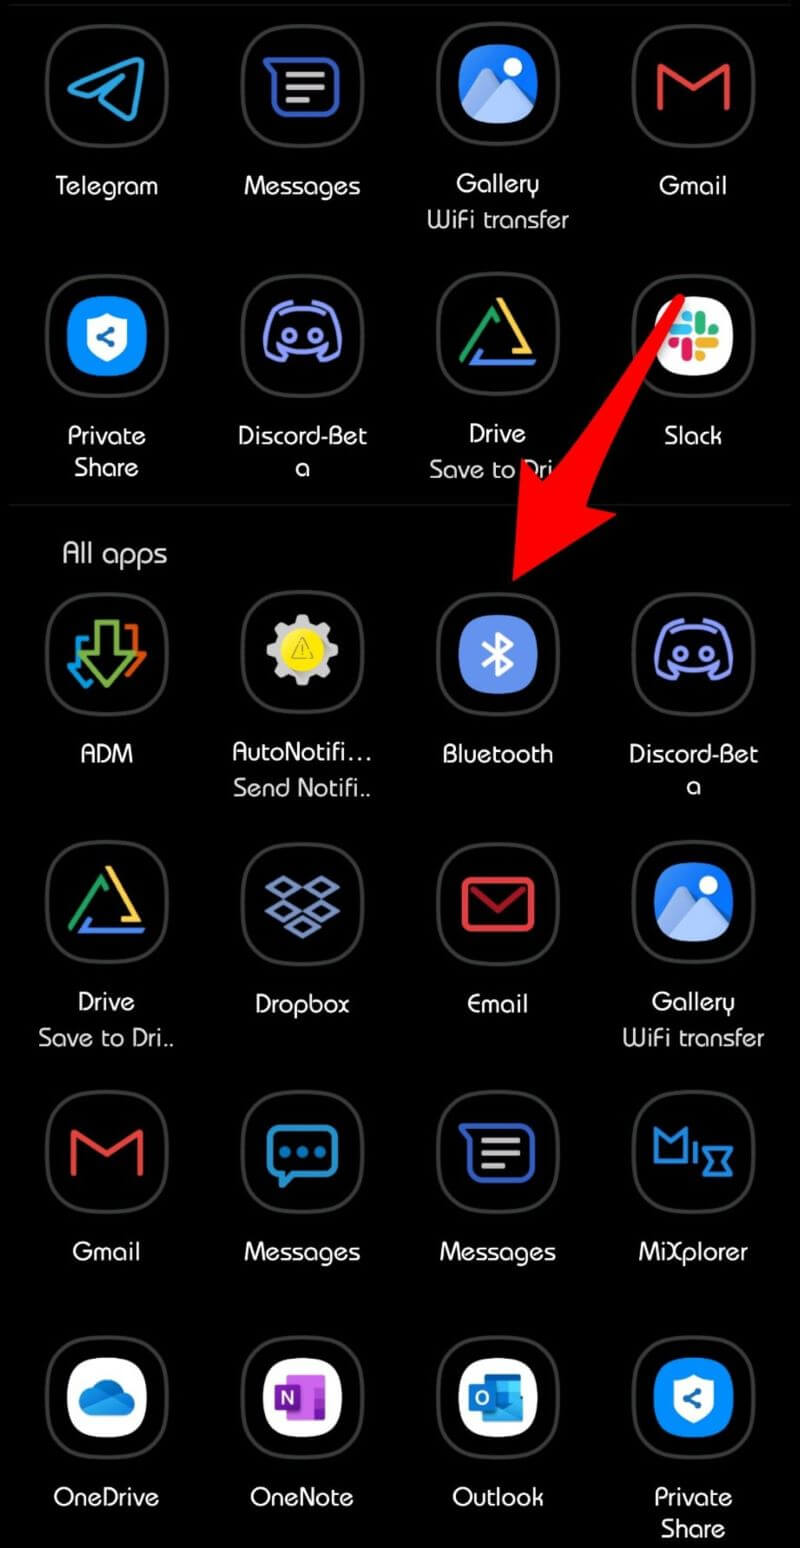
Bluetooth is a wireless technology that allows you to transfer data between Samsung devices in close proximity. Here's how to use Bluetooth for data transfer:
On both your source and target Samsung devices, make sure Bluetooth is turned on: Source Device: Open the "Settings" app, go to "Connections" or "Bluetooth," and enable Bluetooth.
Target Device: Do the same on your new Samsung device.
On your source device, go to "Bluetooth" settings, and you'll see a list of available devices. On your new Samsung device, search for nearby devices. Your source device should appear in the list of available devices. Tap on your source device's name to initiate the pairing process. You may be prompted to confirm the pairing on both devices. Confirm on each device to establish the connection.
On your source device, open the file or photo you want to transfer. Look for the "Send via Bluetooth" or "Send via Bluetooth Device" option in the sharing menu (usually represented by three dots or a share icon). Select your paired target device from the list. Confirm the transfer on your source device.
On your new Samsung device, you should receive a notification or prompt asking if you want to accept the incoming Bluetooth transfer. Confirm the transfer on your target device.
The time it takes to transfer data via Bluetooth depends on the file size and the Bluetooth version of your devices. Be patient and ensure both devices remain within close proximity during the transfer.
Once the transfer is complete, check your target device to ensure the data has been received successfully. Depending on the type of data, you may need to move or open it in the appropriate apps or folders.
Using Bluetooth for data transfer is a straightforward method, especially for smaller files and photos. However, it may not be the fastest option for transferring large volumes of data, so keep that in mind when choosing this method.
Transferring data between Samsung devices using a USB cable is one of the fastest and most reliable methods. This method works well for transferring a wide range of data types, including photos, videos, documents, and more. Here's how to do it:
You will need a USB cable compatible with your Samsung devices. Most modern Samsung devices use USB Type-C or Micro-USB connectors. Ensure you have the appropriate USB cable for both devices.
Power off both your source and target Samsung devices. Connect one end of the USB cable to the USB port on your source device. Connect the other end of the USB cable to the USB port on your new Samsung device.
Turn on your source Samsung device. The target device can remain off for now.
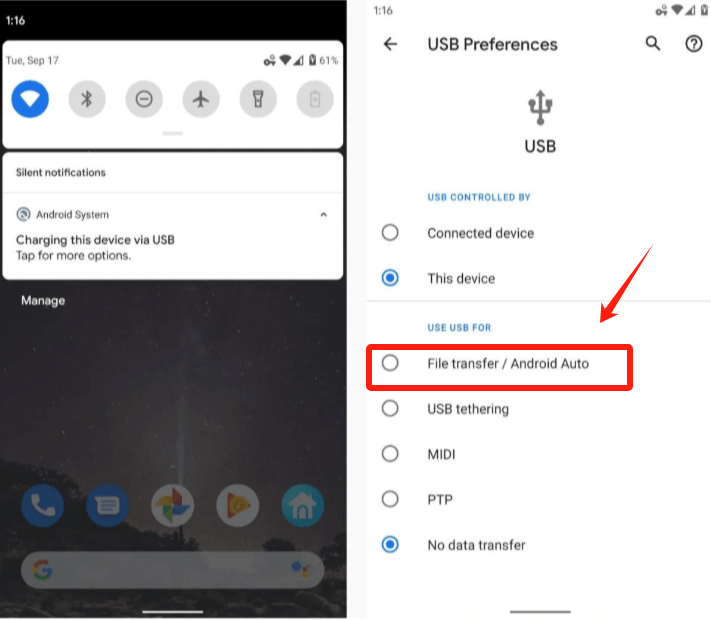
On your source device, unlock the screen. A notification may appear on your source device, indicating that it's connected via USB. Tap on this notification. Select the option for "File Transfer" or "MTP" mode. This allows your source device to be recognized as a storage device by your new device.
Power on your new Samsung device. Unlock the screen and connect it to the USB cable. On your new device, a notification may appear, indicating that it has detected the source device. Tap on this notification or go to the "My Files" or "File Manager" app on your new device.
In the file manager on your new device, navigate to the files you want to transfer from the source device. Copy or cut the files. Go to the location on your new device where you want to paste the copied files. Paste the files.
The time it takes to transfer data via USB depends on the size and number of files. Ensure both devices remain connected throughout the transfer process.
Once the transfer is complete, check your new Samsung device to ensure the data has been successfully transferred. Depending on the type of data, you may need to move or open it in the appropriate apps or folders.
Using a USB cable is an efficient method for transferring data between Samsung devices, especially when dealing with large files or a substantial amount of data. It provides a direct and secure connection, ensuring your data remains intact during the transfer.
FoneDog Phone Transfer is a reliable and efficient data transfer solution that enables users to move their contacts, messages, photos, videos, music, and more from one Samsung device to another with ease. This tool is compatible with various Android and iOS devices, making it a versatile choice for data migration across different platforms.
Phone Transfer
Transfer files among iOS, Android and Windows PC.
Transfer and backup text messages, contacts, photos, video, music on computer easily.
Fully compatible with the latest iOS and Android.
Free Download

Follow these steps to transfer data from one Samsung device to another using FoneDog Phone Transfer:
Visit the official FoneDog website and download FoneDog Phone Transfer. Install the software on your computer.
Launch FoneDog Phone Transfer on your computer.
Connect both your source and target Samsung devices to your computer using USB cables.
On each Samsung device, follow the on-screen instructions to enable USB debugging mode. This allows FoneDog Phone Transfer to access your devices.

After successful device detection, you can choose the types of data you want to transfer, such as contacts, messages, photos, and more.
Click the "Start Transfer" button to initiate the data transfer process. Ensure that both devices remain connected during the transfer.

Once the transfer is complete, verify that your data has been successfully transferred to your new Samsung device.
FoneDog Phone Transfer streamlines the data transfer process, making it a valuable tool for anyone looking to switch to a new Samsung device without the need for Smart Switch. Its user-friendly interface, cross-platform compatibility, and ability to transfer a wide range of data types make it a reliable choice for data migration.
People Also Read6 Ways On How To Transfer Photos From Samsung Galaxy S8 To ComputerA Complete Guide On How To Transfer Contacts From Samsung To Samsung
In this comprehensive guide, we explored various methods to transfer data from one Samsung device to another without relying on Samsung Smart Switch. Whether you prefer using cloud services like Samsung Cloud, email and messaging apps, Bluetooth, USB cables, or specialized software like FoneDog Phone Transfer, you have a range of options to suit your specific needs.
Each method has its advantages, from simplicity and speed to versatility and reliability. By choosing the method that best aligns with your requirements, you can ensure a smooth and successful data transfer experience when upgrading or switching Samsung devices.
Leave a Comment
Comment

iPhone/Android Devices’ Maintenance Expert
Staying home, listening to music, writing tech articles
Many people asked me to repair their mobile phones so I have a lot of experience in mobile phone repair, and I know a lot about Android or Apple phones.
Phone Transfer
Transfer data from iPhone, Android, iOS, and Computer to Anywhere without any loss with FoneDog Phone Transfer. Such as photo, messages, contacts, music, etc.
Free DownloadHot Articles
 /
/
INTERESTINGDULL
/
SIMPLEDIFFICULT
Thank you! Here' re your choices:
Excellent
Rating: 4.7 / 5 (based on 76 ratings)
