FoneDog Screen Recorder FoneDog Screen Recorder
Special Offer Special Offer
Only Only
$4.49 $4.49
to get a ONE-month license to get a ONE-month license
Sale ends in xx days Sale ends in xx days
Buy Now
sale

How to Transfer Everything from One iPhone to Another [2023]

By Nathan E. Malpass, Last updated: September 1, 2023

Upgrading to a new iPhone is an exciting endeavor, whether you're moving from an older model to the latest release or simply looking for an enhanced mobile experience. However, without the proper tool, you might be stuck on Transferring Error while trying to move to iOS.

Fret not, as in today's interconnected digital world, implementing how to transfer everything from one iPhone to another has become more streamlined and user-friendly than ever before.

Gone are the days of manually moving contacts, photos, and apps one by one. With the advent of advanced technologies and intuitive user interfaces, the process of transferring your digital life from one device to another has evolved into a smooth and efficient operation.

In this article, we'll walk you through a step-by-step guide on how to seamlessly transfer everything from your old iPhone to a shiny new one. From your favorite apps and cherished memories to personalized settings, we've got you covered, ensuring that your transition is as effortless as it is exciting. Let's dive into the world of hassle-free iPhone migration.

Part #1: Runner-Up Methods: How to Transfer Everything from One iPhone to AnotherPart #2: The Best Tool on How to Transfer Everything from One iPhone to Another: FoneDog Phone TransferConclusion

Part #1: Runner-Up Methods: How to Transfer Everything from One iPhone to Another

Method #1: Using Your iCloud Backup

When it comes to transferring everything from your old iPhone to a new one, iCloud backup is a tried-and-true method that offers convenience and simplicity. iCloud is Apple's cloud-based storage service that allows you to securely back up your device's data and settings.

Follow these steps how to transfer everything from one iPhone to another using iCloud:
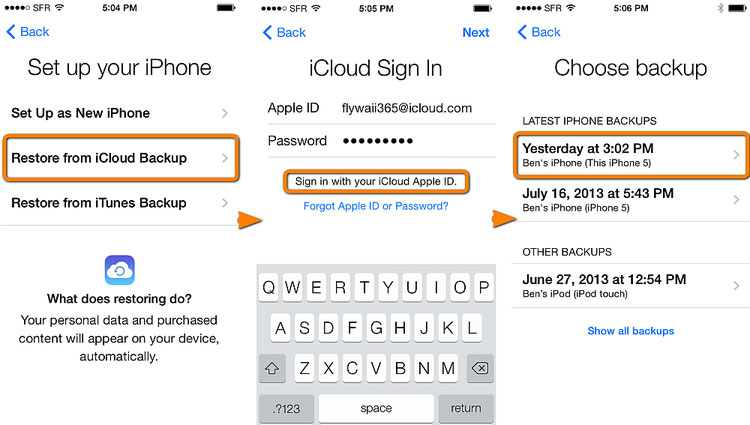
  1. Backup Your Old iPhone: Before you begin the transfer process, make sure your old iPhone is connected to Wi-Fi and has enough battery life or is plugged in. Navigate to “Settings” > [Your Name] > “iCloud” > “iCloud Backup”. Tap “Back Up Now” to initiate a manual backup. This step ensures that your most recent data is saved in iCloud.
  2. Set Up Your New iPhone: Power on your new iPhone and follow the initial setup instructions until you reach the “Apps & Data” screen. Choose “Restore from iCloud Backup” and sign in with your Apple ID.
  3. Select the Backup: A list of available iCloud backups will be displayed. Choose the most recent backup that you created with your old iPhone.
  4. Transfer Process: Your new iPhone will begin the transfer process. This may take some time depending on the size of the backup and your internet connection speed. Ensure that your new iPhone is connected to Wi-Fi during this step.
  5. Complete the Setup: Once the transfer is complete, your new iPhone will restart and begin restoring your apps, data, and settings from the iCloud backup. Follow the on-screen instructions to complete the setup.
  6. Stay Connected: Keep your new iPhone connected to Wi-Fi and connected to a power source until the entire process is finished. This will ensure a smooth and uninterrupted data transfer.

Transfer Everything from One iPhone to Another Using iCloud

Using iCloud backup to transfer everything from your old iPhone to a new one is a user-friendly method that ensures a seamless transition. However, if you're looking for alternatives or have specific requirements, stay tuned for our exploration of other runner-up methods in the upcoming sections.

Method #2: Using iTunes Backup

While iCloud backup is a popular choice, some users prefer the reliability of iTunes for transferring everything from one iPhone to another. iTunes provides a local backup option that can be particularly useful if you have limited iCloud storage or want a more hands-on approach.

Here's how to use iTunes to transfer your data:

  1. Create an iTunes Backup: Start by connecting your old iPhone to your computer using a USB cable. Open iTunes if it doesn’t launch automatically. Select your device when it appears in iTunes and click on “Back Up Now”. This creates a full backup of your old iPhone on your computer.
  2. Prepare Your New iPhone: Power on your new iPhone and follow the initial setup until you reach the “Apps & Data” screen. Choose “Restore from iTunes Backup”.
  3. Connect Your New iPhone: Connect your new iPhone to the same computer that you used to create the iTunes backup of your old iPhone.
  4. Select the Backup: iTunes will detect your new iPhone and prompt you to restore from a backup. Choose the backup that corresponds to your old iPhone from the list displayed.
  5. Initiate the Transfer: Click “Continue” to initiate the transfer process. iTunes will restore your apps, settings, and data from the selected backup to your new iPhone.
  6. Wait for Completion: The transfer process may take some time, especially if you have a large amount of data. Ensure that both your computer and new iPhone remain connected during this time.
  7. Complete the Setup: Once the transfer is finished, your new iPhone will restart and prompt you to complete the setup. Follow the on-screen instructions to finalize the process.

Transfer Everything from One iPhone to Another Using iTunes

Using iTunes backup for transferring everything from your old iPhone to a new one offers a reliable and localized approach. It's an excellent choice for those who prefer to have their data stored locally and want to avoid potential cloud-related concerns. In the next sections, we'll explore additional methods to cater to different preferences and needs.

Method #3: Using AirDrop

When it comes to quick and wireless transfers between iPhones, AirDrop is a standout option. AirDrop allows you to share various types of content, including apps, photos, contacts, and more, directly between devices. While it might not transfer everything in one go, it's a useful method for transferring specific items swiftly.

Here's how to transfer everything from one iPhone to another using AirDrop:

    1. Prepare Both iPhones: Ensure that both your old and new iPhones have Wi-Fi and Bluetooth enabled. Also, make sure that AirDrop is enabled on both devices. You can do this by going to “Settings” > “General” > “AirDrop”.
  1. Select Items to Transfer: On your old iPhone, open the app containing the items you want to transfer. For example, if you want to transfer photos, open the Photos app. Select the specific items you want to transfer.
  2. Initiate AirDrop: Tap the “Share” button (usually represented by a square with an arrow) on your old iPhone while the selected items are highlighted. A list of available AirDrop recipients will appear.
  3. Choose Your New iPhone: Your new iPhone should appear in the list of AirDrop recipients. Tap on its icon to send the selected items.
  4. Accept AirDrop on New iPhone: On your new iPhone, a prompt will appear indicating that someone is trying to AirDrop content to you. Accept the transfer, and the selected items will begin transferring from your old iPhone to the new one.
  5. Repeat for Other Items: If you have multiple types of content to transfer, repeat the process for each item category (e.g., photos, contacts, files). Keep in mind that AirDrop works best for transferring a small number of items.

Transfer Everything from One iPhone to Another Using AirDrop

AirDrop provides a swift and easy way to transfer specific content between iPhones without the need for cables or additional tools. While it might not cover everything in one go, it's a valuable method for efficiently moving selected items to your new iPhone. As we move forward, we'll explore more methods to ensure a comprehensive understanding of your transfer options.

Method #4: Using Finder

If you're using a Mac with macOS Catalina (10.15) or later, Finder has taken over some of the functionalities previously handled by iTunes. This method allows you to transfer data between your iPhones using Finder, providing a combination of local control and convenience.

Here's how to transfer everything from one iPhone to another using Finder:
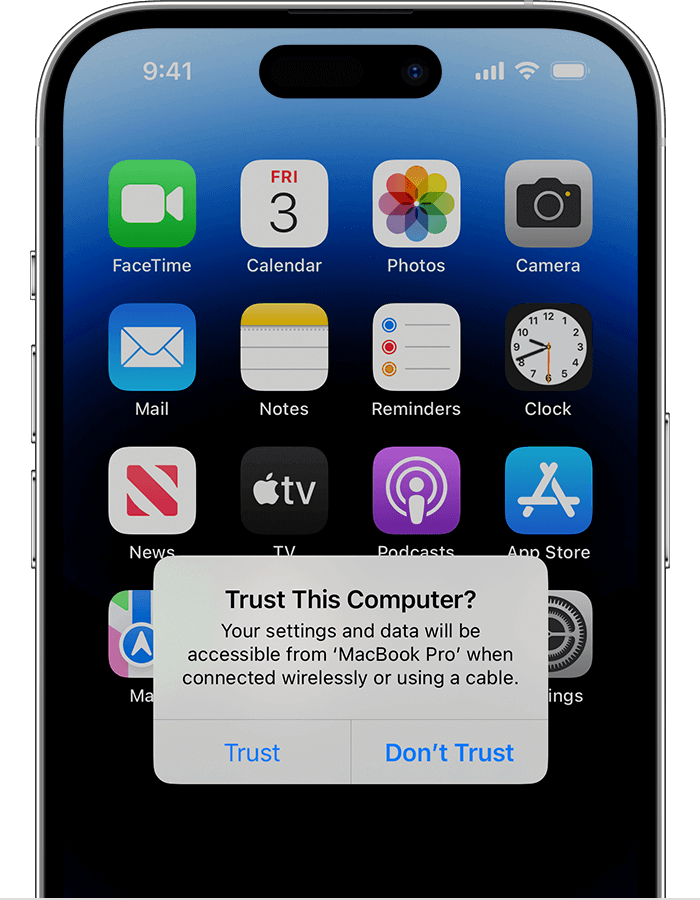
  1. Connect Your Old iPhone: Use a USB cable to connect your old iPhone to your Mac. If asked, unlock your iPhone and choose “Trust This Computer”.
  2. Open Finder: On your Mac, open a Finder window. You might see your iPhone listed in the Finder sidebar under the “Locations” section.
  3. Select Your iPhone: Click on your old iPhone’s name in the Finder sidebar. This will open the iPhone’s summary page in Finder.
  4. Backup Your iPhone: In the Finder window, you’ll see details about your iPhone. Under the “Backups” section, click “Back Up Now” to create a local backup of your old iPhone on your Mac.
  5. Prepare Your New iPhone: Disconnect your old iPhone once the backup is complete and connect your new iPhone using the same USB cable.
  6. Select Your New iPhone: Just like with your old iPhone, select your new iPhone’s name from the Finder sidebar. This will open the new iPhone’s summary page in Finder.
  7. Restore from Backup: In the Finder window for your new iPhone, click “Restore Backup”. A list of available backups will appear. Choose the backup you created from your old iPhone.
  8. Initiate Transfer: Click “Restore” to start the transfer process. Your new iPhone will be restored with the data and settings from your old iPhone’s backup.
  9. Completion and Setup: Once the transfer is finished, your new iPhone will restart and prompt you to complete the setup. Follow the on-screen instructions to finalize the process.

Transfer Everything from One iPhone to Another Using Finder

Using Finder for transferring data between iPhones provides a balance between control and convenience, making it a viable option for users who prefer a local backup approach. For those seeking alternatives, we have more methods to explore in the upcoming sections.

Part #2: The Best Tool on How to Transfer Everything from One iPhone to Another: FoneDog Phone Transfer

When you're looking for a comprehensive and user-friendly solution to transfer everything from one iPhone to another, FoneDog Phone Transfer emerges as a standout option.

Phone Transfer Transfer files among iOS, Android and Windows PC. Transfer and backup text messages, contacts, photos, video, music on computer easily. Fully compatible with the latest iOS and Android. Free Download FoneDog Phone Transfer

This powerful software offers a seamless and efficient way to migrate all your data, apps, and settings, ensuring that your new iPhone is an exact reflection of your old one. Let's dive into why FoneDog Phone Transfer stands out as the ultimate tool for iPhone migration:

FoneDog Phone Transfer is iPhone 15 supported and is a professional data transfer tool designed to simplify the process of moving your data from one iPhone to another. Whether you're upgrading to a new device, replacing a lost or damaged phone, or simply want to ensure a smooth transition, FoneDog Phone Transfer streamlines the transfer process with its intuitive interface and wide range of supported data types.

Here are the steps to use this top-class iPhone transfer tool to implement how to transfer everything from one iPhone to another:
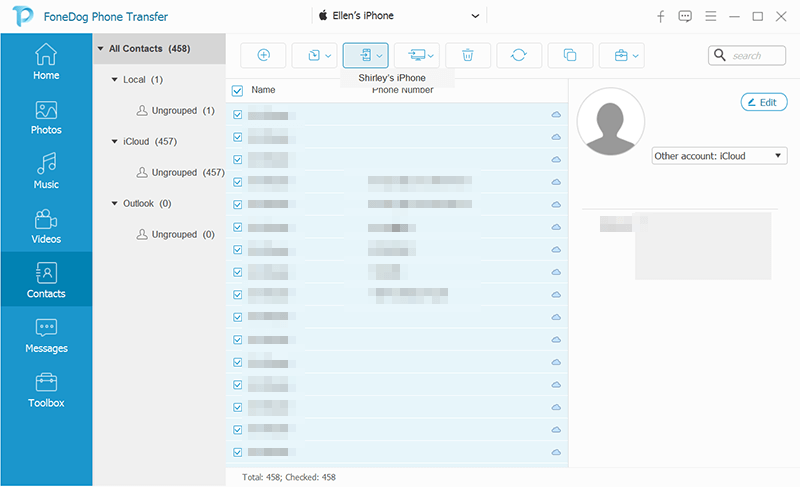
  1. Install and Launch: Download and install FoneDog Phone Transfer on your computer. Launch the software.
  2. Connect iPhones: Connect both your old and new iPhones to your computer using USB cables. The software will detect the devices.
  3. Choose Data Types: Select the types of data you want to transfer, such as contacts, photos, music, etc.
  4. Start Transfer: Click the “Start Transfer” button. The software will begin transferring the selected data from the old iPhone to the new one.
  5. Completion and Verification: Once the transfer is complete, you’ll receive a confirmation message. Check your new iPhone to ensure that all data has been successfully transferred.

The Best Tool on How to Transfer Everything from One iPhone to Another

When it comes to transferring everything from one iPhone to another, FoneDog Phone Transfer stands out as an exceptional tool that combines simplicity, versatility, and reliability. With its ability to seamlessly move all your data, apps, and settings, FoneDog Phone Transfer ensures that your transition to a new iPhone is effortless and stress-free. Say goodbye to complicated transfer processes and hello to a new iPhone experience that's a true continuation of your digital life.

People Also Read2023 Fixed: How to Transfer Music from Computer to iPhone without iTunes?How to Transfer Files to iPad without iTunes: All Things That You Have to Learn

Conclusion

In the ever-evolving landscape of iPhone technology, ensuring a smooth transition from an old device to a new one has become paramount. From iCloud backups and iTunes transfers to AirDrop and Finder methods, a range of options are available to cater to various preferences. However, when seeking a way on how to transfer everything from one iPhone to another, and FoneDog Phone Transfer emerges as a clear frontrunner.

Its user-friendly interface, comprehensive data transfer capabilities, and seamless one-click transfers make it a standout choice. With FoneDog Phone Transfer, the days of fretting over data migration complexities are over, ushering in a new era of streamlined iPhone transitions.

As you embark on your journey to transfer your digital world from one iPhone to another, FoneDog Phone Transfer shines as the ultimate solution. Its powerful features, including the ability to transfer a wide array of data types and its intuitive one-click transfers, offer unmatched convenience and reliability.

Whether you're upgrading to the latest iPhone model or making a fresh start with a new device, FoneDog Phone Transfer ensures that your data, apps, and settings seamlessly make the transition with you. Say farewell to the headache of manual transfers and embrace a new level of ease and efficiency with FoneDog Phone Transfer – the best tool for the job.

Leave a Comment

Comment

Comment ()
author image

Nathan E. Malpass

iPhone/Android Devices’ Maintenance Expert

Staying home, listening to music, writing tech articles

Many people asked me to repair their mobile phones so I have a lot of experience in mobile phone repair, and I know a lot about Android or Apple phones.

Phone Transfer logo

Phone Transfer

Transfer data from iPhone, Android, iOS, and Computer to Anywhere without any loss with FoneDog Phone Transfer. Such as photo, messages, contacts, music, etc.

Free Download

How Do You Like This Article?

Check icon/ Check icon

INTERESTINGDULL

Check icon/ Check icon

SIMPLEDIFFICULT

Thank you! Here' re your choices:

Rate This Article: Excellent

Rating: 4.7 / 5 (based on 75 ratings)

Phone Transfer logo

Phone Transfer

Transfer data from iPhone, Android, iOS, and Computer to Anywhere without any loss with FoneDog Phone Transfer. Such as photo, messages, contacts, music, etc.

Free Download

FoneDog uses cookies to ensure you get the best experience on our website. Click here to learn more.