FoneDog Screen Recorder
FoneDog Screen Recorder
Special Offer
Special Offer


By Nathan E. Malpass, Last updated: February 17, 2025
Are you excited about unboxing your shiny new iPhone but dreading the thought of transferring all your precious photos from your old device? Fret not! In this article, we'll guide you through a simple and effective method on how to transfer photos from old iPhone to new iPhone without iCloud or computer.
While iCloud and computer-based transfers are widely used, they may not always be the most convenient options. iCloud storage can be limited, and not everyone has immediate access to a computer. Fortunately, there's a hassle-free alternative that requires just a few easy steps.
So, whether you're upgrading to the latest iPhone model or simply want to keep your cherished memories safe and sound, let's dive into this effortless photo transfer solution that will have your old photos on your new iPhone in no time.
Part 1. Transfer Photos from Old iPhone to New iPhone Without iCloud or ComputerPart 2. Transfer Photos from Old iPhone to New iPhone Using a ComputerPart 3. Conclusion
How to transfer photos from old iphone to new iphone without icloud or computer? It can be a breeze with the help of cloud services like Google Drive. This method allows you to seamlessly move your pictures without the need for a computer or iCloud. Here's a step-by-step guide:
Step 1: Install Google Drive on Your Old iPhone
If you don't already have Google Drive installed on your old iPhone, download it from the App Store. Sign in or create a Google account if you don't have one.
Step 2: Upload Photos to Google Drive
Open Google Drive and tap the "+" button, usually found at the bottom of the screen.
Select "Upload." Choose "Photos and Videos." Select the photos you want to transfer. You can either choose specific pictures or entire albums. Tap "Upload" to start the process. Depending on the number and size of your photos, this may take some time. Ensure you're connected to Wi-Fi to avoid excessive data usage.

Step 3: Access Google Drive on Your New iPhone
Install Google Drive on your new iPhone if you haven't already. Sign in with the same Google account used on your old iPhone.
Step 4: Download Photos to Your New iPhone
Open Google Drive on your new iPhone. Locate the folder where you uploaded your photos. Select the photos you want to transfer to your new iPhone. Tap the three dots (...) at the bottom right and choose "Download." This will save the selected photos to your new device's camera roll.
Step 5: Organize Your Photos
Once the photos are downloaded, you can organize them into albums or your preferred photo app on your new iPhone.
Step 6: Clean Up Google Drive
To free up space on Google Drive, you can delete the photos you've transferred. Simply select them and tap the trash icon.
That's it! Your photos from your old iPhone are now safely transferred to your new iPhone without needing iCloud or a computer. Google Drive provides a convenient and accessible way to keep your memories intact during the transition to your new device.
AirDrop is another efficient and wireless method to transfer photos from your old iPhone to your new one without the need for iCloud or a computer. Here's how to do it:
Step 1: Ensure Both iPhones Are Compatible with AirDrop
Make sure both your old and new iPhones support AirDrop. To do this, swipe down from the upper-right corner (or up from the bottom on older iPhones) to open the Control Center. Press and hold the network settings card in the upper-left corner and check if AirDrop is set to "Everyone" or "Contacts Only."
Step 2: Turn On Bluetooth and Wi-Fi
On both iPhones, ensure that Bluetooth and Wi-Fi are turned on. AirDrop uses both of these technologies to establish a connection between devices.
Step 3: Open the Photos App on Your Old iPhone
Launch the Photos app on your old iPhone, and select the photos you want to transfer. You can tap "Select" and then choose the photos or albums you want to send.
Step 4: Tap the Share Icon
Tap the share icon (it looks like a square with an arrow pointing up) at the bottom left or bottom center of the screen, depending on your iPhone model.
Step 5: Select Your New iPhone
In the sharing options, you should see your new iPhone listed under the AirDrop section. Tap on it.

Step 6: Accept the Transfer on Your New iPhone
A prompt will appear on your new iPhone asking if you want to accept the incoming photos. Tap "Accept" to initiate the transfer.
Step 7: Wait for the Transfer to Complete
The transfer process may take a moment, depending on the number and size of the photos. Once it's finished, you'll receive a notification on your new iPhone that the photos were successfully transferred.
Step 8: Access Your Photos on the New iPhone
Open the Photos app on your new iPhone, and you should find the transferred photos in your Camera Roll or the appropriate albums.
AirDrop provides a quick and convenient way to transfer photos wirelessly between iPhones, making it a hassle-free option for those who want to move their pictures without using iCloud or a computer.
Messaging apps like FaceTime and WhatsApp can be surprisingly effective for transferring photos from your old iPhone to your new one, all without the need for iCloud or a computer. Here's how to use these apps for the transfer:
Using FaceTime (iOS to iOS):
Step 1: Ensure Both iPhones Are Connected to Wi-Fi
Make sure both your old and new iPhones are connected to Wi-Fi. FaceTime requires an internet connection.
Step 2: Open FaceTime on Both iPhones
Launch the FaceTime app on both your old and new iPhones. Make sure you're signed in with your Apple ID.
Step 3: Start a FaceTime Call
On your new iPhone, initiate a FaceTime call with your old iPhone. This can be done by calling the phone number associated with your old iPhone or the email address linked to your Apple ID.
Step 4: Accept the Call on Your Old iPhone
Answer the FaceTime call on your old iPhone.
Step 5: Send Photos
While on the FaceTime call, you can easily send photos by tapping the camera icon or the ellipsis (...) and selecting photos from your camera roll. Send them to your new iPhone.
Step 6: Save Received Photos
On your new iPhone, you'll receive the photos during the FaceTime call. Save these photos to your camera roll or albums.
Using WhatsApp (Cross-Platform):
Step 1: Install WhatsApp on Both iPhones
If you don't already have WhatsApp installed on both devices, download and install it from the App Store.
Step 2: Set Up WhatsApp
Open WhatsApp on both iPhones and follow the setup process, including verifying your phone number.
Step 3: Create a Chat or Use an Existing Chat
You can either create a new chat or use an existing one to send photos.
Step 4: Send Photos
In the chat, tap the attachment icon (usually a paperclip or camera icon) and select the photos you want to send from your old iPhone.
Step 5: Receive Photos on Your New iPhone
On your new iPhone, open the same chat in WhatsApp. You'll find the received photos there.
Step 6: Save Received Photos
Tap on the received photos and select "Save Image" to save them to your camera roll or other albums on your new iPhone.
Using messaging apps like FaceTime and WhatsApp is a straightforward way to transfer photos between iPhones without the need for iCloud or a computer. It's especially handy if you're looking for a quick and convenient solution that works well across different iOS devices.
Apple's Quick Start feature is a simple and efficient way to transfer all your data, including photos, from your old iPhone to your new one without relying on iCloud or a computer. Here's how to use Quick Start:
Step 1: Prepare Both iPhones
Ensure that both your old and new iPhones are charged and connected to Wi-Fi. You'll also need both devices to have Bluetooth enabled.
Step 2: Place the iPhones Close Together
Put your old iPhone next to your new iPhone. You should see a pop-up on your new iPhone that says, "Set Up New iPhone." Tap "Continue."
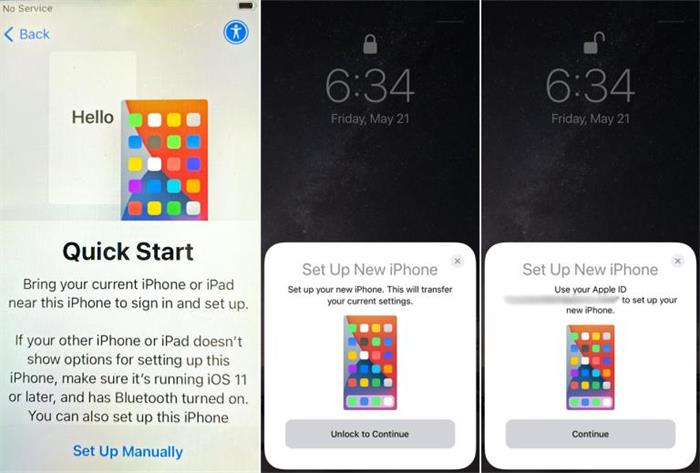
Step 3: Scan the Animation
A swirling animation will appear on your new iPhone's screen. Hold your old iPhone's camera over the animation so that it fits in the viewfinder. You'll receive a prompt on your old iPhone asking you to use your Apple ID to set up your new iPhone; tap "Continue."
Step 4: Set Up Face ID/Touch ID
If your new iPhone supports Face ID or Touch ID, you'll be prompted to set up this feature. Follow the on-screen instructions.
Step 5: Transfer Data
You'll see an option to transfer data from your old iPhone to your new one. Select "Transfer from iPhone" on your new iPhone.
Step 6: Set Up Your New iPhone
Your new iPhone will begin the data transfer process. This may take a few minutes, depending on the amount of data you're transferring. Once the transfer is complete, your new iPhone will display a message stating that the process is finished.
Step 7: Complete the Setup
Follow the on-screen instructions to complete the setup of your new iPhone. This includes setting up Apple Pay, Siri, and other preferences.
Step 8: Check Your Photos
Open the Photos app on your new iPhone to ensure that all your photos from your old iPhone have been successfully transferred. They should be in your Camera Roll and any albums you had on your old device.
Quick Start is a reliable and hassle-free method for transferring your data, including photos, from your old iPhone to your new one. It ensures a smooth transition without the need for iCloud or a computer, making it an ideal choice for Apple users looking to upgrade their devices.
Now that you’ve learned how to transfer photos from old iPhone to new iPhone without iCloud or computer, we’ll give you a bonus tip. While wireless methods like AirDrop and Quick Start are convenient for transferring photos between iPhones, using a computer can offer more control and flexibility.
One effective software solution for this task is the iPhone 15 supported tool called FoneDog Phone Transfer. This is one easy-to-use tool to transfer your photos instantly with the use of your computer. And aside from photos, it can also help you in transferring other data from your smartphone devices such as music, messages, videos, and your contacts.
Using this best photo transfer app totransfer photos from old iphone to new iphone is a straightforward process: In this part, we'll guide you how to do this using FoneDog Phone Transfer.
Phone Transfer
Transfer files among iOS, Android and Windows PC.
Transfer and backup text messages, contacts, photos, video, music on computer easily.
Fully compatible with the latest iOS and Android.
Free Download

Step 1: Download and Install FoneDog Phone Transfer
First, download and install the FoneDog Phone Transfer software on your computer. It's available for both Windows and macOS.
Step 2: Launch FoneDog Phone Transfer
After installation, launch the FoneDog Phone Transfer software on your computer.
Step 3: Connect Your iPhones to the Computer
Connect both your old iPhone and your new iPhone to your computer using USB cables. Ensure that you have trusted the computer on both devices when prompted.
Step 4: Select the "Phone Transfer" Mode
In the FoneDog Phone Transfer interface, you'll see several options. Choose the "Phone Transfer" mode.
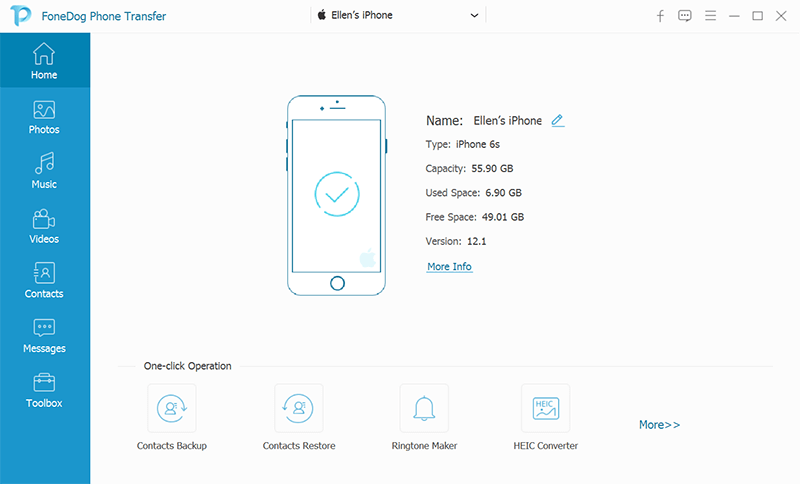
Step 5: Verify Source and Target Devices
FoneDog Phone Transfer will detect your old iPhone as the source device and your new iPhone as the target device. If they are not in the correct positions, click "Switch" to change their order.
Step 6: Select Data to Transfer
You can choose which types of data you want to transfer. To transfer photos, make sure "Photos" is selected. You can also select other data types if needed.
Step 7: Start the Transfer Process
Click the "Start Transfer" button to begin transferring photos from your old iPhone to your new iPhone. FoneDog Phone Transfer will start copying the selected photos to your new device.

Step 8: Wait for Completion
The transfer process may take some time, depending on the number and size of the photos. Ensure that both iPhones remain connected to the computer throughout the process.
Step 9: Confirmation
Once the transfer is complete, you'll receive a notification indicating that the photos have been successfully transferred.
Step 10: Check Your Photos on Your New iPhone
Disconnect your iPhones from the computer and unlock your new iPhone. Open the Photos app to verify that all your photos from the old iPhone are now available on your new device.
FoneDog Phone Transfer provides a reliable and efficient way to transfer photos and other data between iPhones using a computer. This method ensures that your photos are safely and securely transferred without the need for iCloud or complicated manual processes.
Transferring photos from your old iPhone to your new one is a crucial step when upgrading your device or preserving your cherished memories. In this article, we've explored various methods on how to transfer photos from old iPhone to new iPhone without iCloud or computer. Whether you prefer a wireless solution without the need for a computer or a more comprehensive transfer using a computer, there's an option for you.
Ultimately, the choice of method depends on your preferences and specific circumstances. Whether you opt for wireless solutions or a computer-based approach, your photos will find a new home on your new iPhone, ensuring that your memories are never left behind.
As technology continues to evolve, more options for transferring data between devices may become available. Be sure to stay updated with the latest methods and tools to ensure a smooth transition when upgrading your iPhone in the future.
Leave a Comment
Comment

iPhone/Android Devices’ Maintenance Expert
Staying home, listening to music, writing tech articles
Many people asked me to repair their mobile phones so I have a lot of experience in mobile phone repair, and I know a lot about Android or Apple phones.
Phone Transfer
Transfer data from iPhone, Android, iOS, and Computer to Anywhere without any loss with FoneDog Phone Transfer. Such as photo, messages, contacts, music, etc.
Free DownloadHot Articles
 /
/
INTERESTINGDULL
/
SIMPLEDIFFICULT
Thank you! Here' re your choices:
Excellent
Rating: 4.7 / 5 (based on 72 ratings)