FoneDog Screen Recorder
FoneDog Screen Recorder
Special Offer
Special Offer


By Nathan E. Malpass, Last updated: August 16, 2024
In an era where digital connectivity is paramount, the need to seamlessly transfer contacts between Android devices has become more crucial than ever. While Google offers a default solution for this task, concerns about privacy and data security have led many users to seek alternative methods.
In this article, we delve into smart and effective techniques to transfer contacts from Android to Android without Google services. Whether you're switching devices or simply exploring non-Google options, join us on this journey to ensure a smooth transition while safeguarding your personal information.
Part 1. Why You Shouldn’t Use Google Services to Transfer Contacts Between Android Devices?Part 2. How to Transfer Contacts from Android to Android Without GooglePart 3. The Best Tool to Transfer Contacts from Android to Android Without Google: FoneDog Phone TransferPart 4. FAQs
Google services are ubiquitous in the digital realm, providing convenience and connectivity. However, when it comes to transferring contacts between Android devices, there are compelling reasons to consider alternatives. In this section, we explore why you might want to steer clear of Google services for this particular task.
In the next sections, we'll delve into alternative methods that not only address these concerns but also provide a seamless experience for transferring contacts between Android devices.
In the quest for a Google-free contact transfer, Bluetooth emerges as a reliable and straightforward option. This method requires minimal technical know-how and ensures a secure, direct connection between your Android devices.
Begin by activating Bluetooth on both your source and target Android devices. Navigate to Settings, find Bluetooth, and switch it on.

On the device from which you wish to transfer contacts (the source), make sure Bluetooth visibility is enabled. Go to Bluetooth settings and select "Pair new device". The target device should appear in the list; select it to initiate pairing.
Access the Contacts app on the source device and choose the contacts you want to transfer. Most devices allow you to select multiple contacts simultaneously.
Look for the option to share or send contacts. Depending on your device, this might be labeled as "Send via Bluetooth" or similar. Choose the target device from the list of paired devices.
The target device will receive a notification prompting the user to accept the incoming contacts. Confirm the transfer, and the selected contacts will be seamlessly copied to the target device.
Once the transfer is complete, open the Contacts app on the target device to ensure that all selected contacts have been successfully transferred.
Advantages of Using Bluetooth:
By leveraging Bluetooth for contact transfers, you not only sidestep Google's involvement but also embrace a user-friendly and secure method for ensuring your contacts arrive safely at their destination. In the upcoming sections, we'll explore additional methods to cater to different user preferences and scenarios.
Transferring contacts via a SIM card provides a straightforward and efficient solution, especially for users who prefer an offline method. Here's a step-by-step guide to transferring contacts from one Android device to another using a SIM card.
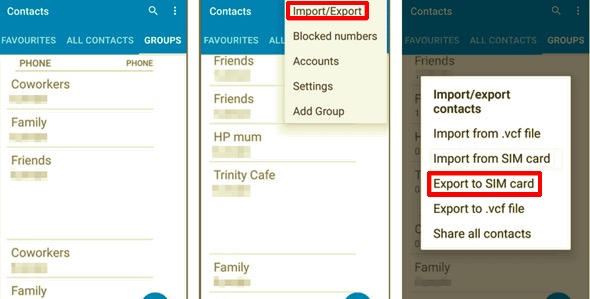
Once the import process is complete, ensure that all contacts have been successfully transferred by checking the Contacts app on the target device.
For those seeking a more advanced and versatile method to transfer contacts without relying on Google, utilizing FTP (File Transfer Protocol) servers provides a secure and efficient solution. This method allows for wireless data transfer over a local network. Here's a step-by-step guide:

Confirm that all selected contacts have been successfully imported by checking the Contacts app on the target device.
Advantages of Using FTP Servers:
Utilizing FTP servers for contact transfers provides a versatile and secure alternative for users who prioritize wireless data transfer within their local network. Stay tuned for more methods as we continue to explore diverse options for a Google-free contact migration experience.
In the quest for the most efficient and user-friendly method to transfer contacts between Android devices without relying on Google, FoneDog Phone Transfer emerges as a standout solution. This comprehensive tool streamlines the process, ensuring a hassle-free and secure transfer of your valuable contacts. Let's explore the overview, steps, and a brief conclusion.
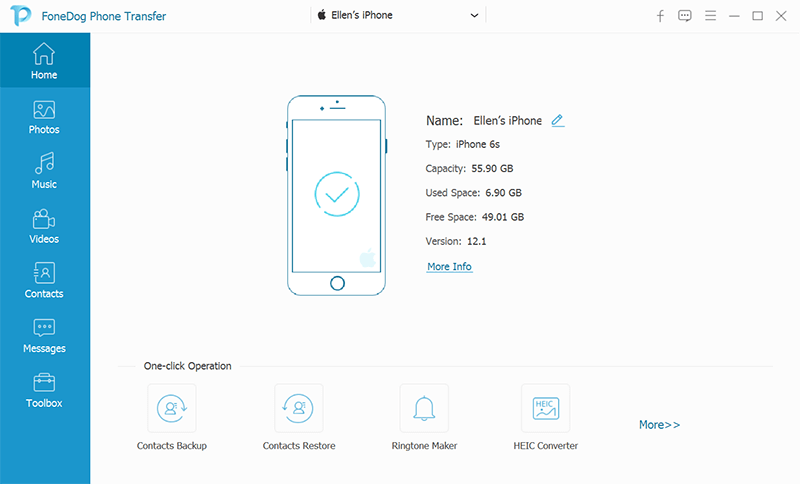
FoneDog Phone Transfer is a robust iPhone 15 supported software designed to simplify data transfer between Android devices. It stands out for its intuitive interface, support for various data types, and the ability to perform transfers without the need for Google services.
Steps to Transfer Contacts:
Visit the official FoneDog website to download and install the Phone Transfer software on your computer.
Open the installed software and select the "Phone Transfer" module from the main menu.
Use USB cables to connect both the source and target Android devices to your computer. Ensure USB debugging is enabled on both devices.
Once the devices are recognized, choose the "Contacts" option from the list of supported data types.
Click on the "Start Transfer" button to begin the transfer process. FoneDog Phone Transfer will efficiently copy the selected contacts from the source to the target device.

Monitor the transfer progress through the on-screen indicator. The process typically completes swiftly, ensuring a quick and seamless transfer.
FoneDog Phone Transfer stands out as an ideal solution for users seeking a reliable, all-in-one tool to transfer contacts without relying on Google services. Its user-friendly interface, broad device compatibility, and efficient transfer process make it a top choice for individuals looking to seamlessly migrate their contacts while maintaining privacy.
Whether you are upgrading to a new device, switching brands, or simply prefer to avoid Google's involvement, FoneDog Phone Transfer provides a comprehensive and hassle-free solution. Embrace the convenience of a dedicated tool designed to safeguard your contacts and streamline the migration process.
People Also ReadHow to Transfer Contacts from One Phone to Another Using Bluetooth2024 Guide: How to Transfer Contacts from Sony to Samsung
Avoiding Google services for contact transfers addresses privacy concerns, minimizes dependency on centralized platforms, and provides more control over your data. This ensures a secure and personalized transfer experience.
Yes, Bluetooth is a secure method for transferring contacts, as it establishes a direct connection between devices. However, ensure Bluetooth visibility is turned off when not in use to prevent unauthorized access.
Yes, using a SIM card is a convenient offline method for transferring contacts. Export contacts to the SIM card on the source device, insert it into the target device, and import contacts. This method works well for basic transfers.
Using FTP servers allows for wireless and localized transfers over a secure connection. It's a versatile option, especially for users comfortable with more advanced setups, and it eliminates the need for physical connections.
FoneDog Phone Transfer is recommended for its user-friendly interface, broad device compatibility, and efficient transfer process. It provides a dedicated solution for contact transfers, ensuring a seamless experience without relying on Google services.
Yes, FoneDog Phone Transfer is designed to be compatible with various Android versions, making it a versatile tool for contact transfers between different devices.
FoneDog Phone Transfer is an efficient tool; however, users should ensure that USB debugging is enabled on their devices and that they have the necessary USB cables for connection. Additionally, check for any specific system requirements on the FoneDog website.
Yes, FoneDog Phone Transfer allows users to selectively transfer contacts. You can choose specific contacts or transfer all contacts based on your preferences.
Leave a Comment
Comment

iPhone/Android Devices’ Maintenance Expert
Staying home, listening to music, writing tech articles
Many people asked me to repair their mobile phones so I have a lot of experience in mobile phone repair, and I know a lot about Android or Apple phones.
Phone Transfer
Transfer data from iPhone, Android, iOS, and Computer to Anywhere without any loss with FoneDog Phone Transfer. Such as photo, messages, contacts, music, etc.
Free DownloadHot Articles
 /
/
INTERESTINGDULL
/
SIMPLEDIFFICULT
Thank you! Here' re your choices:
Excellent
Rating: 4.7 / 5 (based on 65 ratings)
