By Adela D. Louie, Last updated: June 13, 2024
In a world where visual communication reigns supreme, the ability to capture on-screen activities accompanied by crystal-clear audio has become an invaluable skill. Enter Windows 11, the latest operating system that promises a seamless and enhanced user experience. Are you ready to unlock its full potential?
In this guide, we delve into how to record screen on Windows 11 with audio integration. Whether you're a content creator, educator, or just eager to share your expertise, this tutorial aims to empower you with the tools and know-how to effortlessly record your screen alongside captivating audio. Join us on this journey as we navigate through step-by-step instructions, uncovering the tips and tricks to elevate your Windows 11 screen recording game.
Part 1. Methods on How to Record Screen on Windows 11 with AudioPart 2. Best Way to Screen Record on Windows 11 with AudioPart 3. Overview: Windows 11 and its Features for Screen RecordingPart 4. Benefits of Screen Recording with Audio on Windows 11Conclusion
Part 1. Methods on How to Record Screen on Windows 11 with Audio
In Windows 11, there are various methods on how to record your screen with audio, including using the built-in Xbox Game Bar, the Capture widget, or third-party applications. Here are steps for using two primary built-in methods:
Method 1: Using Xbox Game Bar
Here's how to screen record on windows 11 with audio using the Xbox Gmae Bar.
- Begin by initiating the Xbox Game Bar on your Windows 11 system. This can be done by pressing the key combination
Win + G on your keyboard. Once activated, the Xbox Game Bar interface will appear on your screen, providing various gaming and recording options.
- Upon pressing
Win + G, you might be prompted with a confirmation message asking, "Yes, this is a game." You'll need to confirm this to proceed.
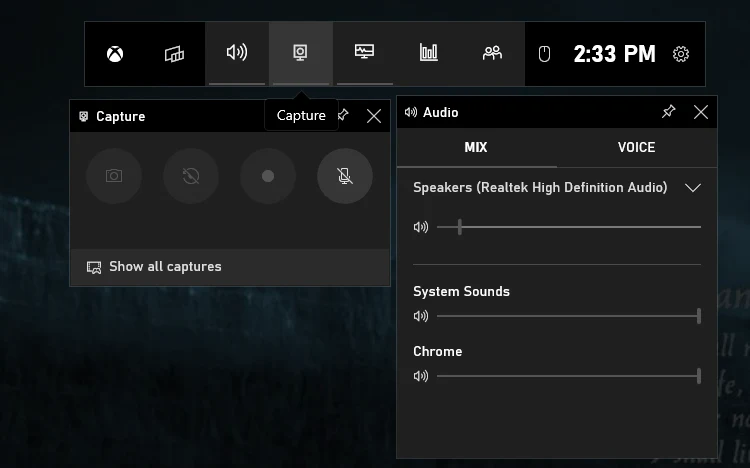
- In the Xbox Game Bar interface, you'll find a set of icons and options. To start recording your screen along with audio, look for the "Capture" button and click it, which is represented by a circular icon inside a square.
- Alternatively, you can also use the keyboard shortcut
Win + Alt + R to start the recording.
- If you wish to include audio in your recording, ensure that the "Record mic" option is toggled on within the Xbox Game Bar settings. Enabling this option allows the capture of your microphone input, synchronizing audio with the recorded video.
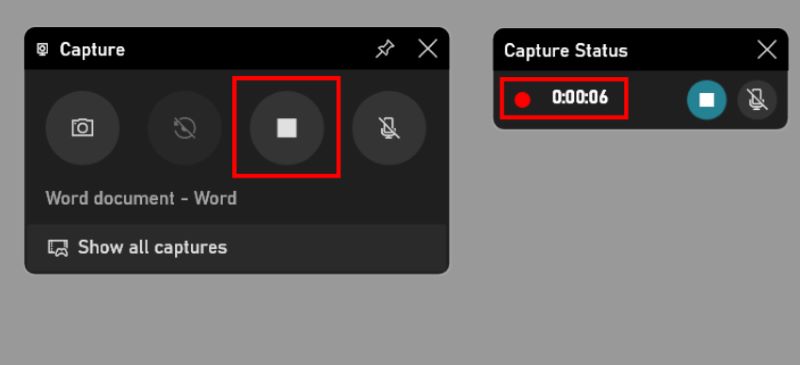
- To conclude the recording, you have two options. Either click the designated stop button available within the Xbox Game Bar interface, or use the same keyboard shortcut (
Win + Alt + R) that you initially used to start the recording.
- Once you're done recording, open the Xbox Game Bar again and this time, navigate to the Capture tab in the interface. Here you'll find a collection of your recorded clips. Simply select the desired clip from the list to view or edit it.

These steps outline the process of using the Xbox Game Bar on Windows 11 to record your screen with audio, offering you a convenient way to capture and manage your recorded content.
Method 2: Using the Capture Widget
To make use of this, you could then use the steps provided below:
- To begin, locate and select the Widgets button on the taskbar or press the keyboard shortcut
Win + W. This action will open the Widgets panel, where you can access various Windows 11 widgets and tools.
- Within the Widgets panel, search for the Capture widget. Once found, click on the Capture widget to initiate its launch. This action will open the Capture widget interface, ready for use.
- After the Capture widget interface appears, locate and click on the "Record" button within the widget. If you intend to capture audio alongside the video, ensure that the microphone icon is activated or enabled before commencing the recording process.
- To conclude the recording, return to the Capture widget interface. Locate and select the "Stop" button, which will halt the ongoing recording session.
- Your recorded video clips will be automatically saved in the designated "Captures" folder. To access these recordings, navigate through the file explorer by selecting "This PC" > "Videos" > "Captures".
- Alternatively, you can access the recorded clips via the Xbox Game Bar's dedicated "Captures" tab, providing a convenient way to review and manage your saved recordings.

These methods offer a convenient way on how to record screen on windows 11 with audio directly without the need for additional software. However, if you require more advanced features or customization options, third-party screen recording applications available on the Microsoft Store or other platforms might also be worth considering.
Part 2. Best Way to Screen Record on Windows 11 with Audio
FoneDog Screen Recorder stands out as a top-tier solution for capturing screen activities with audio on Windows 11. This software is renowned for its user-friendly interface and comprehensive functionalities, making it an excellent choice for those seeking a versatile and efficient screen recording tool.
With FoneDog Screen Recorder, users can easily capture the Windows 11 screen as well as synchronize the audio, allowing for seamless narration, explanations, or any accompanying sound elements during the recording process.
 Free Download
For Windows
 Free Download
For normal Macs
 Free Download
For M1, M2, M3
This software offers a range of features tailored to meet diverse recording needs, such as customizable recording settings for video quality, frame rate adjustments, audio input selection from system sound or microphone, and the ability to capture specific regions or the entire screen.
How to Screen Record:
- Download and install the application on your computer. Once successfully installed, launch the tool to initiate the recording process.
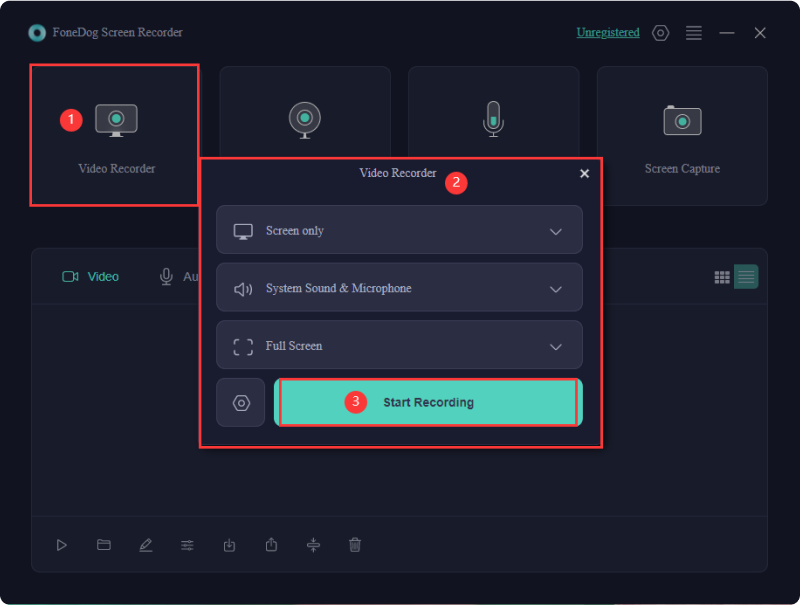
- Within FoneDog Screen Recorder, click "Video Recorder" and choose among "Full Screen" mode, "Custom" mode to select specific areas for recording, or even opt to exclusively record via a connected webcam.
- Once the recording parameters are determined, select the Start Recording button to start the recording session. For convenience, users can choose to configure custom hotkeys to quickly start and end recording sessions.
- During recording, users can pause and resume recording using designated buttons, ensuring easy control and accurate capture of desired segments. In addition, the software provides real-time annotation capabilities, allowing users to overlay text, lines and shapes on recordings, making it easy to take notes or emphasize at any time.
- When ending the recording process, simply press the "Stop" button, indicating that the recording process is complete. After the recording is completed, the user can review the captured content and can make possible edits before the final output, such as deleting unwanted segments.

How to Record Audio:
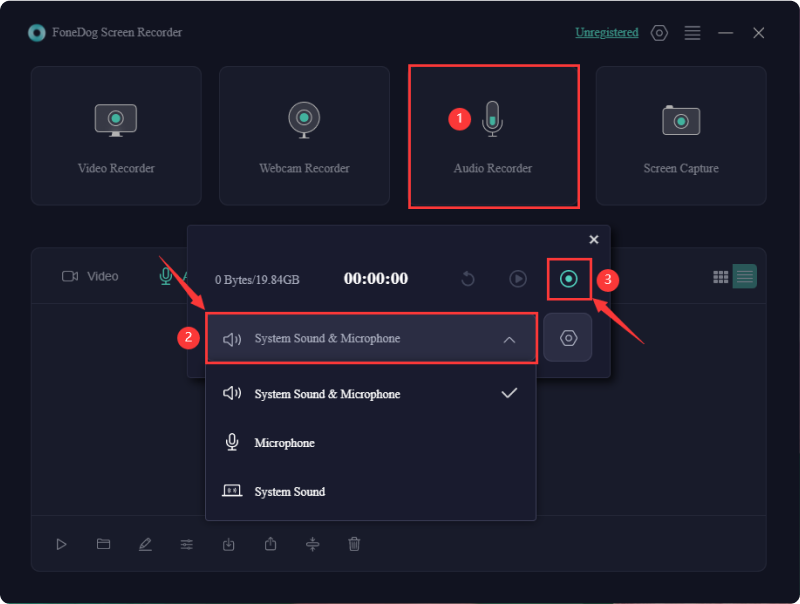
- The application provides several ways to start recording. You can select the "Audio Recorder" option from the drop-down menu of the application.
- Before starting the recording process, select Microphone or System Sound.
- Once these settings are configured, initiate the recording by clicking the green button.
- Throughout the recording process, users always maintain control and can pause, stop or resume recording at any time using the intuitive control buttons next to the audio.
- After completing the desired audio recording, the user clicks on the "Stop" button to end the session. The individual is then free to save the recorded video to a preferred location on the computer.

Part 3. Overview: Windows 11 and its Features for Screen Recording
Windows 11 is the latest operating system released by Microsoft, succeeding Windows 10. It brings forth several new features as well as those enhancements, including improvements in screen recording capabilities. Here are some of the features in Windows 11 related to screen recording:
- Built-in Screen Recorder: Windows 11 comes with a native screen recording tool, making it easier for users to capture their screen activities without needing third-party software. This tool allows users to record their entire screen or select specific areas.
- Audio Capture: The screen recording feature in Windows 11 enables users to capture not only visuals but also system audio or external audio sources (like a microphone). This is crucial for creating comprehensive tutorial videos, presentations, or gaming content where audio narration or sound effects are required.
- Recording Settings Customization: Users have the flexibility to adjust various recording settings, such as video quality, frame rate, and audio input sources, to suit their specific needs and preferences.
- Ease of Access: Windows 11 aims to streamline the user experience, making the screen recording tool easily accessible through the system's interface, possibly via the revamped Start menu or within the Settings app.
- Integration with Gaming Features: For gamers, Windows 11 may further enhance the gaming experience by allowing the recording of gameplay with audio, providing an avenue for content creation or sharing gaming highlights.
- Improved User Interface: With Windows 11's redesigned interface, the screen recording feature might have a more user-friendly layout, offering a smoother and more intuitive recording experience compared to its predecessors.
Part 4. Benefits of Screen Recording with Audio on Windows 11
Screen recording with audio on Windows 11 offers several benefits, catering to a wide range of users across various industries and purposes:
- Enhanced Communication and Instruction: Incorporating audio with screen recordings facilitates clearer communication. Whether it's a tutorial, demonstration, or instructional video, the addition of audio narration helps in explaining concepts, guiding users through processes, and ensuring better comprehension.
- Comprehensive Demonstrations: By capturing both visual and audio elements, screen recordings on Windows 11 allow for comprehensive demonstrations. This is particularly useful for showcasing software functionalities, troubleshooting steps, or explaining complex tasks with detailed audio-visual guidance.
- Effective Training and Education: In educational settings or professional training, the combination of screen recording and audio enables educators and trainers to create engaging materials. It aids in conveying information effectively, accommodating various learning styles, and ensuring retention of information.
- Content Creation and Sharing: For content creators, influencers, and gamers, the ability to record screens with audio on Windows 11 is invaluable. It allows for the creation of high-quality video content, gameplay recordings, reviews, and tutorials, fostering engagement and sharing across different platforms.
- Collaboration and Remote Work: In remote work scenarios, screen recordings with audio serve as an excellent tool for collaboration. Team members can easily create and share recordings to demonstrate workflows, share ideas, troubleshoot issues, or present project updates in a more comprehensive manner.
- Documentation and Problem-Solving: Screen recordings with audio serve as valuable documentation tools. They help in documenting processes, capturing software bugs or errors for troubleshooting, and creating step-by-step guides that assist in problem-solving.
- Personal and Professional Productivity: Utilizing screen recording with audio on Windows 11 can also enhance personal productivity. It allows individuals to create to-do lists, record presentations, capture brainstorming sessions, or even document personal achievements for self-improvement.
People Also ReadFull Guide 2024: How to Record Screen on Windows 11How Long Can You Screen Record: Anything to Know
Conclusion
Windows 11’s powerful native screen recording capabilities, coupled with versatile solutions like FoneDog Screen Recorder, making it easier to record screen on Windows 11 with audio. The operating system offers intuitive built-in tools like Xbox Game Bar and Capture widgets while providing advanced features through dedicated apps.
This versatility, combined with Windows 11’s user-friendly interface, enhances its potential to meet a wide range of screen recording needs, catering to both regular users and professionals. We hope this helps, and have a great day!


Free Download
For Windows
Free Download
For normal Macs
Free Download
For M1, M2, M3


/
/