FoneDog Screen Recorder
FoneDog Screen Recorder
Special Offer
Special Offer


By Adela D. Louie, Last updated: June 25, 2024
Within current fast-paced online world, getting information across clearly is very important. PowerPoint, which lets you change the images on the slides, has become a useful tool for slideshows. Here comes PowerPoint recordings, a tool that lets you record PowerPoint with sound and the pointer moving. Let's say you've got to provide your presentation with people who don't use PowerPoint.
Do not be afraid! This guide discusses about how to save PPT recording as video. We'll walk you through every step, from choosing the best settings to making sure they work on all systems. Knowing this process opens up a world of ways to get your message across effectively, whether you're using it for education or for online discourse.
Part 1. How to Save PPT Recording as Video on Windows or MacPart 2. How to Save PPT Recording as Video on MacPart 3. How to Save PPT Recording as Video on WindowsPart 4. FAQs about How to Save PPT Recording as VideoConclusion
When it comes to recording PowerPoint presentations upon both Mac and Windows, FoneDog Screen Recorder is the clear favorite. This application can be used for many things as well as works smoothly, so users can record PowerPoint talks easily and also indeed accurately.
With its technological advances, such as high quality output along with recording choices that can be changed to fit your needs, FoneDog Screen Recorder offers the best recording experience possible.
![]() Free Download
For Windows
Free Download
For Windows
![]() Free Download
For normal Macs
Free Download
For normal Macs
![]() Free Download
For M1, M2, M3
Free Download
For M1, M2, M3

We will begin by demonstrating how to save your PowerPoint presentation to video after recording videos on a Mac. The entire procedure should be completed in just a couple minutes. Following our detailed instructions to begin here:
This section ensures that every slide in your presentation plays smoothly. Before you export your movie, you must synchronize your slides. Here's how to do this:
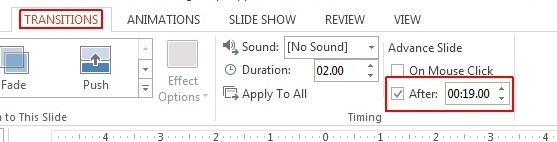
In order to precisely set the duration for each slide before transitioning to the next, it is necessary for you to assign a specific time frame to each slide in the presentation.
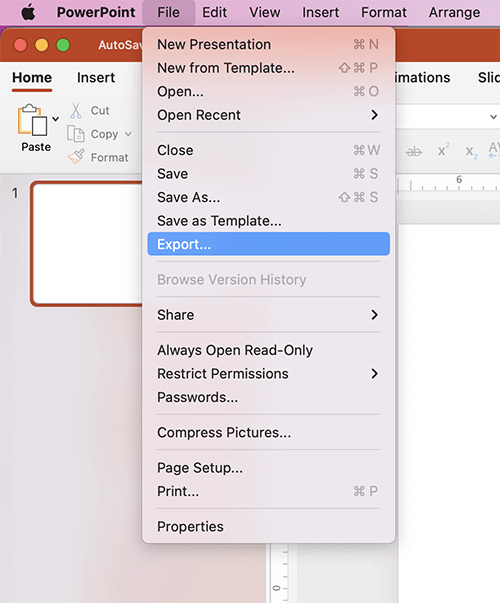
Once the each and every slide timing are set, the subsequent action you need to do was to export or save the slide presentation into video format. Listed below is a fast and effortless way to accomplish that:
The duration of the converting process will vary based on the length as well as complexity of your slide presentation. After the conversion process has ended, your PowerPoint presentation is going to be accessible as video format file onto your Mac. Just go towards the save location to locate it.
On a Windows computer, it's just as convenient to shift from PowerPoint into video. Keep in mind that the control system in more recent versions of the Windows is a little distinct from one another. For this reason, we showed you how to use the different types of programming through every step.
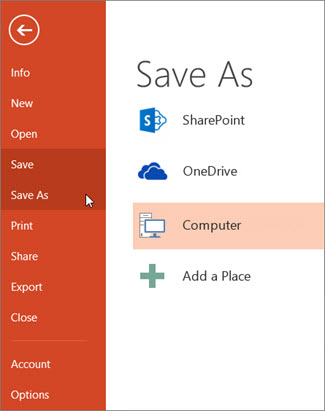
It is possible that you will be need to make use of the "save as" function in order to save the presentation's slideshow onto a video file even though you have been working with a former version software of PowerPoint. In order to get commenced, the following are the actions that you are required to execute:
The PowerPoint presentation will start saving onto a video once you are done with the steps outlined above. The length of time required for this operation is mostly determined by the size of the file as well as the media that it contains.
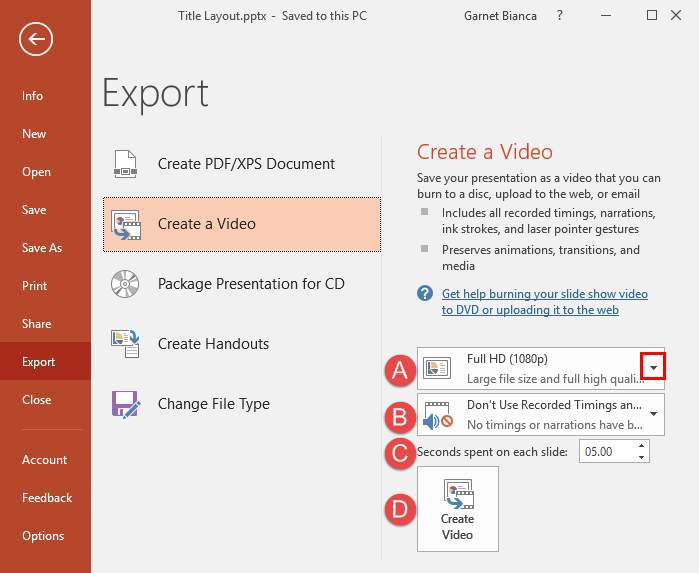
It is quite likely that you will not require the "save as" option of Microsoft PowerPoint unless you are using a more recent release of the program. On the other hand, the program now includes a "export" characteristic. This is how you should utilize it:
After following these steps, it will be easy to turn the presentation you created in PowerPoint into a video. To reiterate, the length of time required for the conversion is contingent upon the level of intricacy of any presentation.
As outlined in this guide, the process is straightforward. Just follow the provided steps, and at the point where you choose the file format, opt for "MP4". The software will then perform the conversion and store the resulting file on your device.
If you encounter difficulties with the conversion process, examine the active background applications on your computer. Excessive concurrent programs may hinder the file conversion. Shutting down some of these applications could potentially expedite the PowerPoint conversion process.
To ensure high-quality video output when saving a PowerPoint presentation, consider optimizing media files for compatibility, using high-resolution images and videos, maintaining consistent formatting, and avoiding excessive animations or transitions. Additionally, preview the video before saving to ensure proper synchronization and clarity of content.
People Also Read14 Best Internal Audio Recorder for Windows/Mac/PhoneTop 11 Presentation Recording Software (with Audio)
In conclusion, knowing how to save PPT recording as video is a straightforward process that enhances accessibility as well as indeed sharing options, allowing for versatile dissemination of content beyond traditional slideshows. Overall, FoneDog Screen Recorder offers a seamless solution for transforming presentations into dynamic videos, enhancing accessibility along with sharing capabilities.
![]() Free Download
For Windows
Free Download
For Windows
![]() Free Download
For normal Macs
Free Download
For normal Macs
![]() Free Download
For M1, M2, M3
Free Download
For M1, M2, M3
Leave a Comment
Comment

Tech Website Writing /Content Optimization
Singing, smiling, surprising every day!
So as a technical writer, it is my duty to gather effective and reliable solutions to answer questions on how to deal with the issues they are having with their devices.
Screen Recorder
Powerful screen recording software to capture your screen with webcam and audio.
Hot Articles
 /
/
INTERESTINGDULL
/
SIMPLEDIFFICULT
Thank you! Here' re your choices:
Excellent
Rating: 4.7 / 5 (based on 87 ratings)