FoneDog Screen Recorder FoneDog Screen Recorder
Special Offer Special Offer
Only Only
$4.49 $4.49
to get a ONE-month license to get a ONE-month license
Sale ends in xx days Sale ends in xx days
Buy Now
sale

[4 Ways] How to Screen Record on Chromebook in 2024

By Adela D. Louie, Last updated: June 17, 2024

Have you ever desired to effortlessly capture your screen? Understood! This article give a clear guide on how to screen record on Chromebook. Following these guidelines will help you to quickly learn how to record screen in easy ways. Whether you study or play specialized games, developing knowledge in this field can significantly affect your performance and results.

Discover the tools to increase your creativity and efficiency. Whether you're saving noteworthy events or documenting lessons, these actions will maximize your Chromebook.

Part 1. How to Screen Record on Chromebook EasilyPart 2. Tips to Enhance Screen Recording on ChromebookPart 3. Common Ways on How to Screen Record on ChromebookPart 4. FAQsConclusion

Part 1. How to Screen Record on Chromebook Easily

FoneDog Screen Recorder is an excellent tool for screen recording on a Chromebook, offering a user-friendly interface and robust features. It allows for simultaneous recording of system and microphone audio, provides annotation options during recording, and supports easy pausing and restarting. This software ensures high-quality video capture with minimal effort, making it an ideal choice for users needing a reliable and efficient screen recording solution.

windows Free Download For Windows mac Free Download For normal Macs mac Free Download For M1, M2, M3

How To Screen Record on Chromebook:

  1. Start by downloading and installing the FoneDog Screen Recorder on your device. The installation process is straightforward and quick.
  2. Once installed, open the software to access the main interface. From the various available features and modes, select "Video Recorder".
  3. Decide whether you want to record audio by selecting the "System Sound & Microphone" option to capture both system and microphone audio simultaneously.
  4. Begin the screen recording by clicking "Start Recording". During the session, use the "Edit" button to add annotations.
  5. To finish the recording, click the red stop button. The file would thus be saved to the device.
  6. Simply click the "Pause" button to halt the recording, and then click it again to continue it. By using the "Restart" button, delete the currently recording and begin again.

How to Screen Record on Chromebook

Part 2. Tips to Enhance Screen Recording on Chromebook

To enhance your screen recording experience on a Chromebook, here are eight useful tips:

  • Close Unnecessary Applications: Ensure optimal performance by shutting down any applications not needed during the recording. This reduces the strain on your system and helps prevent lag​​.
  • Adjust Screen Resolution: Optimize your screen resolution to balance clarity and performance. High resolution ensures clear recordings, but excessively high settings can cause lag​​.
  • Check Internet Connection: To record web content continuously and flawlessly, you need a strong and reliable internet connection. This will help you avoid any buffering or perhaps even within the interruption problems.
  • Use External Microphone: Audio quality suffers less when an external microphone is used rather than the built-in one. This can significantly improve the clarity of your narration or any audio input​.
  • Enable Audio Recording: Ensure that you activate the audio recording feature if you require the ability to capture noises. To accomplish this, you can enable or disable the microphone feature in the recording settings.
  • Utilize Annotation Tools: Utilize the pre-installed annotation tools or external applications to sketch or insert text while recording. This is useful for tutorials and presentations to emphasize key points​​.
  • Edit Recordings Post-Recording: Utilize video editing tools to trim and polish your recordings. Many third-party apps offer basic to advanced editing features to enhance the final output​​.

Part 3. Common Ways on How to Screen Record on Chromebook

Recording your screen is a great way for folks who use Chromebooks to visually show ideas using your device as a canvas instead of depending just on descriptive texts as well as static images. Here we will lead you through the exact methods on how to screen record on Chromebook.

Way 1. How to Screen Record on Chromebook (Keyboard Keys)

The most efficient way to capture your screen on a Chromebook involves utilizing a keyboard shortcut, which allows you to record screen or a window. To record the screen on a Chromebook using a keyboard shortcut, head below:

  1. To begin, just press onto these "Ctrl+Shift+Show windows" keys at the same time. The "Show windows" key was usually located right within the top row and resembles a rectangle with two vertical lines within the right.
  2. In the control panel that appears right from the bottom, make sure to click right into the "New screen recording" button.
  3. After that, ensure to choose whether to record the full screen, or even a specific window, or perhaps such of a selected area.
  4. To this point, just click onto the "Record" button to begin recording.
  5. Thereafter, to stop recording simply click the "Stop" button right within the control panel.
  6. The recording will be thus saved into the Downloads file folder.

Screen Record on Chromebook Using Keyboard Keys

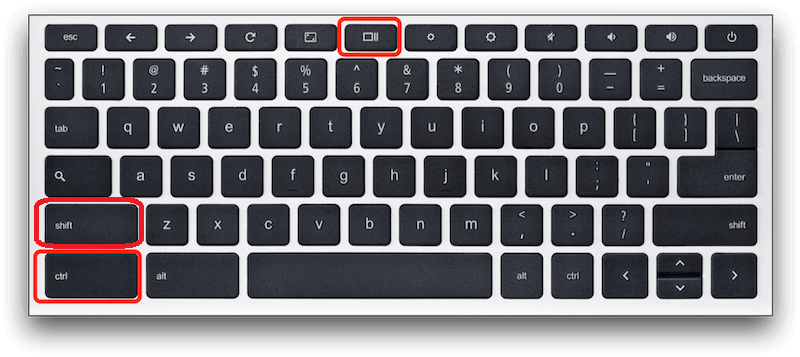
Note: If can't locate this "Show windows" key, ensure to start a screen recording by using the "Ctrl+Shift+F5" keyboard shortcut on a Chromebook.

Way 2. How to Screen Record on Chromebook (Screen Capture)

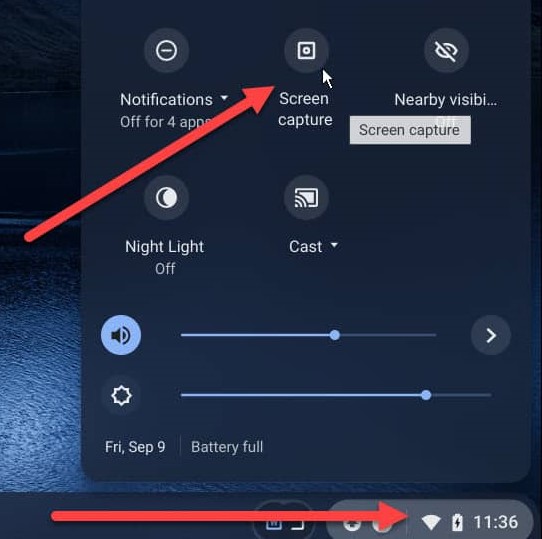
Screen Capture has been a pre-installed capability of Chromebooks that lets users record their displays and get screenshots without a keyboard shortcut. Beginning with Chrome operating system version 89, the Screen Capture function is easily available for capturing your Chromebook screen. Use the Screen Capture tool to record your screen following these guidelines:

  1. To get started with this, make sure to open up the Quick Settings panel by simply clicking onto the clock right within the screen. If the panel isn’t fully expanded, hit up the up arrow within top right.
  2. After that, select this “Screen Capture” button to have fully access that Screen Capture toolbar.
  3. Afterwards, the Screen Capture toolbar would thus appear within bottom of the screen which then ready for use.
  4. From there, into the left side of that toolbar, make sure to select between taking of such screenshot or perhaps recording the screen, but don’t start recording yet.
  5. Decide how much of the screen you want to record. To this point, within the right of the button that implies “Record”, there are three icons as well as from that just pick which one that suits the needs.
  6. Upon doing that, to adjust audio settings just simply press onto the Settings gear which then right beside of the selection icons. Decide if to include the microphone audio along with system audio.
  7. Thereafter, hit “Record” button to begin recording. When finished, just hit also the button “Stop” to end as well as to indeed save the video.

How to Screen Record on Chromebook via Screen Capture

Way 3. How to Screen Record on Chromebook (Screencast)

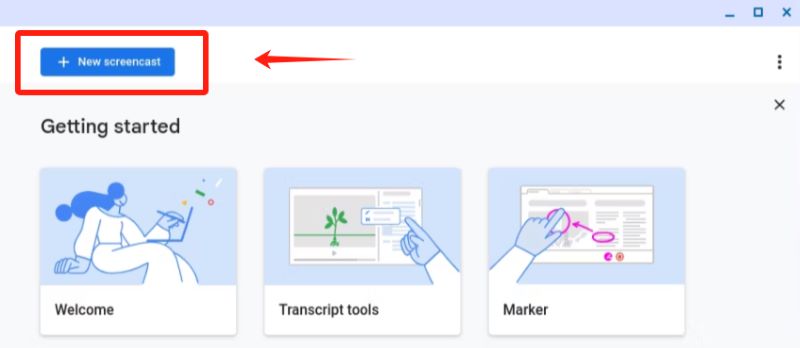
Versions of Chrome OS 103 as well as indeed later include an additional tool called the Screencast app. This free and also pre-installed app on the Chromebook is ideal for recording your screen along with adding quick annotations. Follow these steps to screen record using the Screencast app:

  1. Start within accessing the program launcher as well as locate the "Screencast" app. To access the toolbar, simply click upon the "+ New Screencast" tab located right within the top left corner of the screen.
  2. After doing so, select the preferred recording settings. After which, to activate audio recording, tap onto the "Settings" icon and ensure to enable the "Microphone" option.
  3. Once the necessary adjustments have been made, simply press over the red record button to initiate the screen recording process.
  4. After that, to fully include annotations, simply choose the "Pen" symbol.
  5. Once the recording has been fully finished, simply click upon the red "Stop" icon to conclude the session.
  6. Thereafter, store those recording within the Screencast application or perhaps distribute it immediately via a hyperlink within the social media platforms.

How to Screen Record on Chromebook with Screencast

Part 4. FAQs

In what place on my Chromebook can I find the records of my screen?

On a Chromebook, screen recordings typically find home under the Downloads folder. Nevertheless, the limited storage capacity of the Chromebook's hard drives could cause the device to periodically delete acquired data in order to free up more space.

In what type of file do Chromebook screen captures get saved?

Usually, on a Chromebook, the pre-installed screen recording capabilities save the recordings automatically in the WEBM format. Although this format may not be the most user-friendly, converting WEBM files to MP4 is usually crucial to improve interoperability with many devices.

Can a designated section of the Chromebook screen be captured?

Absolutely, you have the capability to capture a designated section of the screen on a Chromebook by opting for the partial screen feature in the screen capture toolbar. To pick the required region, drag your cursor and then click the "Record" button.

Can one annotate or simply sketch on the screen while filming on a Chromebook?

Indeed, when recording on a Chromebook, one can annotate or draw on the screen using particular screen recording tools that offer this feature. This function records and lets you annotate or draw straight on the screen.

People Also Read14 Best Internal Audio Recorder for Windows/Mac/Phone5 Ways on How to Record Gameplay on PC [Windows 10]

Conclusion

In conclusion, Chromebooks provide versatile and efficient solutions for screen recording, ensuring users can easily create high-quality video content for any purpose. Knowing how to screen record on Chromebook is straightforward with various methods available and using the best tool FoneDog Screen Recorder to screen record within your Chromebook. Indeed, each option offers unique features to suit different needs, from quick captures to detailed recordings with annotations.

Leave a Comment

Comment

Comment ()
author image

Adela D. Louie

Tech Website Writing /Content Optimization

Singing, smiling, surprising every day!

So as a technical writer, it is my duty to gather effective and reliable solutions to answer questions on how to deal with the issues they are having with their devices.

Screen Recorder logo

Screen Recorder

Powerful screen recording software to capture your screen with webcam and audio.

How Do You Like This Article?

Check icon/ Check icon

INTERESTINGDULL

Check icon/ Check icon

SIMPLEDIFFICULT

Thank you! Here' re your choices:

Rate This Article: Excellent

Rating: 4.8 / 5 (based on 92 ratings)

Screen Recorder logo

Screen Recorder

Powerful screen recording software to capture your screen with webcam and audio.

FoneDog uses cookies to ensure you get the best experience on our website. Click here to learn more.