FoneDog Screen Recorder
FoneDog Screen Recorder
Special Offer
Special Offer


By Adela D. Louie, Last updated: March 22, 2024
Have you ever encountered a situation when you desire to capture an ideal moment off your screen, but are uncertain about how to accomplish this using your Gateway laptop? Do not worry, as we have you taken care of! The goal of this article is to give you a general idea of how to screenshot on Gateway laptop.
Irrespective of the user's technological proficiency, the comprehensive guidelines presented herein will elucidate the process and permit quick and effective screenshot capture and screen recording on a laptop. We'll help you get the most out of your Gateway device, so say goodbye to confusion and hello to easier screen grabs. Let us fully explore and bring out your creative side!
Part 1. Top-Notch Tool to Screenshot on Gateway Laptop – FoneDog Screen RecorderPart 2. Methods on How to Screenshot on Gateway LaptopPart 3. FAQsConclusion
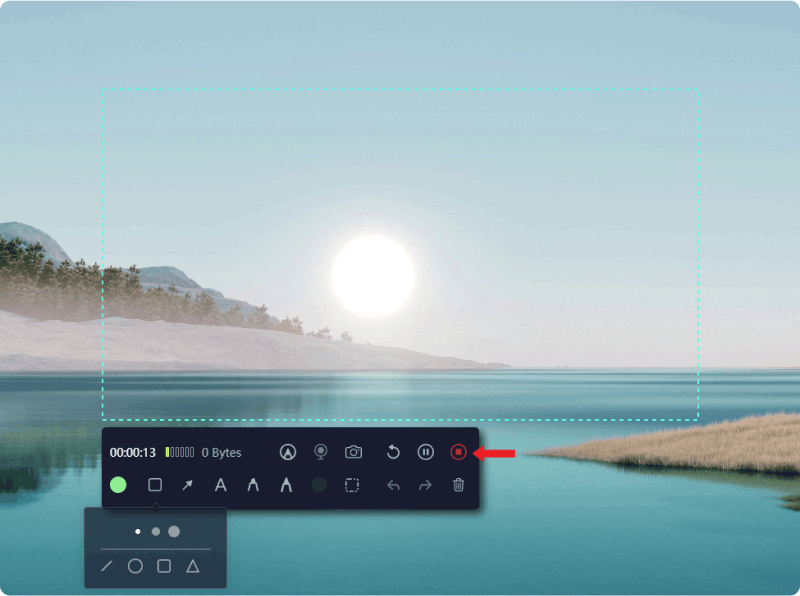
FoneDog Screen Recorder is widely regarded as the prime application for capturing screenshots on a Gateway laptop owing to its feature-rich design and straightforward user interface. With its amazing capabilities, users can effortlessly select custom-sized capture areas, apply annotations with various color options, and utilize convenient tools for precise editing.
FoneDog Screen Recorder ensures efficient screenshot capture and customization, making it the preferred choice for Gateway laptop users seeking high-quality screenshots. It's also a powerful tool for recording screen on a PC.
![]() Free Download
For Windows
Free Download
For Windows
![]() Free Download
For normal Macs
Free Download
For normal Macs
![]() Free Download
For M1, M2, M3
Free Download
For M1, M2, M3
Capturing screen images has become integral in both educational and communicative endeavors. These images serve to elucidate complex concepts and notions, aiding in comprehension. Screenshots find utility across various scenarios such as instructing software usage, documenting pivotal instances during video conferences, and illustrating data or instances within academic documents. This section will demonstrate diverse methods on how to screenshot on Gateway laptops, allowing us to delve into the process without delay.
Snip & Sketch's primary objective is to streamline the task of collecting screenshots while annotating these through drawings. The Snip & Sketch application enables users to easily grab snapshots of their overall screen, running windows, or particular sections. The tool provides a range of adjustable features to accommodate the distinctive preferences and specific needs of individuals.
It serves as a valuable resource for collaborative endeavors, thorough documentation of information, and seamless sharing of visual content, streamlining the process of capturing and editing screenshots. Below are several steps outlining how to utilize it effectively for capturing clear screenshots:
Windows" keyUsers were able to efficiently and swiftly capture screenshots throughout the Windows operating system, eliminating the necessity of switching between apps or acquiring supplementary software. This convenience is made possible by Microsoft's integration of convenient keyboard shortcuts.
These shortcuts provide a smooth method to capture specific screen areas or the entire screen, catering to various needs. This segment will guide you through the process of taking screenshots in Windows utilizing the default keyboard shortcuts.
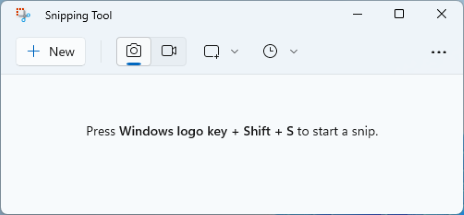
Windows," "Shift," and "S" keys.Ctrl" + "V" to paste the screenshot, or perhaps opt for a right-click followed by simply selecting on the option "Paste."Windows 10 offers a user-friendly program called The Snipping Tool, which particularly facilitates the efficient capture of screenshots. Users can quickly and precisely screenshot their displays with this feature. Customization features within the Snipping Tool allow for the selection of specific regions or the entire screen for capture.
Besides that, users can add annotations or even highlight important parts of pictures after taking them, and they can also make other quick changes. Below are outlined steps on how to utilize it effectively:
An alternative method for capturing screenshots on Gateway laptops involves utilizing the Xbox Game Bar. This integrated feature facilitates the capture of high-resolution screenshots on Gateway devices through a straightforward process. Additionally, it possesses the capability to record screen activity and gameplay in high-definition quality, rendering it an appealing option for Windows 10 and 11 Gateway users.
Windows + G" keys to launch the Xbox Game Bar right within the Windows 10 or even into the Windows 11 device.Windows + Alt + PrtScn" to capture screenshots on a Windows 10 Gateway laptop.
Here are some common questions regarding how to screenshot on Gateway Laptop, check them up to help you out:
The location of the screenshot feature varies depending on your device. Typically, you can utilize the Windows + PrtScn combination to swiftly capture a screenshot. If the PrtScn key is absent, you can use Fn + Windows as the designated screenshot command on your laptop.
Absolutely! There exist diverse methods to capture screenshots of a particular webpage or a scrolling window. One approach involves employing specialized tools developed by third-party companies designed specifically for capturing scrolling screenshots. These tools enable you to capture the entirety of a webpage, including areas not currently visible on your screen. Alternatively, you can manually scroll through the window and capture individual segments as they become visible.
Screen recording serves various purposes on a Gateway laptop. Below are just a few examples:
The length of your recordings and the grade level you choose will determine how big your video files are. Making sure you have enough room on your hard drive is very important before you start any recordings.
People Also ReadUser-Friendly Guide: How to Screen Record on HP Laptop 2024How to Screen Record on Lenovo Laptop: 6 Easy Ways!
In conclusion, capturing screenshots on a Gateway laptop is a simple process. However, it's crucial to explore specific variations depending on the laptop model and operating system so it is nice to incorporate tools like FoneDog Screen Recorder as the go-to solution for Gateway laptop users seeking seamless and high-quality screenshot functionality.
Remembering keyboard shortcuts and utilizing built-in screenshot tools can streamline the process. Overall, mastering screenshot techniques enhances productivity and facilitates effective communication through visual aids. Happy Screencapturing!
Leave a Comment
Comment

Tech Website Writing /Content Optimization
Singing, smiling, surprising every day!
So as a technical writer, it is my duty to gather effective and reliable solutions to answer questions on how to deal with the issues they are having with their devices.
Screen Recorder
Powerful screen recording software to capture your screen with webcam and audio.
Hot Articles
 /
/
INTERESTINGDULL
/
SIMPLEDIFFICULT
Thank you! Here' re your choices:
Excellent
Rating: 4.5 / 5 (based on 99 ratings)