FoneDog Screen Recorder
FoneDog Screen Recorder
Special Offer
Special Offer


By Adela D. Louie, Last updated: September 9, 2024
One of the best products released by Microsoft is Surface Pro. Many users love it as it’s actually a 2-in-1 device. It can be considered a “hybrid” gadget since it can be used as a tablet and a laptop. Using one might have surely made you think of several things you can enjoy out of it such as being able to capture screenshots or record screen.
Whether you’re looking to create materials for presentations or for content for sharing, or explaining and detailing a complaint, learning how to screenshot on Surface Pro would be vital. Thus, we curated this post to highlight the easy methods of how you can ace the procedure.
Begin reading by moving into the first part. Hopefully, at the end of this post, you’ll be able to decide on which option is the most suited to you.
Part 1. Taking Screenshots on Surface Pro Via Hardware ButtonsPart 2. Taking Screenshots on Surface Pro Using the KeyboardPart 3. Taking Screenshots on Surface Pro Using the Surface PenPart 4. Taking Screenshots on Surface Pro Using the Snipping ToolPart 5. The Best Way to Capture Screenshots on Surface ProPart 6. Conclusion
One of the most basic ways of how to screenshot on Surface Pro is by utilizing your device’s hardware buttons. Such buttons could vary depending on the model you’re using.
Apart from explaining in detail how to screenshot on Surface Pro via the hardware buttons of the device, it’s worth taking some to also highlight how it can be done using the keyboard.
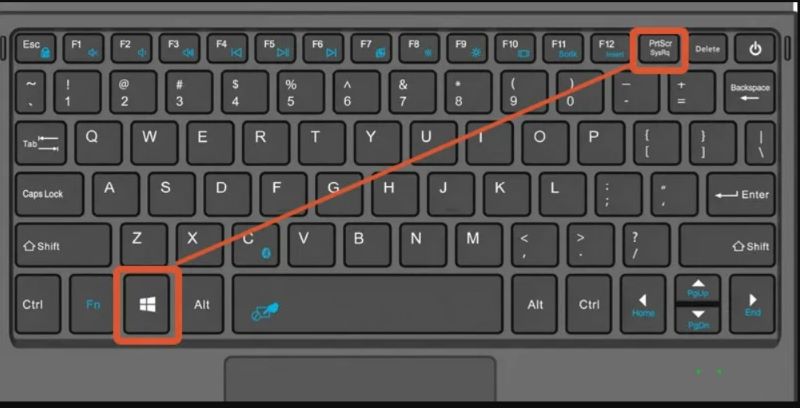
When capturing your entire screen, you can just simply press the “Print Screen” key.
When the “Print Screen” and “Windows” buttons are pressed at the same time, it will also let you capture your whole screen.
If you’re thinking about how to screenshot on Surface Pro targeting an active window, you just have to do the below.

If you have a Surface pen, capturing a snip of your screen is also easily possible on your Surface Pro. Here are the simple guides on how to screenshot on Surface Pro with the help of the Surfacee Pen.
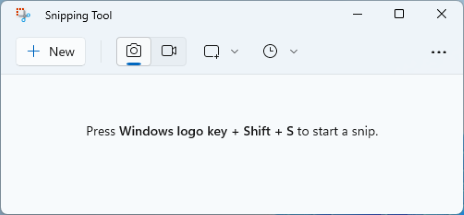
The Snipping Tool is also available on Surface Pro! This means you can have this utilized as well. Since this device has Windows OS, the program is already pre-installed. You just have to launch and use it well!
If you’d like to use the Snipping Tool, just follow the below guide on how to screenshot on Surface Pro.
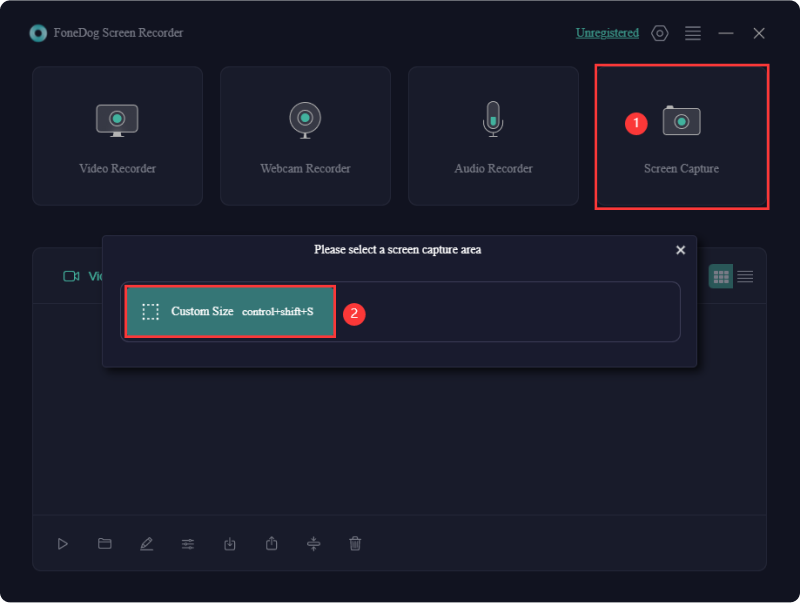
Indeed, the previously shared methods of how to screenshot on Surface Pro are good enough since they are easily accessible and won’t cost you any fee. However, they might be lacking when it comes to advanced features. Thus, we highly suggest the use of professional software apps like the FoneDog Screen Recorder.
There should not be any issues when it comes to compatibility as this tool supports both Mac and Windows OS. Plus, it is loaded with great and awesome functions. It has an easy UI and is easy to handle and navigate. To use it to take screenshots on any PC like Samsung or Surface Pro, check out the below.
![]() Free Download
For Windows
Free Download
For Windows
![]() Free Download
For normal Macs
Free Download
For normal Macs
![]() Free Download
For M1, M2, M3
Free Download
For M1, M2, M3
People Also ReadQuick Guide: How to Screenshot on Dell Laptop Or DesktopEasy Guide on How to Screenshot on HP Devices (2024)
This post has shared five easy methods of how to screenshot on Surface Pro. All of them are good enough to use even the free options. However, if you’re eyeing to have the best experience when taking screenshots and achieving the best outputs, resorting to using professional tools like the FoneDog Screen Recorder is the key.
Leave a Comment
Comment

Tech Website Writing /Content Optimization
Singing, smiling, surprising every day!
So as a technical writer, it is my duty to gather effective and reliable solutions to answer questions on how to deal with the issues they are having with their devices.
Screen Recorder
Powerful screen recording software to capture your screen with webcam and audio.
Hot Articles
 /
/
INTERESTINGDULL
/
SIMPLEDIFFICULT
Thank you! Here' re your choices:
Excellent
Rating: 4.6 / 5 (based on 71 ratings)