By Adela D. Louie, Last updated: June 12, 2024
If you could take your videos to the next level by adding sound that goes exactly with each scene, that would be amazing. You can use OBS Screen Recorder to manage different audio tracks like a pro whether you're a gamer or a content creator. This article will enable you to access OBS robust audio capabilities, enabling you to individually manipulate and improve each individual sound component.
Enjoy clear sound like a pro! Follow these steps on how OBS separate audio tracks to easily set up, manage, and improve multiple audio tracks so that your audience gets exactly what you want them to. Want to change the way you listen to music? Let us begin!
Part 1. Top Alternative Tool to Record Audio Tracks on PCPart 2. How OBS Separate Audio Tracks (Steps)Part 3. Benefits and Tips of Separating AudioPart 4. FAQsConclusion
Part 1. Top Alternative Tool to Record Audio Tracks on PC
FoneDog Screen Recorder is an excellent alternative tool for recording audio tracks on a PC. It allows users to capture system sound and microphone input simultaneously or separately, providing flexibility for different recording needs.
Its user-friendly interface simplifies the process, while features like pause, restart, and easy saving enhance convenience. This makes FoneDog Screen Recorder a versatile choice for creating high-quality audio recordings for various purposes.
Free Download
For Windows
Free Download
For normal Macs
Free Download
For M1, M2, M3
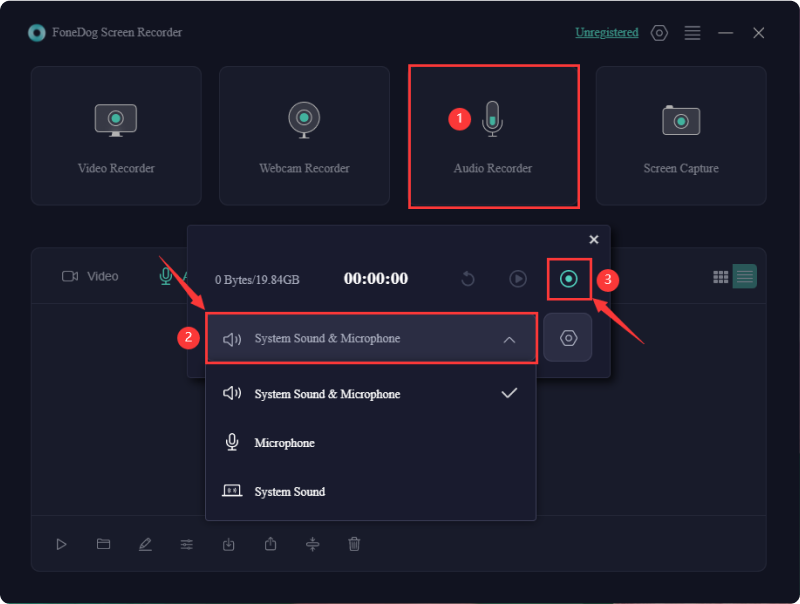
How to Record Audio Tracks on PC:
- After downloading and activating FoneDog Screen Record on PC, begin the setup process.
- Next, select feature "Audio Recorder" from the main interface.
- To record both system and microphone audio simultaneously, choose "System Sound & Microphone". For recording a single audio source, select either "Microphone" or "System Sound".
- Start recording by clicking the green button on the right side of the screen.
- Stop the recording by clicking the red button, then save and organize the clip on PC.
- Use the "Pause" feature to temporarily halt and resume recording as needed. To start over, use the "Restart" option to clear the previous recordings.
Part 2. How OBS Separate Audio Tracks (Steps)
Simple video and audio capture is made possible by OBS, the open-source screen recording program, which works with most streaming platforms. Both podcasters and vloggers prefer this adaptable tool. Here’s a comprehensive guide on how to record separate audio tracks in OBS Studio:
- Step 1: To get started, simply download OBS Studio for free right within the official website if then haven’t already within the device.
- Step 2: After that, open the app and make sure to check the permissions to ensure that OBS Studio can access the camera, microphone, and such necessary settings.
- Step 3: From doing such, simply navigate to the audio settings which thus located right within lower-right corner of OBS Studio screen window.
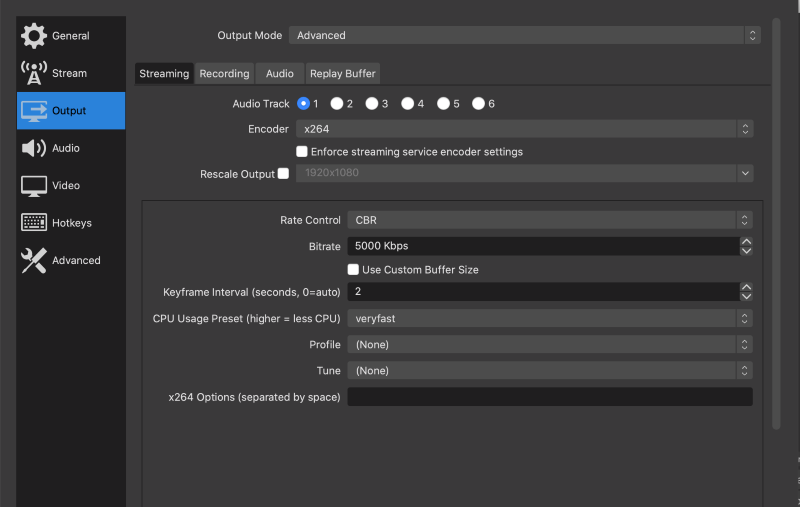
- Step 4: Upon there, go over to the "Output" tab within that settings window.
- Step 5: Change the "Output Mode" into the "Advanced" option and from that click on that "Recording" tab.
- Step 6: Afterwards, select upon the Audio Tracks "1-6" which then based on the number of tracks which thus wish to record.
Bonus Method: How OBS Separate Audio Tracks for Streaming
While separate audio tracks don’t directly impact streaming, they offer enhanced control over your audio. Twitch streamers could indeed utilize a VOD track which thus enabling selective audio for streams as well as the VODs. Follow these steps:
- Make sure to open first the OBS output settings. After which, head over and set the output mode to "Advanced".
- From there, simply navigate over towards the streaming tab to find audio track options.
- Afterwards, choose on a track for streaming. Twitch streamers can enable and choose a VOD track.
- Upon there, apply and close the settings.
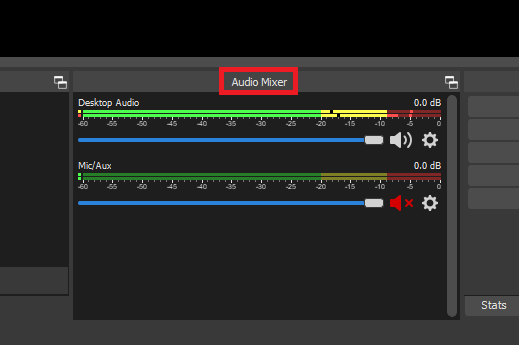
- Thus, herein access advanced audio properties via the audio mixer.
- After doing so, indeed access the desired audio sources for the streaming track.
- To this point, just simply repeat for the VOD track.
Part 3. Benefits and Tips of Separating Audio
Separating audio tracks in OBS provides several benefits:
- Enhanced Editing Flexibility: Allows for precise adjustments to individual audio sources during post-production without affecting other tracks.
- Improved Audio Quality: Enables fine-tuning of volume levels and applying specific effects to each track, enhancing overall sound quality.
- Selective Audio Control: Facilitates the inclusion or exclusion of specific audio elements, such as background music, from different outputs like live streams and recordings.
- Simplified Troubleshooting: Isolates audio issues to specific tracks, making it easier to identify and resolve problems.
- Audience Customization: Tailors audio content for different audience experiences, such as creating separate tracks for commentary and game sound.
- Professional Production Value: Offers the capability to produce more polished and professional content by managing audio tracks separately.
- Streamlined Workflow: Integrates seamlessly with video editing software, streamlining the workflow for content creators by keeping audio tracks organized and manageable.
Additional Tips:
- Organizing Audio Tracks: Initially, assigning audio to specific tracks can be challenging. An effective approach is to categorize each track and enable the respective applications within those categories, ensuring each application is correctly assigned to its track.
- Applying Filters: You can apply filters to application audio capture sources, helping to eliminate background noise from conversations or calls.
- Using Hotkeys for Quick Audio Control: OBS hotkeys allow you to quickly mute certain audio devices with a simple keyboard shortcut.
- Playing Music Without Hearing It: You can play music through a separate audio device and add it to OBS via an application audio source. This setup ensures that your stream hears the music while you do not.
- Organizing Audio Sources: To manage audio sources more effectively, you can either group them or create a dedicated scene for audio management.
Part 4. FAQs
Are separate audio tracks supported in all OBS recording formats?
Yes, separate audio tracks are supported in most recording formats in OBS, including popular ones like MP4 as well as MKV. However, it's always recommended to verify compatibility with specific formats as some may have limitations or require additional configuration.
Do separate audio tracks affect performance in OBS?
Separate audio tracks in OBS typically have minimal impact on performance since audio processing is less resource-intensive compared to video. However, enabling a large number of tracks or using heavy audio effects may slightly increase CPU usage.
Can I edit each audio track separately after recording in OBS?
Yes, after recording in OBS with separate audio tracks, you can edit each track individually using audio editing software. This allows for precise adjustments, such as volume levels, effects, and timing corrections, providing greater control over the final audio mix.
Can I record multiple audio sources simultaneously with separate audio tracks?
Yes, OBS allows you to record multiple audio sources simultaneously with separate audio tracks. This feature enables you to capture different audio inputs individually, providing flexibility for editing and post-production adjustments.
People Also ReadFull Guide about Best OBS Recording Settings [Step-by-Step]Insight Guide: Where Does OBS Save Recordings?
Conclusion
To sums up, OBS separate audio tracks feature significantly enhances audio management by providing precise control and flexibility. As such, separate audio tracks in OBS elevate the professional quality of both live streams and recorded videos, making OBS an essential tool for serious content creators.