By Adela D. Louie, Last updated: January 17, 2024
Ever wished you could capture the laughter, the stories, and the shared moments with your loved ones during those virtual calls? Well, wish no more! Our guide is your gateway to unlocking the power to record FaceTime calls effortlessly.
In this article, we'll navigate the technological terrain, providing you with step-by-step insights and insider tips on how to preserve those special moments at the touch of a button. Discover the art of FaceTime call recording and turn your virtual connections into timeless memories. Let's dive in and make your conversations last a lifetime!
Part #1: How to Record FaceTime CallPart #2: Best Tool in Recording FaceTime Calls with or without Audio – FoneDog Screen RecorderPart #3: Troubleshooting And TipsConclusion
Part #1: How to Record FaceTime Call
There are several ways to record FaceTime calls, and the methods vary depending on the device you're using. Here are different approaches for recording FaceTime calls on iOS devices (iPhone, iPad) and Mac:
Recording FaceTime Calls on iOS Devices:
Method #1: Built-in Screen Recording:
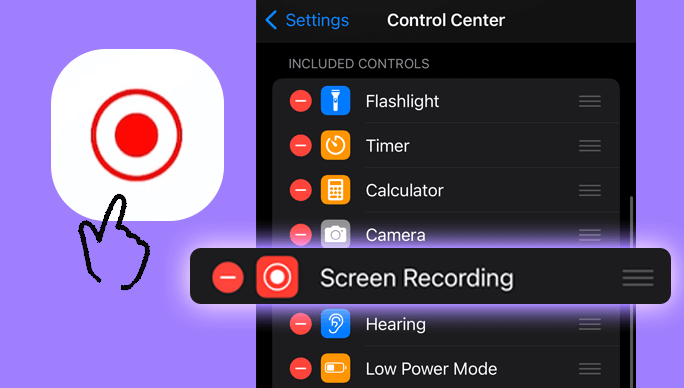
- To begin, launch the "Settings" application on your iOS device. From there, navigate to the "Control Center" settings and proceed to the "Customize Controls" section. Within the customization options, locate and add "Screen Recording" to the list of included features.
- Once this setup is complete, initiate a FaceTime call. During the call, perform a specific gesture depending on your iPhone model: if you're using an iPhone X or perhaps a later version, from that you must swipe down right into the top-right side of the screen. For iPhone 8 or perhaps the earlier, just simply swipe up from the bottom edge. This action will reveal the Control Center.
- Within the Control Center, identify the screen recording button—it is represented by a circle with a dot inside. Press and hold this button. To enable audio recording, tap on the microphone icon.
- The recording process will commence after a brief 3-second countdown. This sequence of steps ensures that you seamlessly activate screen recording with audio during a FaceTime call on your iOS device.
- Note: This method captures both video and audio.

Method #2: Using a Third-Party App:
There are several apps available on the App Store that allow you to record FaceTime calls. Examples include "TapeACall" and "Rev Call Recorder". These apps usually require a subscription or one-time purchase.
- Begin the process by accessing the App Store on your device and proceed to download a FaceTime call recording application.
- Subsequently, install the downloaded application by following the installation prompts and instructions provided.
- Once the installation is complete, launch the application on your device.
- Within the app, initiate a FaceTime call according to the provided functionalities.
- Adhere to the application's specific guidelines and prompts to commence the recording process seamlessly.
Recording FaceTime Calls on Mac:
Method #1: Using QuickTime Player:
To initiate the screen recording process on your Mac using the QuickTime Player application, follow these comprehensive steps:
- Commence by launching the QuickTime Player application on your Mac. You can typically find this application in your Applications folder or by using the Spotlight search.
- Once QuickTime Player is open, navigate to the top menu bar of your Mac screen.
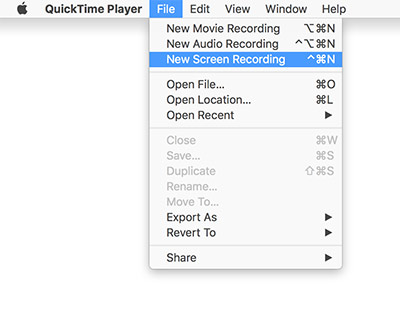
- Click on the "File" option in the top menu bar. From the dropdown menu, choose "New Screen Recording".
- A screen recording window will appear. To select your iPhone or iPad as the camera and microphone source, click the arrow located adjacent to the record button within this window.
- Confirm that the record button is selected. This is a crucial step to ensure that the screen recording captures the desired content seamlessly.
- With the screen recording settings configured, begin your FaceTime call on your iOS smartphone by pressing the appropriate button on your device.
- As you start the FaceTime call, the QuickTime Player screen recording will commence capturing the ongoing interaction on your iOS device screen.
- To conclude the recording session, return to the top menu bar on your Mac screen. Click on the stop button, usually represented by a square or a similar icon, to halt the QuickTime screen recording.
- Note: This method captures both video and audio.

Method #2: Using Third-Party Software:
There are third-party applications like "Capto" or "ScreenFlow" that offer more advanced recording features.
- To successfully record your FaceTime call, start by downloading and installing third-party recording software. It's crucial to meticulously follow the instructions provided by the software during the installation process.
- Once the software is installed, initiate your FaceTime call by pressing the appropriate button.
- Subsequently, commence the recording process by utilizing the functions and features made available by the program. This step-by-step approach ensures a smooth and effective experience in capturing and preserving your FaceTime conversations.
Part #2: Best Tool in Recording FaceTime Calls with or without Audio – FoneDog Screen Recorder
Introducing FoneDog Screen Recorder, a standout screen recording solution, especially renowned for its seamless integration with FaceTime calls. This versatile software stands out as the ideal choice for capturing and preserving those precious moments during your virtual conversations.
FoneDog Screen Recorder excels in providing high-quality video and audio recording capabilities, making it the perfect companion to record FaceTime calls.
 Free Download
For Windows
 Free Download
For normal Macs
 Free Download
For M1, M2, M3
Key Features of FoneDog Screen Recorder:
- User-Friendly Interface: FoneDog Screen Recorder offers an intuitive and user-friendly interface, ensuring a straightforward experience for both beginners and seasoned users.
- High-Quality Output: Capture your FaceTime calls with exceptional video and audio quality, preserving the details of your conversations in crystal clarity.
- Customizable Settings: Tailor your recording experience with customizable settings, allowing you to adjust video resolution, audio sources, and other parameters according to your preferences.
- Flexible Output Formats: Save your recorded FaceTime calls in a variety of popular formats, granting you the flexibility to choose the one that best suits your needs.
- Real-Time Editing: Edit your recordings on the fly with FoneDog's real-time editing features, ensuring that your final output meets your standards before saving.
How to Use FoneDog Screen Recorder for FaceTime Call Recording:
1. Download and Install: Start by downloading and installing FoneDog Screen Recorder on your computer.
2. Launch the Program: Open the software and familiarize yourself with its user-friendly interface.
3. Adjust Settings: Customize your recording settings, including video resolution, audio sources, and other preferences.

4. Initiate FaceTime Call: Start your FaceTime call on your iOS device.
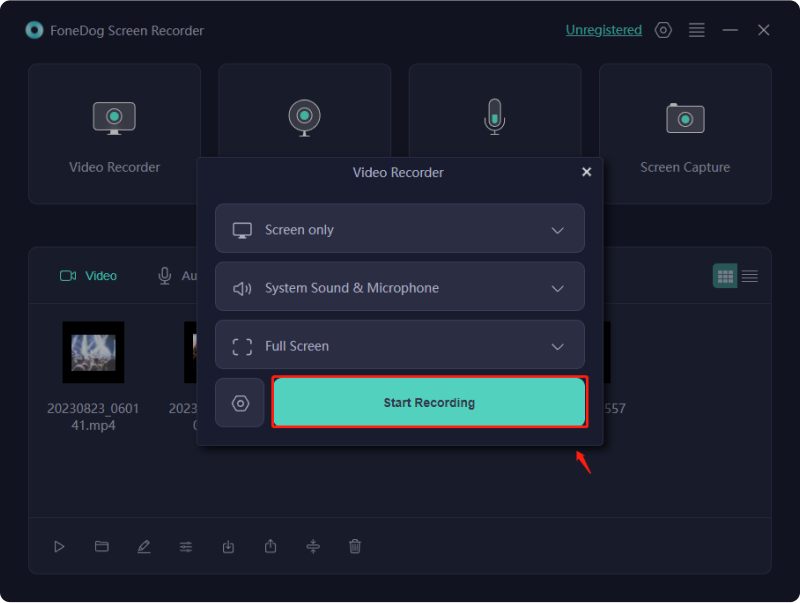
5. Begin Recording: With FoneDog Screen Recorder running, press the designated button to commence recording your FaceTime call.

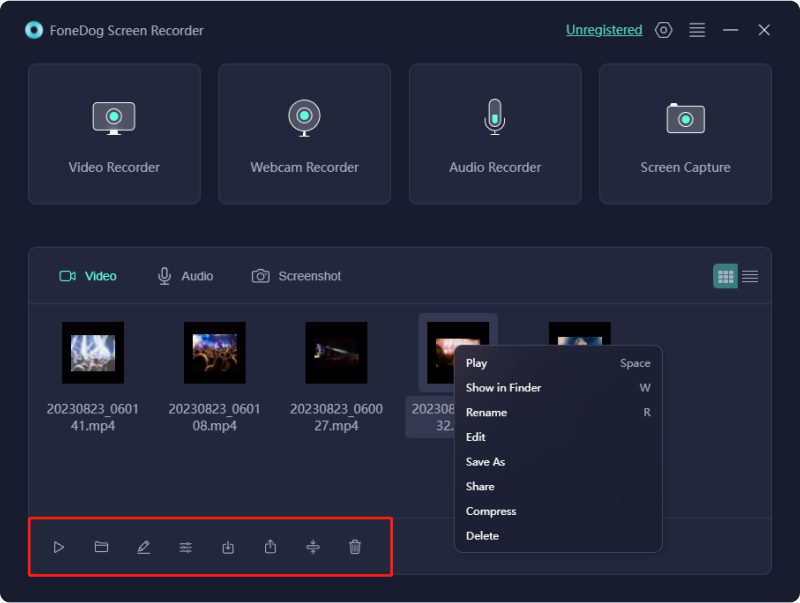
6. Edit and Save: Take advantage of the real-time editing features if needed and, once satisfied, save your recorded FaceTime call in your preferred format.

This open-source screen-capturing tool streamlines the FaceTime call recording process, ensuring a hassle-free and efficient experience. Download today and elevate your ability to capture and relive those special moments with the utmost clarity and convenience.
Part #3: Troubleshooting And Tips
While choosing to record FaceTime calls, users may encounter common issues. Here are some potential challenges, along with troubleshooting tips:
Common Issues:
- Audio Quality Problems:
- Issue: Distorted or low-quality audio in the recorded FaceTime call.
- Troubleshooting:
- Ensure that the microphone on your device is not obstructed.
- Check for background noise and minimize it.
- Use headphones with a built-in microphone for better audio quality.
- Video Lag or Glitches:
- Issue: Video recording may have lag or glitches.
- Troubleshooting:
- Check your device's available storage space; insufficient space can affect recording quality.
- Close unnecessary apps running in the background.
- Restart your device before initiating the recording.
- Failed Screen Recording:
- Issue: The screen recording stops unexpectedly or fails to start.
- Troubleshooting:
- Ensure that the "Screen Recording" feature is enabled in your device settings.
- Check for any restrictions or limitations on your device that might interfere with screen recording.
- App or Software Compatibility Issues:
- Issue: Third-party recording apps or software may not work seamlessly with FaceTime.
- Troubleshooting:
- Update the recording app or software to the latest version.
- Check for any specific settings within the recording app related to FaceTime.
- Incompatibility with iOS Updates:
- Issue: FaceTime recording features may be affected by iOS updates.
- Troubleshooting:
- Ensure that both your iOS device and any recording apps are up to date.
- Check the app's official support resources for updates or patches related to new iOS versions.
Tips to Improve FaceTime Call Recording:
- Stable Internet Connection: Ensure a stable and high-speed internet connection to prevent lag or interruptions during recording.
- Optimal Lighting Conditions: Position yourself in well-lit areas to improve video quality and clarity.
- Update Apps and Software: Regularly update your FaceTime app, screen recording features, and any third-party recording apps or software.
- Consent and Privacy: Always obtain consent from all parties before recording FaceTime calls to respect privacy and legal considerations.
- Clear Device Storage: Maintain sufficient storage space on your device to prevent recording issues due to lack of space.
- Check Microphone and Camera Settings: Ensure that your device's microphone and camera settings are configured correctly before initiating a call.
- Experiment with Different Apps: If using third-party apps, try different ones to find the one that works best for your device and preferences.
By addressing these common issues and following these troubleshooting tips, users can enhance their experience when recording FaceTime calls and minimize potential disruptions.
People Also ReadDetailed Guide: How to Record Zoom Meeting on iPhoneCapturing Conversations: Full Guide to Google Meet Recording
Conclusion
In conclusion, unlocking the potential to record FaceTime calls is your gateway to transforming virtual interactions into cherished memories. Whether it's preserving laughter, sharing milestones, or bridging distances, the tools and tips provided empower you to capture the essence of your conversations.
Embrace the journey of recording FaceTime calls; embark on a digital adventure that immortalizes the moments that matter. Create lasting memories at the touch of a button and relive the magic of your connections time and time again. Have a nice day ahead!


Free Download
For Windows
Free Download
For normal Macs
Free Download
For M1, M2, M3


/
/