

By Adela D. Louie, Last updated: July 31, 2024
In this modern age, it is necessary to know how to screen record on Windows 11, especially when it comes to capturing online classes, recording gameplay highlights, or performing jobs that require screen recording. Luckily, the market is wide, and it is easily accessible with just a few clicks. Here we explore screen recorder shortcuts for Windows 11, to optimize your performance and record high-quality clips.
Part 1. Best Screen Recorder with Shortcuts for Windows 11 Part 2. Xbox Game Bar Shortcuts for Screen Recording on Windows 11Part 3. OBS Screen Recorder Shortcuts for Windows 11Conclusion
Fonedog Screen Recorder is a professional and, at the same time, convenient screen recording tool that produces high-quality screen recordings with just a few clicks. It offers a wide scope of recording tools that increase the productivity of the user for protected video recording, screen gameplay, screen and sound recording, and more, such as screen recorder shortcuts for Windows 11.
Free Download
For Windows
Free Download
For normal Macs
Free Download
For M1, M2, M3
In addition, it has the ability to screen record simultaneous HD videos with system sound and microphone, lag-free recording, and specific recorded screen parts.
Here is the step-by-step guide:
Download and Run the FoneDog Screen Recorder on your Windows 11 PC.
In the main interface of the software, click the “Video Recorder” icon.
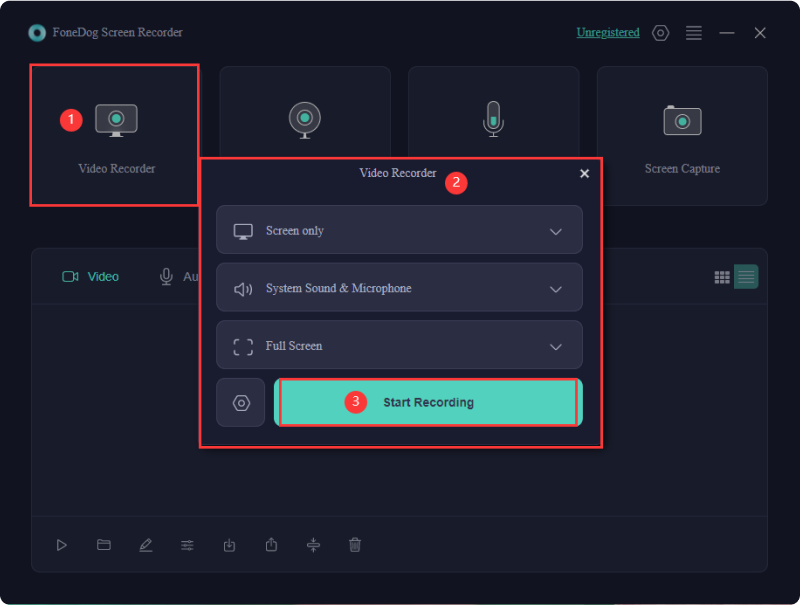
To record the screen, click “Screen Only” button, and “Screen & Camera” button to record the screen and webcam simultaneously. Then, choose the recording area you prefer (Full Screen, Window, or Custom Size).
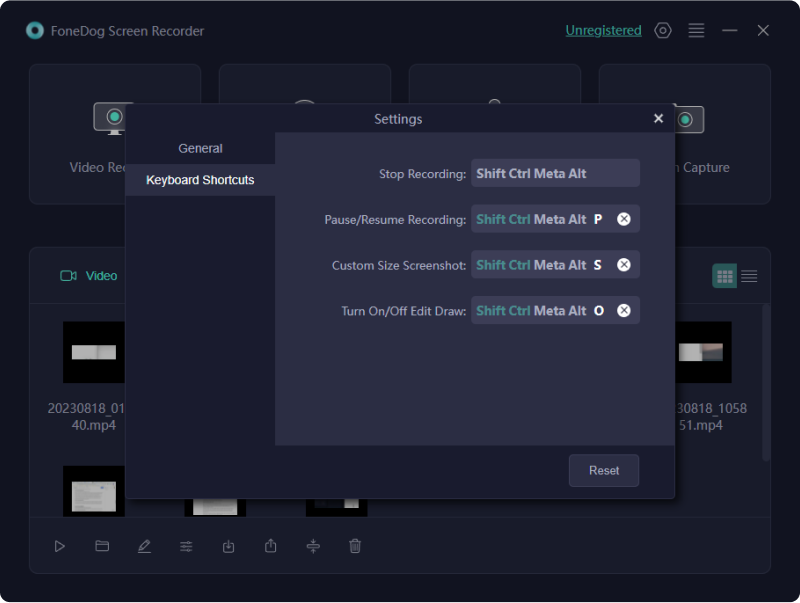
You can customize shortcut keys by just clicking the General Settings > Keyboard Shortcuts. It has default shortcut keys for the different recordings including Screen Recorder Shortcuts for Windows 11, you can change based on your needs.
Select “System Sound & Microphone” to record the sound and microphone simultaneously; “System Sound” or “Microphone” to record only one; or “None” to record the screen without sound.
Click “Start Recording” to record.
Tip: If you select “Window” as the recording area, you can choose several windows of your preference to record, which will pop up. Just click the desired window, and you are good to go.
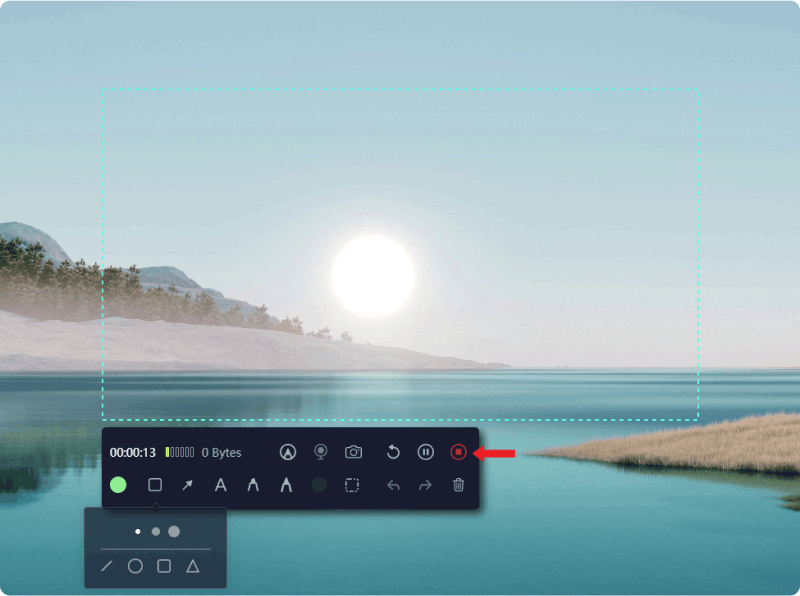
Note: In the Floating toolbar, “Edit” icon is use select the color you prefer, utilize annotation tools to make lines, circles, brushes, arrows, and erasers. Aside from that, “Undo”, “Redo”, and “Clean” buttons, and the turning of the webcam are also available during recording process.
Press the “Stop” button to stop the recording process, and it will automatically save to your computer. You can also pause by just clicking “Pause” and click again to continue; and “Restart” icon to start over the recording.
Xbox Game Bar, though freeware for taking screenshots, has screen recorder shortcuts for Windows 11. With this, you can screen record your PC, but with an estimated time of 4 hours. It allows the user to adjust the quality, frame rate, and hotkeys for the desired recording, however, it is limited to customizing the screen recording region. Here’s how to activate:
To activate the screen recorder shortcuts for Windows 11, press the Windows icon + G, or you can proceed to the Xbox Game bar by searching in the menu.
Note: If problems arise, such as the game bar not showing up, go to Settings > Gaming > Xbox Game Bar.
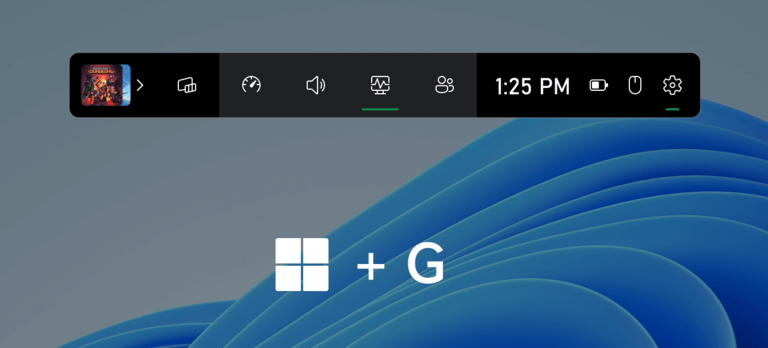
As you can see from the following icons in the floating toolbar, click “Settings” to adjust the recording parameter, which includes sound source, and alike.
Go back to the floating toolbar and select the “Capture” icon. Click on the start recording button, or simply press Windows + Alt + R hotkeys as the screen recorder shortcuts for Windows 11. You also have the freedom to enable and disable the microphone at any time.
Once done, simply hit Windows + Alt + R to end the video recording. Upon viewing, click the “Show all captures”.
Pro Tip for Windows 11 Users: Screen recorder shortcuts for Windows 11 have advance tips, just go to Settings > Gaming > Captures. This includes Aiving path, Max recording Length, Video frame rate and quality and more.
The vast availability of OBS Studio, a freeware, open-source recorder with screen recorder shortcuts for Windows 11, paves its way to the market as it offers advanced features that maximize your recording experience, including desktop capturing with audio and web cameras, dual monitor recording, and more. However, it is not convenient because it is difficult to operate due to the complicated UI. To set off:
From its official website, install OBS Studio on your Windows 11 computer or laptop.
As you open, display the current screen you wish to record. Click the “+” button under the Source tab, and navigate to the Display capture button.
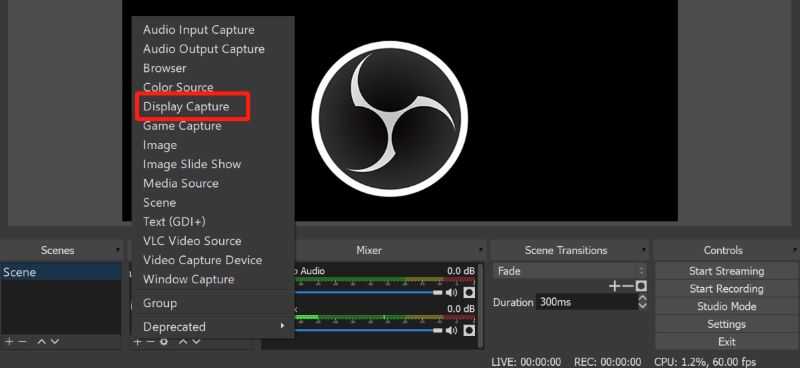
Click the “+” icon under the Source tab. Then adjust your recording preference and parameters based on your necessities.
Hit the “Start recording” button at the lower right corner to begin recording.
People Also Read12 Must-Have And Best Free Recording Software for PC (2024)5 Ways on How to Record Gameplay on PC [Windows 10]
Screen recording is quite overwhelming, especially since there are vast screen recorder applications that offer screen recorder shortcuts for Windows 11—making the experience accessible, efficient, and convenient while still yielding high quality recording. It is up to the user to pick which software fits who. Fonedog Screen Recorder, Xbox Game Bar, and OBS Studio are some of the numerous programs available to try.
Leave a Comment
Comment
Screen Recorder
Powerful screen recording software to capture your screen with webcam and audio.
Hot Articles
/
INTERESTINGDULL
/
SIMPLEDIFFICULT
Thank you! Here' re your choices:
Excellent
Rating: 4.8 / 5 (based on 103 ratings)