FoneDog Screen Recorder FoneDog Screen Recorder
Special Offer Special Offer
Only Only
$4.49 $4.49
to get a ONE-month license to get a ONE-month license
Sale ends in xx days Sale ends in xx days
Buy Now
sale

How to Screen Recording with Voice Over on PC/Phone [2024]

By Adela D. Louie, Last updated: June 18, 2024

Imagine easily guiding your audience through lessons, presentations, or gameplay with engaging voice narration. Get ready to enhance the quality and impact of your screen recordings! This article explores the process of screen recording with voice over which spontaneous narration, revealing the artistic aspects involved.

If you're a content creator, instructor, or professional aiming to improve your presentation skills, this guide is for you. Learn how to create captivating and instructive recordings that leave a lasting impact. Get ready to turn your static graphics into engaging experiences that both fascinate and educate. Let's get started!

Part 1. Best Tool for Screen Recording with Voice Over on Windows/MacPart 2. How to Screen Recording with Voice Over on All DevicesPart 3. Tips on Enhancing Screen Recording with VoiceoverPart 4. FAQsConclusion

Part 1. Best Tool for Screen Recording with Voice Over on Windows/Mac

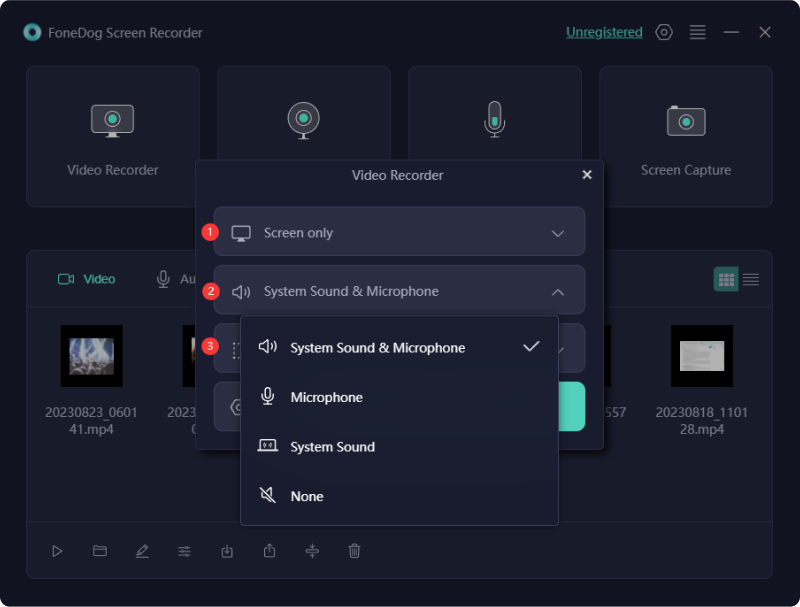
FoneDog Screen Recorder stands out as the premier tool for screen recording with voiceover on both Windows and macOS platforms. Its intuitive interface allows seamless navigation, while its versatile recording options cater to various audio sources.

windows Free Download For Windows mac Free Download For normal Macs mac Free Download For M1, M2, M3

With features like simultaneous system sound and microphone capture, it ensures high-quality recordings. Whether for tutorials, presentations, or gaming, FoneDog Screen Recorder offers unparalleled convenience and performance for all your recording needs.

How to Screen Record with Voice Over on PC:

  1. To begin with this, obtained and correctly installed the FoneDog Screen Recorder application on the device operating (Windows or macOS).
  2. Upon installation completion, navigate right towards the primary interface of FoneDog Screen Recorder and opt for the "Video Recorder" function.
  3. Following that, select the option labeled "System Sound & Microphone" to capture audio right within the device's system. Alternatively, choose either "Microphone" or "System Sound" to record a singular source of audio.
  4. After that, initiate the recording process by tapping the “Start Recording” button located right within the bottom right corner of FoneDog Screen Recorder interface.
  5. When finished recording, tap the red "Stop" icon. Utilize the "Pause" feature to temporarily halt the recording. When ready to resume, simply press the "Pause" button again.
  6. To initiate a new recording while discarding the previous one, opt for the "Restart" function within the FoneDog Screen Recorder display interface.

How to Screen Record with Voice Over on PC

Part 2. How to Screen Recording with Voice Over on All Devices

Amid the era of remote work, individuals often find themselves navigating a series of virtual meetings or online educational sessions. For those disinclined towards note-taking, capturing these conferences and classes in video format using a video conference recorder emerges as an optimal solution.

The process involves simultaneous screen and voice recording, yielding a video accompanied by your narration effortlessly. Below, explore diverse ways on how to screen recording with voice over across different devices.

Way 1. Screen Recording with Voice Over (Mac)

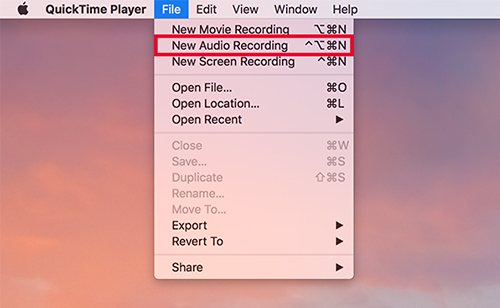
When conserving memory storage is a concern, QuickTime Player emerges as a valuable tool, eliminating the need for additional software installation. Its utility extends notably to crafting instructional content and presentations.

However, for Mac users aiming to capture screen recordings inclusive of internal audio, particularly for tutorial creation or gameplay highlights on platforms like YouTube, alternative software becomes necessary as QuickTime lacks the capability to capture system sound.

It's essential to note that QuickTime Player entails a more intricate process, demanding meticulous adherence to each step.

  1. Launch the QuickTime application right within Mac. After that, navigate to "File" and select either "New Screen Recording" or "New Audio Recording" from the ensuing menu, depending onto the intended action.
  2. Following that, opt for "Screen Recording" to capture both audio as well as video simultaneously.
  3. Upon accessing the Recording Interface, locate and click the arrow adjacent towards the record button.
  4. From here, designate a microphone if audio recording is part of the plan.
  5. Open the desired application, video, also document, or even image to capture, after which initiate recording by simply clicking the "Record" button within QuickTime.
  6. To record the entire screen, simply click anywhere on it.
  7. For selective recording, employ click and drag action to delineate a specific area.
  8. Conclude the recording session through simply clicking the "Stop" button situated right within QuickTime's menu bar.

Screen Recording with Voice Over on Mac Computer

Way 2. Screen Recording with Voice Over (Windows)

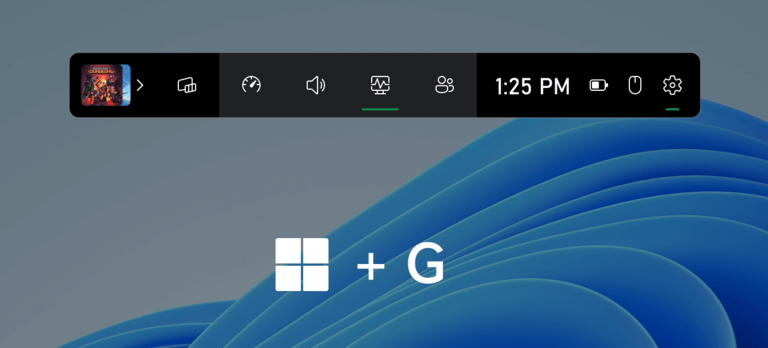
The Xbox Game Bar is compatible with Windows 10 and subsequent versions, offering a seamless method to incorporate your voice into screen recordings. Here's a guide on executing screen recording with voice on Windows 10 using the Xbox Game Bar:

  1. Begin by entering "Xbox" into the search bar on the Windows 10 or the Windows 11 system, then proceed to launch the Xbox application through simply clicking on the corresponding search result.
  2. Simultaneously press the Windows key and the letter "G" right within the keyboard to initiate the Game Bar.
  3. Upon prompt, confirm that it is indeed a game to grant Xbox permission to record the screen.
  4. After which, commence the recording through clicking on option "Start Recording".
  5. Once finished, halt the recording by pressing "Windows + G" again, followed by clicking the "red" button.
  6. Subsequently, access those recordings via the Xbox app through navigating to the Start menu and selecting the "Game DVR" option.

Screen Recording with Voice Over on Windows PC

Way 3. Screen Recording with Voice Over (iOS)

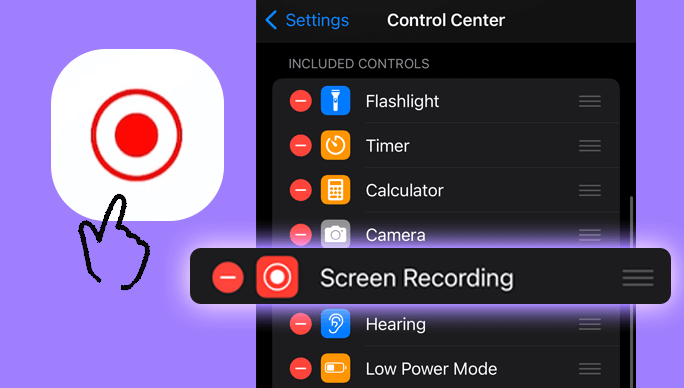
When you aim to share captivating videos or demonstrate app operations to a friend using an iPhone or iPad, screen recording with accompanying voice narration proves to be the ideal approach! Remarkably, you need not install additional recorder apps or software to capture screen activity with microphone input on your device.

The iPhone is equipped with an integrated recording feature, accessible through the Control Center, enabling seamless screen and voice recording. Here's a guide on how to execute screen and voice recording on an iPhone:

  1. Access the "Control Center" and press and hold the "Screen Record icon" to activate the recording feature.
  2. After that, choose the desired video or even the app for recording and toggle the "Microphone" button to enable voice recording.
  3. Initiate the recording by selecting "Start Recording", allowing the device to capture both screen and voice.
  4. Upon completion, simply tap "Stop Recording" to conclude the process as well as indeed save the recorded file.

How to Screen Recording with Voice Over on iOS Device

Way 4. Screen Recording with Voice Over (Android)

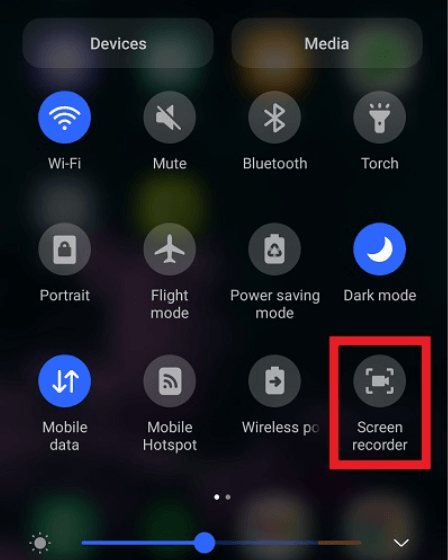
Android also offers a swift and straightforward method for capturing your phone's screen, complete with audio, and enables editing within the Photos app.

  1. Swipe downwards from the upper right corner of the display screen to access this “Quick Settings”.
  2. After that, just select the "Screen Recorder" or "Screen Recording" icon and grant necessary permissions for screen recording.
  3. Following that, opt for a sound input, which may include Microphone or even internal audio.
  4. Thereafter, initiate the screen recording process through simply tapping "Start Recording", typically preceded by a 3 or such of 5-second countdown.
  5. Upon commencement, a toolbar will materialize at the top.
  6. From here, simply cease recording by clicking "Stop Recording," and those captures will be automatically stored right within the photo library.

How to Screen Recording with Voice Over on Android

Part 3. Tips on Enhancing Screen Recording with Voiceover

By incorporating these suggestions, you can enhance the overall quality of your screen recordings with narration, leading to more captivating and enlightening content.

  • Write down and Practice voiceover: This is important to make sure that the narration is clear and makes sense before you record it. Practice your voiceover repeatedly to eliminate any obstacles and guarantee a seamless presentation. This preparation will help you convey information effectively and maintain engagement throughout the recording.
  • Modify Audio Levels: Take note of the equilibrium between your narration and any ambient sounds or music. Make certain that your voice maintains clarity and audibility without dominating over other audio components. Following the editing process, make necessary modifications regarding the audio levels in order to create a balanced and pleasing combination that improves the viewer's overall experience.
  • Integrate Visual Cues and Markings: To enhance the effectiveness of your voiceover, integrate visual cues and annotations into your screen recording. Emphasize important details on the display to direct the viewer's focus.

Part 4. FAQs

Does screen capturing capture audio?

Absolutely, yes. You have the option to activate the microphone feature if you wish to record audio during your screen capturing. By default, both computers and mobile devices offer the capability to utilize microphone audio for narrating your captures.

How can I activate voice recording concurrently with my screen capture?

Usually, within screen capturing software, there exists a functionality to enable audio recording alongside video capturing. You must designate your microphone as the audio input source to capture your voice.

Which file formats are commonly employed for screen recordings accompanied by voice narration?

The MP4 format stands out as the prevailing choice for screen recordings owing to its effective equilibrium between quality and file size. Moreover, formats such as MOV and AVI see frequent usage as well.

People Also Read13 Best Android Voice Recorder (Free & Paid)3 Easy Ways: How to Record Voice on Google Slides

Conclusion

In conclusion, screen recording with voice over presents a dynamic means of conveying information, offering versatility across various fields such as education, training, and content creation. By combining visual demonstrations with spoken narration, it enhances understanding and engagement.

Whether for instructional videos or others the integration of voiceover enriches the viewer's experience, making screen recording such of FoneDog Screen Recorder a powerful tool for communication and expression in the digital age.

windows Free Download For Windows mac Free Download For normal Macs mac Free Download For M1, M2, M3

Leave a Comment

Comment

Comment ()
author image

Adela D. Louie

Tech Website Writing /Content Optimization

Singing, smiling, surprising every day!

So as a technical writer, it is my duty to gather effective and reliable solutions to answer questions on how to deal with the issues they are having with their devices.

Screen Recorder logo

Screen Recorder

Powerful screen recording software to capture your screen with webcam and audio.

How Do You Like This Article?

Check icon/ Check icon

INTERESTINGDULL

Check icon/ Check icon

SIMPLEDIFFICULT

Thank you! Here' re your choices:

Rate This Article: Excellent

Rating: 4.7 / 5 (based on 78 ratings)

Screen Recorder logo

Screen Recorder

Powerful screen recording software to capture your screen with webcam and audio.

FoneDog uses cookies to ensure you get the best experience on our website. Click here to learn more.