FoneDog Screen Recorder
FoneDog Screen Recorder
Special Offer
Special Offer


By Adela D. Louie, Last updated: September 13, 2024
Whether you’re aiming to create a presentation, tutorial material, or content, or you want to complain or report an issue, having screenshots would be very helpful. They say images talk better than text! The use of snips can help one better convey and explain details.
If you are one of those who are aiming to learn more about the Snipping Tool on Mac, you’re on the right page. This post will particularly tackle important points relating to it. Right away, we’ll be walking you through the detailed guide on how to use it as we move into the first part.
Part 1. Capture a Snip Using Mac’s Snipping ToolPart 2. Capture a Snip Using the Screenshot ToolbarPart 3. Additional Information on Mac’s Snipping ToolPart 4. The Best Way to Screenshot on MacPart 5. Conclusion
When using the Snipping Tool on Mac, you have to be aware of the keyboard shortcuts or hotkeys for it that you can use. There are several keyboard combinations depending on the type of screenshots you are to take – full screen, a window, or a section of your screen. All that’s left for you to do is to be familiar with them.
If you’re aiming to capture a snip of your full screen, you have to press the “Shift + Command + 3” combination on your keyboard. Automatically, an image will be taken by your Mac. At the lower right portion of your screen, you’ll notice a preview of the screenshot captured. In case you want to edit, clip, or simply copy the image, you may press it. In case you missed it, you can simply head over to your desktop and you’ll see it right away.

Using the Snipping Tool on Mac, you may also take a snip of a portion on your screen. All you need is to press the “Shift”, “Command”, and “4” keys at the same time. You’ll see that your mouse cursor will transform into a crosshair. Simply click on a corner of the section you like to snip and just drag it to include the whole area. When you release your mouse, the screenshot will then be captured.
Now, if you’re looking at taking a screenshot of just a chosen window, the same keys previously mentioned need to be pressed – “Shift + Command + 4”. However, instead of using your mouse cursor to hover over the area to be snipped, you just have to click and release your “Spacebar” key. The crosshair mouse cursor will become a camera icon. Navigate this to the window to capture and when ready, click it to get a snip.
The Snipping Tool on Mac cannot only be accessed via the shortcut keys. You can also take snips with the help of the Screenshot Toolbar.
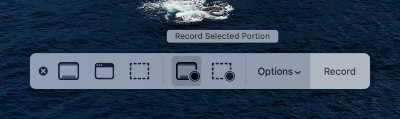
For you to launch the Screenshot Toolbar on your Mac, you have to hold the “Shift”, “Command”, and “5” keys altogether. You shall notice that your screen will mostly be darkened and that a rectangle in the middle will show up. The reason behind this is that this tool is defaulted to capturing a snapshot of a section of the screen. But there’s nothing to worry about if you’re looking at taking a screenshot of your full screen or a window. You can just click the appropriate button that’s on the toolbar to proceed with capturing.
Additionally, it’s also good to be aware that you can enjoy the option of recording your screen via this Screenshot toolbar. The “Record Entire Screen” and “Record Selected Portion” icons are readily available. Apart from this, you may also modify the settings of this tool if wanted. You just have to click the “Options” menu (beside the “Screen Capture” and “Video Capture” buttons). When the dropdown menu shows up, you may freely tick off the available options to be able to screenshot via the custom settings.
Surely, what was previously shared in the first and second sections of this article relating to the Snipping Tool on Mac is helpful enough already. But just so you know, there are still some more details that might be beneficial to you. We’ll be exposing those to you in this part.
Apart from the ability to assist with taking screenshots of your whole screen, a window, or a portion of it, you may also take advantage of the Snipping Tool on Mac when taking videos of your screen activities.
Upon bringing up the Screenshot toolbar via the “Shift, Command, 5” key combinations, locate the screen recording menus that should only be beside the screenshot buttons. If you are aiming to screen record your whole screen, press “Record Entire Screen” and for a custom section, tap “Record Selected Portion”. Shortly, recording will begin.
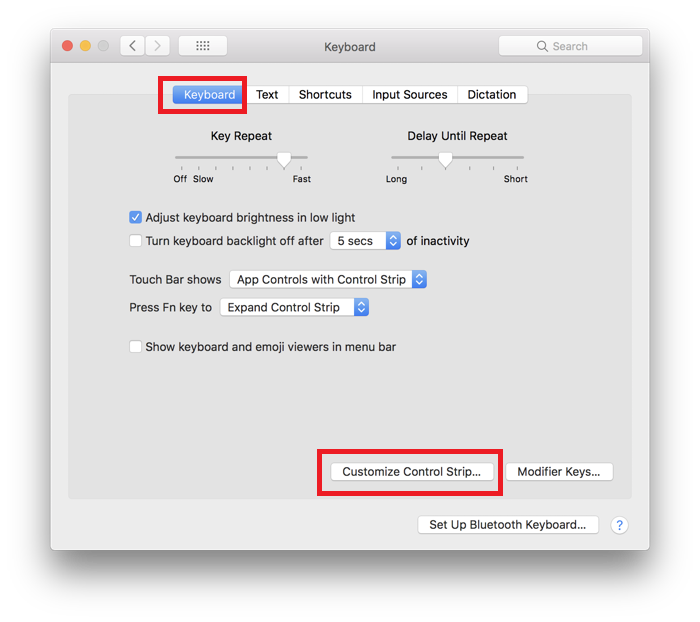
In case you’re wondering how you can add the Snipping Tool on Mac to the Touch Bar, check out the below guide.
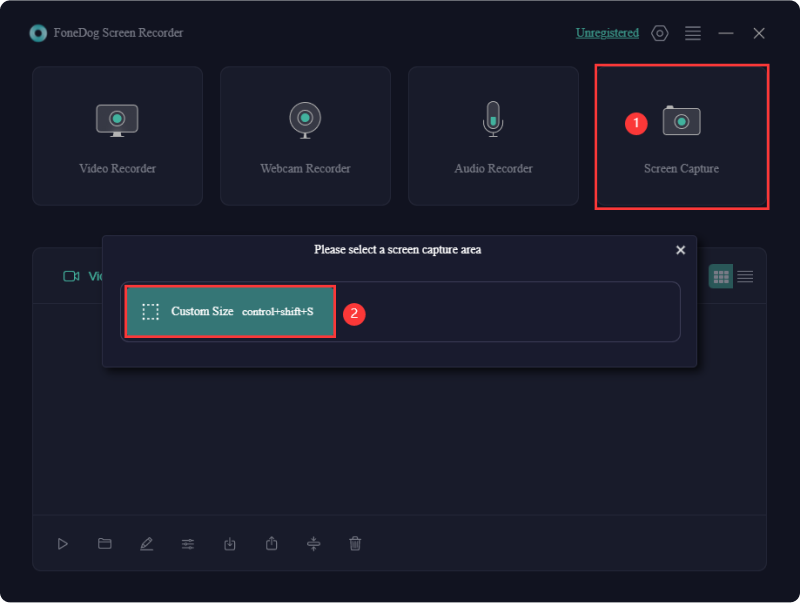
Surely, you have already learned vital information about the Snipping Tool on Mac by reading what we have in the previous parts. But do you know that there’s even a better way to capture a screenshot on your Mac? Well, that’s through the help of tools like the FoneDog Screen Recorder! This tool even supports capturing your screen, webcam, and audio! It’s simple to use because of its simple UI and is compatible with both Mac and Windows OS!
![]() Free Download
For Windows
Free Download
For Windows
![]() Free Download
For normal Macs
Free Download
For normal Macs
![]() Free Download
For M1, M2, M3
Free Download
For M1, M2, M3
To try using the abovementioned tool when taking a screenshot, here’s what’s needed to be done.
People Also ReadSolved: Windows 11 Snipping Tool Not Working [7 Fixes]Fixed: Screenshot on Mac Not Working [7 Methods]
Utilizing the Snipping Tool on Mac is totally beneficial as it’s convenient to use since there is no need for any app installation procedures. However, if you’re looking to have a more advanced screen-capturing experience, it’s a bit unfortunate that this tool lacks other functions such as several editing menus. In such an instance, it would be best to rely on professional software apps like the FoneDog Screen Recorder.
Leave a Comment
Comment

Tech Website Writing /Content Optimization
Singing, smiling, surprising every day!
So as a technical writer, it is my duty to gather effective and reliable solutions to answer questions on how to deal with the issues they are having with their devices.
Screen Recorder
Powerful screen recording software to capture your screen with webcam and audio.
Hot Articles
 /
/
INTERESTINGDULL
/
SIMPLEDIFFICULT
Thank you! Here' re your choices:
Excellent
Rating: 4.7 / 5 (based on 74 ratings)
