FoneDog Screen Recorder
FoneDog Screen Recorder
Special Offer
Special Offer


By Adela D. Louie, Last updated: August 6, 2024
When taking quick snapshots on your screen, utilizing built-in tools like the Snipping Tool with shortcut feature is very efficient as they are easily accessible and are already pre-installed on your PC. If you suddenly notice that your snips are being broken off, you can’t select a window after capturing a snip, or you can’t do screen recording with sound when using the Snipping Tool, then probably, you’re facing the “Windows 11 Snipping Tool not working” issue. Don’t think too much! This is something every user can easily resolve.
In this article, multiple solutions will be shared to assist you with resolving the concern when it comes to the Snipping Tool’s functionality. Get to know more of them as you jump into the first part.
Part 1. Solutions to the “Windows 11 Snipping Tool Not Working” ConcernPart 2. The Best Alternative to Snipping Tool: Take Screenshots on PCPart 3. Conclusion
Take a look at each workaround that we have listed here to address the “Windows 11 Snipping Tool not working” issue.
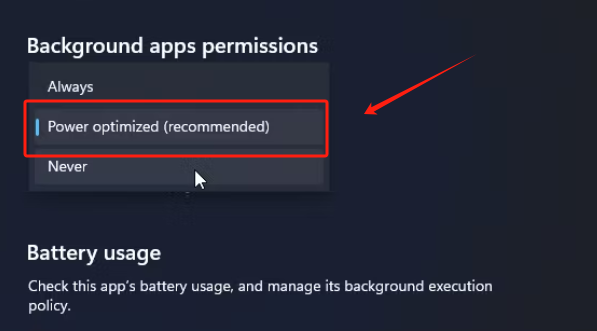
If the Snipping Tool lacks the necessary app permissions when screen recording or capturing pictures, it won’t work as expected. Here’s how you can turn it on.
The second suggested fix to the “Windows 11 Snipping Tool not working” problem is to do a clean boot of your system by removing or ending those unused or conflicting programs that are running on your PC while the Snipping Tool is in use.

You may also try repairing and resetting the app and see if the “Windows 11 Snipping Tool not working” issue will be fixed.
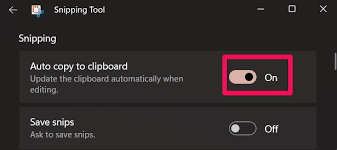
Sometimes, the features of the program itself could affect its functionality. You can also try to switch off the “Auto Copy to Clipboard Feature” to see if this can address the issue. Here’s what you need to do.
Trying to reinstall the Snipping Tool could solve the “Snipping Tool not working” problem. This could be simple but this is one of the most basic fixes a user can apply.
The Snipping Tool might not also work if you have an incorrect date or time which relates to the digital certificates of the app. To fix the error, you can temporarily modify the time and date from “automatic” setup to “manual”. You can switch it back once the issue is gone.
You might not be aware, but you might be facing other problems aside from the “Windows 11 Snipping Tool not working” dilemma which could be due to your computer itself. And so, one of the most basic things that you can do to address the issue is by restarting your computer. Doing so will help refresh the whole system and fix minor problems and bugs. This could also help fix your problem with the Snipping Tool.
If you are too tired of checking and trying all the possible workarounds to fix the “Windows 11 Snipping Tool not working” problem, you can also turn to the best alternative that you can use to take screenshots, the FoneDog Screen Recorder. In addition to this feature, you can even perform screen, webcam, and audio recording through it if you need to. It’s packed with numerous features making it so worthwhile to use.
![]() Free Download
For Windows
Free Download
For Windows
![]() Free Download
For normal Macs
Free Download
For normal Macs
![]() Free Download
For M1, M2, M3
Free Download
For M1, M2, M3
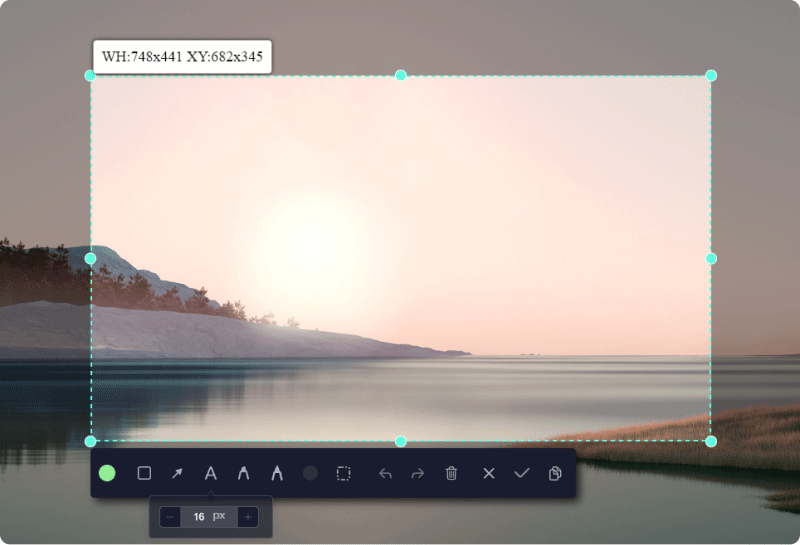
For your reference, here’s how you can easily capture screenshots via the FoneDog Screen Recorder.
People Also ReadQuick Guide: How to Screenshot on Dell Laptop Or DesktopHow to Screenshot on Gateway Laptop [Quick Guide]
Addressing the “Windows 11 Snipping Tool not working” problem should no longer be a dilemma for you as we have already provided you with bunches of fixes that you can try and apply. In addition to those solutions, you may also opt to try an alternative app that works so well when capturing screenshots and even when screen recording, the FoneDog Screen Recorder.
Leave a Comment
Comment

Tech Website Writing /Content Optimization
Singing, smiling, surprising every day!
So as a technical writer, it is my duty to gather effective and reliable solutions to answer questions on how to deal with the issues they are having with their devices.
Screen Recorder
Powerful screen recording software to capture your screen with webcam and audio.
Hot Articles
 /
/
INTERESTINGDULL
/
SIMPLEDIFFICULT
Thank you! Here' re your choices:
Excellent
Rating: 4.8 / 5 (based on 92 ratings)