
By Vernon Roderick, Last updated: January 3, 2024
Adobe Photoshop is a popular graphics editing program developed by Adobe. And its important function is that it can open the Photoshop AutoSave location to access the automatically restored PSD file. Adobe Photoshop comprises many powerful features of image setting such as layers, various tools, vector masks, smart objects, 3Ds, and shapes. The application offers a free trial download for both Windows and Macintosh operating systems.
Moreover, Adobe introduces another advantage for the convenience of its users. The Adobe Creative Cloud feature allows the users to download updates of the software’s latest version. It lets users also save their Photoshop (PSD) files in the cloud which can be accessed from anywhere and on any device.
But what if you do not have a Creative Cloud account or you forgot to connect to it, and suddenly your Photoshop or the computer crashes and the files went missing or got corrupted. Other issues that may happen: when the PSD files are accidentally deleted, due to virus and malware attack, the Photoshop AutoSave feature is not enabled or the sudden shutdown of the system before the document is saved, and many others.
To solve the problem, this tutorial will guide you on how to recover your Photoshop files using different methods. One is to enable the AutoSave feature and access the auto-recovered PSD files in the Photoshop AutoSave location. Here is an article that teaches you to open PSD files without opening photoshop. The steps below also introduce an easy-to-use and reliable professional FoneDog data recovery software that you can utilize to restore the deleted or lost PSD files.
Tip: Adobe Photoshop is a very powerful tool that can turn good images into great ones. However, once you don’t need it anymore, you’ll learn that it takes up much space on your computer. That’s why you might want to learn how to completely uninstall Photoshop from your Mac.
Part 1. How To Use FoneDog Data RecoveryPart 2. How to Recover Photoshop Files Part 3. Where is the Photoshop AutoSave LocationPart 4. Recover Photoshop Files from TempPart 5. Recover Photoshop Files from Recent FilesPart 6. Recover Photoshop Files from CloudPart 7. Recover Photoshop Files from BackupIn Summary
Before learning to enable the AutoSave feature and access the auto-recovered PSD files in the Photoshop AutoSave location, let's first learn how to use third-party software to recover deleted files. A reliable and professional data recovery wizard that allows you to quickly and safely recover your deleted files including your Photoshop (PSD) files, FoneDog Data Recovery is easy and convenient to use tool with a 100% high success rate and secured data.
Recover from any device, restore any data type, and in any situation. The software offers a free trial and a 30-day money-back guarantee should you purchase it. You can download the software for Windows or Mac. You can recover from any device such as and other removable drives in different supported file systems.
You can restore any data type such as image, video, audio, email, archive, and documents. This will work in any situation such as crashed Windows or Mac recovery, partition recovery, file recovery, hard drive recovery, memory card recovery, or flash drive recovery.
Just launch, scan, and restore. This is the process on how to use the FoneDog Data Recovery program:
Start the FoneDog Data Recovery software. Go to the Start menu and search FoneDog Data Recovery from the Programs list. Other ways: double-click its shortcut icon located on the desktop. You can also click its pinned icon on your taskbar (if a shortcut is created or it is pinned to the taskbar).
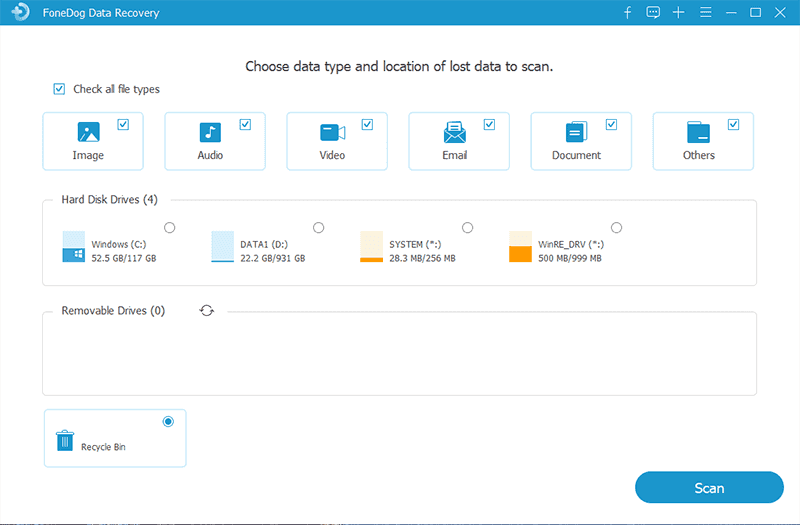
On the main page of FoneDog Data Recovery, select one or more file types to restore and the drives (hard disk or removable) where you want to recover the lost files. Then, press the “Scan” button to start scanning.

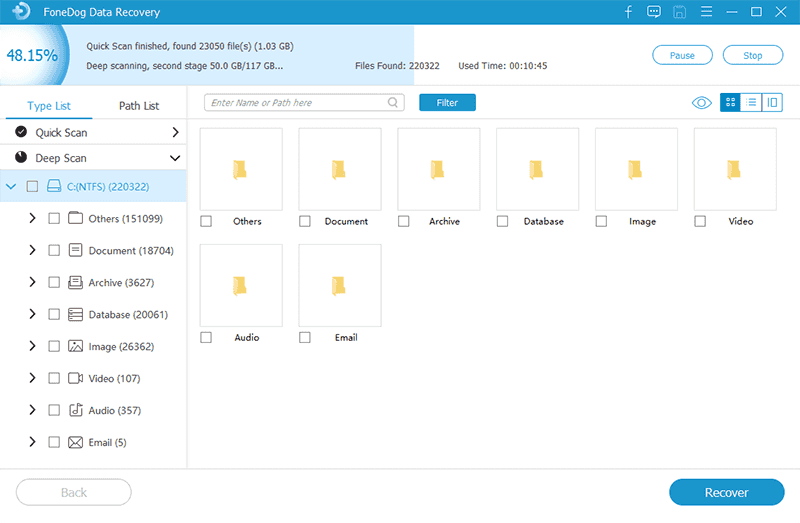
Two scans are available: Quick Scan or Deep Scan. The first scan will work at a quicker speed and a deep scan will show more results but will take a longer time to scan. Contents are shown based on the options you have entered after FoneDog Data Recovery completes the data scan.

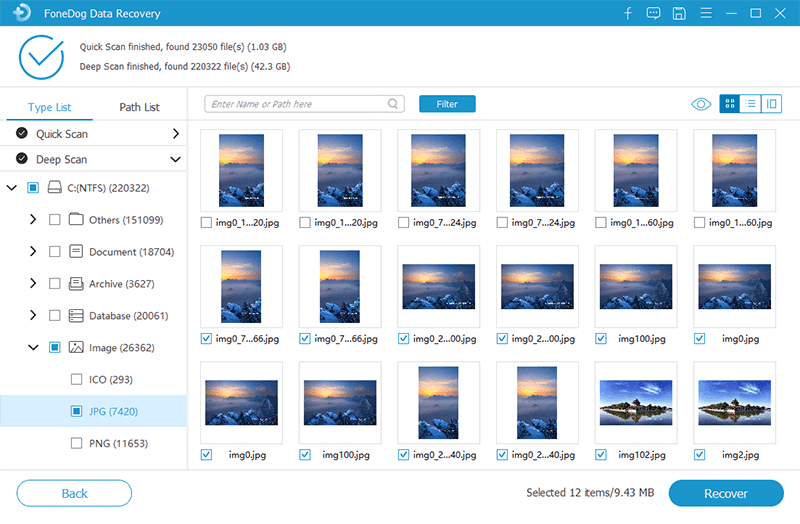
After the scan, choose the PSD files that you want to recover. The results are returned by type or path. Apply Filters so you can quickly locate the data files by entering the file name or file path in the search bar. Hit the Recover button to restore the PSD files.

Thanks to Adobe Photoshop it offers a useful feature that will automatically save your PSD files by creating a backup at regular intervals that you set. This is important to save backup copies so that in case of a computer crash and corrupted files, you can easily recover a copy and restore the backup of your Photoshop file.
The auto-recovery will only work if the AutoSave feature is enabled in Photoshop and the application had time to save the document before the crash. The AutoSave function is available only on Photoshop CS6 and above.
This simple process will guide you on how to set the AutoSave frequency.
Step 01: Launch Adobe Photoshop.
Step 02: In Windows, go to the “Edit” menu located at the top left corner of the screen. In Mac, go to the “Photoshop” menu.
Step 03: Select Preferences > File Handling.
Step 04: Make sure that the “Automatically Save Recovery Information Every” option is enabled.
Step 05: By default, the AutoSave frequency is set to run every 10 minutes. You can choose to set it for every 5, 10, 15, or 30 minutes, or every hour.
Step 06: Click “OK”.
C drive:\Users\
Note: Photoshop will not save over the original file but will save the recovery in a separate backup file. It will add “Recovered” to the end of the file name of the backup copy.
When you encounter that Photoshop crashes, launch again the application and it will automatically reload the most recent saved copy of the file. If you cannot see the copy of the file, make sure that the autosave feature is enabled on your Photoshop. Here is another way to retrieve the auto-saved files.
Step 01: If you still cannot see the auto-saved files, look for the unsaved files on the AutoRecover folder, where the specific location path differs depending on the Photoshop version.
Note: The AppData folder is hidden by default. You can unhide it by going to File Explorer. Click on View/Option, then click on the View tab, and turn on the “Show hidden files, folders, and drives” option.
You can also search for the AutoRecover folder using the search box in the File Explorer window.
Step 02: In the AutoRecover folder, you can see a PSB file which is the auto-saved copy of the Photoshop file.
Step 03: Do not open the PSB file yet, instead save first another copy of the file because Photoshop will delete it after opening.
Step 04: Open the PSB file after creating the backup copy and save it as a file in Photoshop.
After we learned where Photoshop AutoSave Location is, this is another method that will guide you on how to retrieve your Photoshop (PSD) files from Temp files. When Photoshop suddenly crashes without saving your document or your files got corrupted, you can follow the steps below to restore the Photoshop files.
If you receive a message when opening the Temp folder in File Explorer that says, “You don’t currently have permission to access this folder”, just click “Continue”.
Step 01: Go to “This PC” or “Computer” (in other Windows versions). You can also press together the Windows logo + E keys as a shortcut.
Step 02: In the File Explorer window, navigate to the Temp folder location, where C: is your system drive:
C:\Users\<user profile>\AppData\Local\Temp\
Step 03: Search through the Temp files that match the last date and time of your Photoshop document. The file names start with “Photoshop”.
Step 04: Open the temp file in the Photoshop application.
Step 05: Save as the Photoshop document file in. PSD format.
You can also search for the Photoshop temp files using the search box in the File Explorer window by typing “Photoshop”.
Another option to open the Temp folder is through the Run command.
Step 01: Launch the “Run” dialog window. Press together Windows Logo + R keys.
Step 02: Type %temp% on the box and press “Enter”, or click “OK”.
Step 03: File Explorer window appears and Temp files are displayed. Find the Photoshop files that match the last date and time of your document. The file names start with “Photoshop”.
Step 04: Open the temp file in the Photoshop application.
Step 05: Save as the Photoshop document file in. PSD format.
This is another method that will guide you on how to retrieve your Photoshop (PSD) files from Temp files. When Photoshop suddenly crashes without saving your document or your files got corrupted, you can follow the steps below to restore the Photoshop files.
Step 01: Restart the Photoshop application.
Step 02: Go to the “File” menu located at the top left corner of the screen.
Step 03: Select “Open Recent”.
Step 04: In the Recent files dropdown, find the unsaved PSD file.
Step 05: Open the PSD file and restore it.

If you have an Adobe Creative Cloud account, you can restore your lost Photoshop (PSD) files. The Adobe Creative Cloud lets you work from anywhere and on any device, which can also sync any changes with your other devices.
Step 01: Log on to your Adobe Creative Cloud account.
Step 02: Go to the “Deleted” folder.
Step 03: Select the PSD files that you want to restore.
Step 04: Click on the “Restore” icon.
Note: The deleted files from the Adobe Creative Cloud Files can be accessed in the Archive files located on the Files page. To restore the deleted PSD files, you can browse the archived files on the Files view of the Adobe Creative Cloud Assets site.
You can restore your Photoshop (PSD) files if you have created a backup. You can save a backup of the files in another storage device or utilize the Windows backup utility. Windows stores the backup copies as restore points. You can enable the feature by following these steps:
Step 01: Go to Control Panel.
Step 02: On the left part of the screen, click “System Protection”.
Step 03: Under “Protection Settings”, check that the Protection is set to “On”.
Step 04: Click “OK”.

People Also ReadHow To Do A Canon Photo RecoveryHow to Recover Deleted Photos
Adobe Photoshop is a popular and leading software that is essentially available to aid users in digital art and graphic design works. It encompasses various remarkable features that serve different purposes. The tool can be used for image editing, creation, retouching, effects, and many others.
A Photoshop file can be huge that is why users need to create backup copies, utilize the Adobe Creative Cloud, and enable the AutoSave function of the application.
There are several processes listed in this article that can help users restore the PSD files in cases of lost, deleted, or corrupted files. Another important thing to note is to know the Photoshop AutoSave location where the auto-recovered PSD files are saved.
An extra bonus for users that is highly recommended is to use a data recovery program like FoneDog Data Recovery software which is a reliable and professional tool that will help users in recovering any data types from any device.
Leave a Comment
Comment
Data Recovery
FoneDog Data Recovery recovers the deleted photos, videos, audios, emails, and more from your Windows, Mac, hard drive, memory card, flash drive, etc.
Free Download Free DownloadHot Articles
/
INTERESTINGDULL
/
SIMPLEDIFFICULT
Thank you! Here' re your choices:
Excellent
Rating: 4.7 / 5 (based on 88 ratings)