FoneDog Screen Recorder FoneDog Screen Recorder
Special Offer Special Offer
Only Only
$4.49 $4.49
to get a ONE-month license to get a ONE-month license
Sale ends in xx days Sale ends in xx days
Buy Now
sale

Learning How to Effectively Remove Audio from YouTube Video

By Adela D. Louie, Last updated: May 30, 2023

If you are a student, there can be a lot of school requirements that you might instantly find on YouTube. However, to be able to put some touches into the video, you need to remove audio from YouTube video. But you do not have enough knowledge on how this can be possible. You are in the right place, in this article, we will talk about procedures and tools that we can use to cut audio out from YouTube. You can absolutely ace the project as you will integrate your own personal touch into the video.

This could also help if you wanted to impart some knowledge using YouTube videos, and you wanted to explain it in terms that average learners could grasp immediately. Well, if you are up for discovering these tools and methods, get ready with your notebook and pens as we get all the necessary information needed to execute the removal of the audio.

Part #1: What Are the Methods to Remove Audio from YouTube Video?Part #2: What Is the Best Tool to Remove Audio from YouTube Video?Summary

Part #1: What Are the Methods to Remove Audio from YouTube Video?

Let us get things straight to the point. In this part of the article, we will learn about the different tools and procedures that we can do to remove audio files from YouTube video.

Using VLC Media Player

The first tool that we are going to talk about is the VLC Media Player. See the steps on how to remove audio from YouTube video using VLC Media Player.

  1. On your personal computer, open the VLC Media Player. Once you have successfully launched it go to “Media”, and then proceed to “Convert/ Save”.
  2. There will be a pop-up window which is called the “Open Media” window. On the pop-up window, tap “Add” so you can start browsing the files that you wanted to edit. You can continue with the process once the video has been loaded. Then tap “Convert/ Save” which is located at the lower right part of the interface.
  3. Then, after Step No.2, a pop-up window will appear again, it says “Convert”. Once you see the “Settings” portion, you have to choose the profile and the format which is supported by YouTube. Then, tap the “Edit Selected Profile” tab which you will see next to the format that you have selected.
  4. Another window which is called the “Profile edition” window will open. Here, you can choose the “Audio Codec” tab, and then you have to uncheck the box which is beside the “Audio” option. To be able to confirm the settings, you have to tap “Save”.
  5. Then for the fifth step you have to choose where are you going to save your output files, and go to the “Destination” file tab. Once you are here, you have to tap “Start”. Then VLC Media Player will do its job and remove audio from YouTube video. You can find the output file in the destination folder that you have set.

Remove Audio from YouTube Video Using VLC

Using Windows Photos

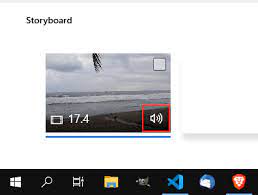
You can also use Microsoft Photos which is compatible with Windows 10 and Windows 11. Some people are confused with this tool, but since it is so accessible, let us look at the steps and see how can it remove audio from YouTube video.

  1. Tap the “Start” button on your Windows computer. In case you cannot see the app, you can tap “Windows Photos” on the search button on the computer.
  2. Once you are already in the app, check the many options which are in the upper right corner of your Microsoft Photos app. Some of the options that you will see are Albums, Collections, Folders, People, and Video Editor. Since we have to edit a video, tap “Video Editor”. Once tapped, a new window will appear, choose "New Video Project”. You will then be asked to input a file name, you can opt to type in a file name and you also have the option to skip the process.
  3. Tap “Add”. If the videos that you are going to edit are stored on your personal computer, choose “select from this PC”, then you have to go to where you have saved your video, and once located tap it. Once you have successfully located it, it will be seen in the “Project Library Section”.
  4. To start removing the audio or sound of your video, drag the video to the “Storyboard Section” from your “Project Library”.
  5. Then you have to click the sound icon that you will see in the thumbnail of the video twice. Once you have clicked it, it will remove audio files from YouTube video.

Remove Audio from YouTube Video Using Windows Photos

Free Method on How to Remove Audio from YouTube Video

We will share another method that you can try to do. This method can be done using your mobile devices, so in case you do not have your computer with you this method will also do. You can search for a lot of free applications from the Apple App Store, or the Google Play Store. See the common steps or procedures that you have to follow in case you opted to try this recommendation.

  1. Open the application that you have installed.
  2. Add the video to the app’s platform.
  3. Go and hit the “Mute” button.
  4. Then, of course, do not forget to “Save” the video that you have muted.

With this, we are also delighted to share with you two of the said apps that you can choose, one is for Android devices, while the other one is for Apple devices. The first one is called Mute Video which is said to be simple and can quickly remove audio from YouTube video. This tool is available to iOS users, and aside from muting the audio of the videos, you can also trim the output videos before you finally export them.

Part #2: What Is the Best Tool to Remove Audio from YouTube Video?

Apart from all the tools that we have shared above, there is another one that we will share with you. This free video editing tool can help you edit, and convert your video files. Amongst all the tools that we have listed, this is the best one when it comes to making sure that your videos are edited and well-handled accordingly.

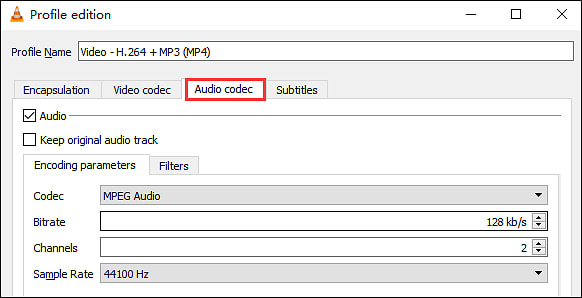
This tool is the FoneDog Video Converter and is compatible with both Windows and Mac computers. If you are longing for a very efficient output, this is the most recommended tool to use. To help you decide, see the listed features of the FoneDog Video Converter.

  • If you wanted to save most of your time, this tool is the one for you. You can use it to convert not just a single file at a time, but multiple ones if you wanted to. Once you used this tool, the processes to convert and edit your files will be done quickly without compromising the quality of the files.
  • Apart from the very fast and reliable conversion of files, there are also a lot of file formats from which you can choose in case you wanted to convert your files. You can also edit your audio files using this converter.
  • You can also edit the video files that you have like for example remove audio from YouTube video or enhance the video by adjusting parameters like brightness and saturation.
  • You can also add external subtitles in case you wanted to understand your videos better.
  • You can also use it to rotate, flip, and even crop your videos and make them bleed as your own.

So, how are you going to remove audio from YouTube using the FoneDog Video Converter?

  1. Open the FoneDog Video Converter, and then proceed to “Adjust Volume”, once you tap this option, you will see a volume bar. This is located in the middle part of the interface.
  2. Then you can move the volume bar to adjust the volume, you can either increase or decrease the volume of the video. In our case, you have to decrease the volume to be able to remove the audio.
  3. Then to finalize all the settings that you have changed, tap “Save”.

Best Tool to Remove Audio from YouTube Video

People Also ReadThe Best Video Format For YouTube in 2023The Best Way to Convert YouTube Video to AVI [2023 Updated]

Summary

We hope that we have shared enough information that you can use to remove audio from YouTube video. Through the use of these tools and methods, you can be able to use needed videos to make that school requirement rock!

We recommend the use of the FoneDog Video Converter; it can create the output that you are yearning for in a very fast and efficient manner without compromising the quality of the video that you are going to have as your output. We also want to emphasize, that we do not recommend the use of videos of other people for illegal distribution purposes.

Leave a Comment

Comment

Comment ()
author image

Adela D. Louie

Tech Website Writing /Content Optimization

Singing, smiling, surprising every day!

So as a technical writer, it is my duty to gather effective and reliable solutions to answer questions on how to deal with the issues they are having with their devices.

Video Converter logo

Video Converter

Convert and Edit 4K/HD Video and Audios to Any Formats

Free Download Free Download

How Do You Like This Article?

Check icon/ Check icon

INTERESTINGDULL

Check icon/ Check icon

SIMPLEDIFFICULT

Thank you! Here' re your choices:

Rate This Article: Excellent

Rating: 4.7 / 5 (based on 86 ratings)

Video Converter logo

Video Converter

Convert and Edit 4K/HD Video and Audios to Any Formats

Free Download Free Download

FoneDog uses cookies to ensure you get the best experience on our website. Click here to learn more.