
By Nathan E. Malpass, Last updated: March 22, 2018
“Can you suggest ways to transfer photos from Android to PC?I have hundreds of images on my Samsung phone that I want to export to my computer. I just want to have an extra copy of them just in case I lose my phone. Having my photos on my PC will also allow me to edit them in Photoshop.”
Part 1. Why You Must Transfer Your Photos from Android Phone to PCPart 2. What is the Quick Ways to Transfer Android Images to Your ComputerPart 3. How to Transfer Photos from Android to PCPart 4. ConclusionVideo Guide: How do I Transfer Photos from Android to PC
Pay Attention!
Having your images at your fingertips is fantastic. However, is it really safe to keep all your photos on your Android device? Your smartphone or tablet can get stolen at any moment. Your SD card may get corrupted.
Your device can suddenly malfunction due to a malware attack or system crash. Together with it, you lose your files and valuable photos. Transferring your photos to your PC is a great way to secure your cherished memories.
You’ll never know when your backup will come in handy until you’ve actually lost your files. Why wait, if you can do it now?
Transfer your images from Android to a computer is also an excellent way to free up space on your device. That way, you can install more apps and save more files. Your device will also thank you for it. It can perform much faster with its memory freed up.

Transfer photos from Android to pc
With such benefits, there should be no stopping you from transferring your photos. This post will feature 3 quick ways to do that. In less than an hour, you should already have your images saved on your trusty computer.
Here are introducing some quick solutions to transfer Android photos to your PC. Ready your USB cable as two of the methods below will require you to connect your device to your PC. Remember, you may not disconnect your phone or tablet while the transfer process is ongoing. You will risk losing your files if you interrupt the transfer. If you’re all set, read on and let’s get started.
This method is a straightforward way to export your photos from Android to PC. By connecting your device, your computer gains access to all of your files.

Manually Transfer Pictures from Android to a Computer
The No.2 quick way to export pictures from Android device to Computer is using Dropbox.
Dropbox is a popular cloud-based storage that you can use to conveniently download your photos to the computer.
There are others that you can use such as Google Drive. In this post though, we will teach you how to transfer photos via Dropbox.

Use Dropbox to Export Images from Android to PC
The first two methods that we have discussed are both easy to do. But what if we tell you that there is a way to get back your deleted photos? At the same time, you get to transfer both existing and deleted images from Android device to your computer.
Isn’t that an attractive proposition? You get to do all that with Android Photos Transfer Tool by FoneDog.
See for yourself and download the software on your Mac or Windows computer. It is 100% effective, safe, and secure. It comes with a 30-day free trial too!
Click on the Download button and get it
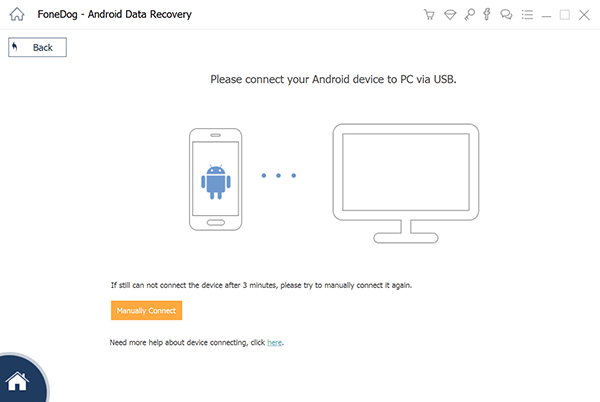
Run the software. With a USB cable, connect your Android smartphone or tablet to your computer

Download and Launch Android Photos Transfer toolkit --Step1
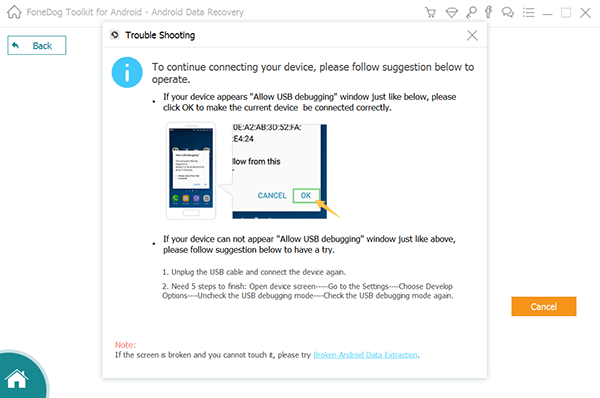
You may receive a prompt on your device. This will ask for your permission to allow USB debugging. If you do get a prompt, simply tap OK.
If you don’t receive any, you will have to manually enable USB debugging. Steps to do that will vary depending on your device’s Android version. First, head to your device’s Settings.
Devices with Android 2.3 or earlier
Tap Applications > Select Development > Choose USB debugging
Devices with Android 3.0 to 4.1
Choose Developer options > Select USB debugging
Devices with Android 4.2 or later
Tap About Phone > Repeatedly click Build Number until a “You are under developer mode” prompt appears > Return to Settings > Choose Developer options > Select USB debugging
Hit OK on FoneDog Android Data Recovery and tap OK on your device.
You can refer to the guide here: How to Enable USB Debugging on Android Device

Activate USB Debugging --Step2
The software will show you supported file types. Since you want to transfer photos from Android to PC, tick Gallery and Picture Library from the choices. Hit Next to proceed. The scan will start immediately.
Related Article:
How to Recover Deleted Photos from Android Phone and Memory Card

Select Pictures for Scanning --Step3
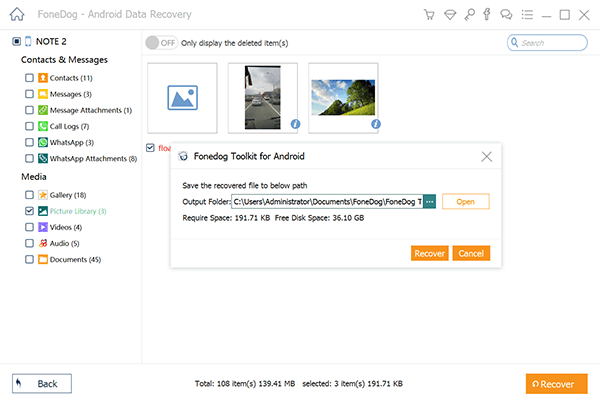
Once the scan is complete, you will see the selected file types on the left of the window. If you click on it, the photos will appear.
You will see both existing and deleted ones. Scroll down to see all of them and mark the desired items as you go.
When you are satisfied with your selection, click Recover. You will be asked to select a folder where your images will be saved to. Hit Recover to start transferring your photos to your computer.

Preview Photos and Save from Android to the Computer--Step4
With these 3 convenient methods, it’s a breeze to transfer photos from Android to PC. For best results, you should use FoneDog Android Data Recovery.
If you’re happy with the software, you can give our other tools a try. For instance, our Android Data Backup and Restore Developed by FoneDog can help you create backups and retrieve them whenever needed. Read our other tutorials to learn more about our range of reliable software.
Leave a Comment
Comment
Android Data Recovery
Recover deleted files from Android phone or tablets.
Free Download Free DownloadHot Articles
/
INTERESTINGDULL
/
SIMPLEDIFFICULT
Thank you! Here' re your choices:
Excellent
Rating: 4.5 / 5 (based on 94 ratings)