
By Nathan E. Malpass, Last updated: July 31, 2019
Do you currently have an iPhone 7? Then you have probably used it to capture photos and videos. You might have contacts in your iOS device as well. Thus, it is important for you to have a backup in case something goes wrong. Once you encounter a problem, you’ll be able to restore all data from your iPhone 7.
Do you know how to backup iPhone 7? In this article, we’ll teach you three different methods that will allow you to back up your iPhone 7. Thus, everything including your apps, calendars, contacts, messages, call logs, and contacts, among others, will have a soft copy for you to restore later on.
Let’s start with the easy method first.
Part 1. How to Backup iPhone 7: The Most Quickly WayPart 2. How to Backup iPhone 7 Using iTunes: A Manual TrickPart 3. Backing Up Your iPhone 7 Using iCloud: An Automatic MethodPart 4. Conclusion
People Also ReadHow to Backup iPhone Contacts to GoogleBest Guide: How to Selectively Retrieve iCloud Backup Contents to Your New iPhone 7How to Retrieve Deleted Videos without Backup on iPhone 7
iTunes and iCloud won’t be able to back up all types of data from your iPhone. Plus, these platforms won’t give you the ability to select specific data you wish to back up. That’s why we recommend iOS Data Backup & Restore at FoneDog.
The said software can help you select which data to back up and which to leave behind. In addition, it supports multiple file types and backs up data which are not covered by iCloud and iTunes. FoneDog’s software allows you to backup and restores calendars, contacts, music, photos, videos, SMS, ebooks, call logs and other data types from your iPhone 7.
Here’s how to use FoneDog iOS Data Backup & Restore to back up your iPhone 7:
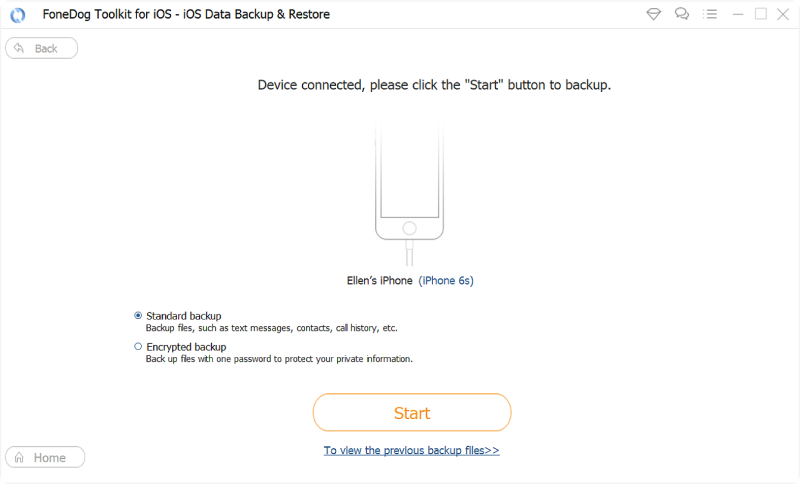
Download FoneDog Toolkit – iOS Toolkit and install it on your computer. Then launch it and connect your iOS device. Once the iPhone 7 is recognized, choose the option iOS Data Backup & Restore and then press iOS Data Backup.
You can choose either Standard Backup or Encrypted Backup. The latter backs your files up and encrypts them with a password.
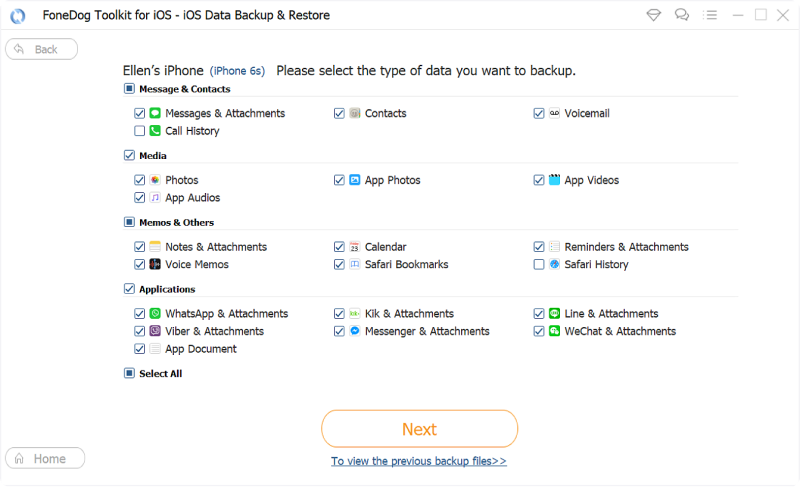
After you’ve pressed the Start button, the tool will show various data types for you to choose from. Select the type of data you wish to back up. These might include Photos, Videos, Messages, Call History, Contacts, etc. Then, click Next.
Now, FoneDog will back up your data from iPhone 7. Once it is complete, the software will display the backup file’s name and size. You can click either Backup More or Restore iOS Data.
Now, your data has been backed up. You can also follow the user guide of FoneDog to learn how to restore the backup file to your iPhone 7 or to another Apple device.
Do you have iTunes? You probably do because you own an iPhone. iTunes can be used to back up important data from your iPhone 7 to your computer. Here are the steps on how to do it:
Step 01: Connect your iPhone 7 to your computer.
Step 02: Go to iTunes and press File. Then, click Devices, and then click Back Up.
You can also access the button for Back-Up Now within iTunes > Summary.
In order to ensure that you have actually made a backup, follow the steps below:
Step 01: Click iTunes within the top menu.
Step 02: Press Preferences. Then, click on the tab labeled Devices.
Step 03: Check if the iPhone 7 device name is there including the time when the backup process took place.
With iCloud, you can back up the following: movies, music, TV shows, apps, books. You can also back up images, videos, home screen, SMS text, ringtones, MMS messages, and app data. iMessages can be included in your backup as well.
Backups with iCloud can be done both manually and automatically. You are given 5GB worth of free storage per Apple account. However, you can also purchase additional storage space for a specific amount of money.
It doesn’t really back up movies, books, apps, and music you have purchased. However, it will actually download these from the stores (App, iBook, and iTunes) when you restore your data from that of iCloud Backup.
 Here are the steps you should follow in order to back up your iPhone 7 to iCloud:
Step 01: Connect the iPhone 7 to a Wi-Fi network.
Step 02: Press Settings and visit [Your Name]. Press iCloud. If you have iOS version 10.12 or earlier, you can visit Settings and directly go to iCloud.
Step 03: Press iCloud Backup. If you have iOS version 10.12 or earlier, you can just press Backup. Ensure that iCloud Backup is activated as well.
Step 04: Press Back Up Now. Make sure you are connected to a Wi-Fi network to avoid errors in connectivity.
Step 05: Ensure that the backup is actually done. To do this, visit Settings and then tap [Your Name]. After this press iCloud and then go to iCloud Storage. Then, click Manage Storage. Select your device after the previous step. Check if the backup you created is there. It should have details such as the backup size and the time it was created. If you have iOS version 10.12 or earlier, the steps should be Settings and then iCloud. After which, press Storage and then Manage Storage.
Step 01: Use your iPhone 7 and check if iCloud Backup is turned on. To do this, visit Settings. Then tap on [Your Name]. After this, go to iCloud and then iCloud Backup. If you have versions from iOS 10.12 or earlier, visit Settings and then iCloud. After this, visit Backup.
Step 02: Connect your iPhone 7 to a power source. After this, connect it to a Wi-Fi network.
Step 03: Ensure that your iPhone 7’s screen is actually locked. Finally, make sure you have enough space within iCloud for backing up your iPhone 7.
In this guide, you learned how to back up iPhone 7 using three different methods. The easiest method is through FoneDog’s iOS Data Backup & Restore tool. Other methods include using iTunes and iCloud. As such, you can use this guide to back up your iPhone 7 and ensure that all data won’t be lost in case your iPhone encounters an error.
Leave a Comment
0 Comment
Hot Articles
/
INTERESTINGDULL
/
SIMPLEDIFFICULT
Thank you! Here' re your choices:
Excellent
Rating: 5.0 / 5 (based on 1 ratings)