
By Adela D. Louie, Last updated: June 1, 2021
There are a lot of people who are asking what happens when you initialize disk? Will this process delete all the data? These are some of the most common questions that people would ask when there is a need to initialize the disk on their computer.
Well, for us to give you an understanding of this, we are going to show you in this post what does the initialize disk means and if it will delete your precious data on your computer or not. Fonedog data recovery, a data recovery software, will also be mentioned. It can recover all kinds of data, such as the data of damaged hard drives.
Part 1. Does Doing An Initialize Disk Delete Data?Part 2. Initialize Disk With No Data Loss
The most common question every user has when they need to deal with a process to initialize the disk if they are going to lose the data that they have. Well, doing an initialize the disk usually comes when you have a brand new device and that you have to make it prepared for storing all of your data or files. Also, this is necessary for the event that your hard drive is not recognized anymore.
When we say initialize the disk, it is referred to as a process wherein you have to build or even rebuild the MBR on your computer. The MBR or Master Boot Record is the very first part of any disk. This is where the information is kept on logical partitions, contains the file system, and is organized on a storage device. So when you initialize the disk, it will only affect the very first sector and will not delete the data that you have on your hard drive.
But on the other hand, when you just initialize disk, this will not make it usable. So if you want to make a write and read process on the disk that you have, then you will be needing to make some partitions on it and then have it formatted once that you are done with initializing your disk. And with that, since you know how formatting a hard drive works, it will delete everything that you have on your hard drive.
So basically, initialize the disk will not delete your data, but they need to format it for you to make usable again will. So there is a tree procedure on how you can do this and that is what we are going to show below.
Now, since that when you initialize the disk it will require you to format it as well, then you will be needing a data recovery software that can help you recover those data that has been deleted because of the formatting process. So for you to have less hassle in initializing your disk, here are the procedures that you should follow.
In this procedure, you can go ahead and make use of your Windows Disk Management o a free partition manager for you to initialize the disk. And with that, we are going to show you below how you can do this using your Disk Management.
Step 1: Key in Computer Management
The first thing that you need to do is to click on the Start button and then enter the words of computer management.
Step 2: Run as Administrator
And then, for you to be sure that you gain permission, go ahead and right-click on the Computer Management and then choose the Run as Administrator option.
Step 3: Choose Disk Management
After that, go ahead and choose the Storage option and then click on Disk Management.

Step 4: Make it Online
From there, if it shows you that it is in offline mode, then all you have to do is to click on the Online button.
Step 5: Select on Initialize Disk
Then after that, you can go ahead and right-click on your disk and then choose the Initialize Disk option.
Step 6: Finish the Process
And on the next page, go ahead and check on the disk that comes with a partition of MBR or GPT. After that, go ahead and click on the OK button.
So, once that you are able to initialize disk, the next thing that you need to do is to recover the files that you have stored in it. And for you to do this, you will be needing third-party software in order for you to recover your lost files. And the most recommended software that you can use is the FoneDog Data Recovery software.
This software is known to be very effective when it comes to recovering your lost data from your hard disk and as well as from your computer. It can recover your emails, documents, photos, videos, audios and other data that you have lost. It is also very easy to use because of its user-friendly interface. Plus, it will not overwrite any data that you have on your computer so everything will be safe.
Now, to do a recovery process using the FoneDog Data Recovery, here is what you need to do.
Step 1: Select on Files and Hard Disk
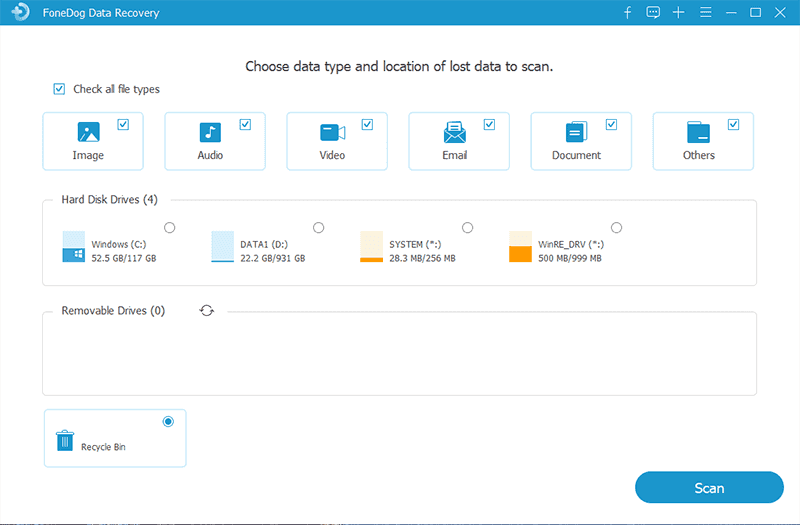
After you have successfully downloaded and installed the FoneDog Data Recovery on your computer, then it is time for you to launch the program. And after that, go through the main page of the software and then choose the types of files that you want to recover. Also, just below those lists of file types, go ahead and choose the hard disk that you have just initialized earlier.

Step 2: Scan Your Disk
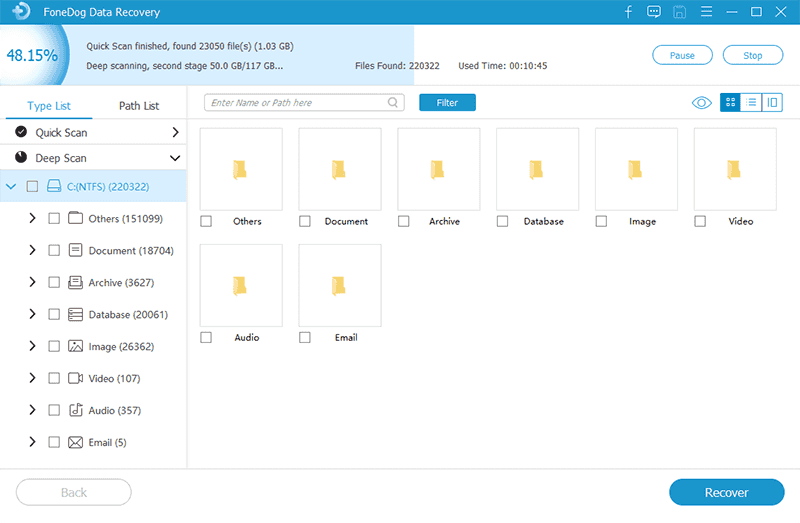
After doing all of that, then go ahead and make a scan. Here, all you have to do is to click on the Scan button and choose from two options on how to scan your disk. You have the Quick Scan as the first option and the Deep Scan as the second one. And choosing the Deep Scan process will take a longer time than the regular scanning process so you have to wait patiently for it to complete.

Step 3: See Your Files and Choose Those to Recover
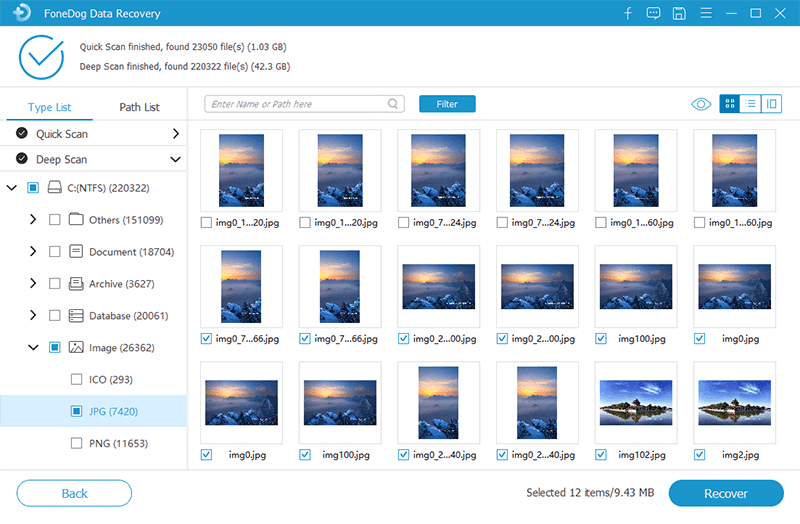
After the scanning process is complete, you can now check on your files one by one. You can go ahead and click on them for you to see if you have the right files. And if so, you can mark them up for recovery.

Step 4: Recover Your Lost Files
Then, once that you are done choosing all of the files that you would want to recover, you can now go ahead and get them back. All you need to do is to click on the Recover button on the lower right hand of your screen and the process of getting back those lost files will begin. So from here on, you just need to wait for the process to complete.
Once that you were able to recover your lost files and have them saved on your computer, then it is now time for you to partition and at the same, format your disk. From here now, you do not need to worry about losing your files because you already have recovered them earlier.
So, for you to do this process, here are the steps that you need to follow.
Step 1: Simply right-click on the space that is unallocated on your disk and then select on the New Simple Volume option.
Step 2: Then on the next screen, just simply go ahead and click on the Next button.
Step 3: Then after that, go ahead and follow on the wizard for you to indicate the volume size and at the same time, for you to put in the letter of the drive to the volume. And then go ahead and format the partition that you just made.

People Also ReadWhat is RAW Partition and How to Recover Files?How to Use Mac Recovery Mode
To cut everything short and make it simple, when you initialize disk, it will also require you to have it formatted. This means that you will lose all of the important data that you have on your disk. But, even if this is the case, just go ahead and follow the exact procedure that you have shown you above for you to be able to initialize your disk without even worrying about losing any of your important data anymore.
Leave a Comment
Comment
Data Recovery
FoneDog Data Recovery recovers the deleted photos, videos, audios, emails, and more from your Windows, Mac, hard drive, memory card, flash drive, etc.
Free Download Free DownloadHot Articles
/
INTERESTINGDULL
/
SIMPLEDIFFICULT
Thank you! Here' re your choices:
Excellent
Rating: 4.7 / 5 (based on 79 ratings)