

By Nathan E. Malpass, Last updated: July 23, 2024
In the fast-paced world of computing, losing important EXE (executable) files on your Windows system can be a daunting experience. Whether it's due to accidental deletion, system errors, or unforeseen issues, the loss of these files can disrupt your workflow and cause unnecessary stress. However, the good news is that there are effective methods to recover a lost EXE file on Windows.
In this article, we will explore a step-by-step guide to help you retrieve your valuable executable files. From utilizing built-in Windows tools to employing third-party recovery software, we've got you covered. So, let's dive into the world of file recovery and ensure that your lost EXE files are back where they belong, ready to support your computing needs.
Part 1. How to Retrieve Lost EXE File on Windows?Part 2. The Best Tool To Retrieve Deleted or Lost EXE File: FoneDog Data RecoveryPart 3. Conclusion
Accidentally deleting files is a common mishap, and fortunately, Windows provides a safety net in the form of the Recycle Bin. Here's a simple step-by-step guide to recovering your lost EXE files:
Step 1: Access the Recycle Bin
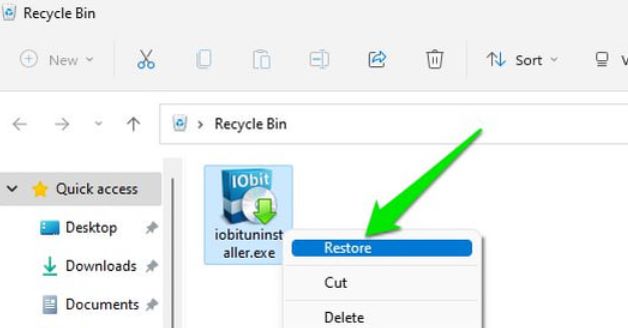
Your deleted files, including EXE files, might still be residing in the Recycle Bin. To check, double-click on the Recycle Bin icon on your desktop.
Step 2: Locate and Select the Lost EXE File
Once inside the Recycle Bin, browse through the list of deleted files. If you remember the name or date of deletion, use the search bar or sort options to locate your lost EXE file. Once found, right-click on the file.
Step 3: Restore the File
After right-clicking, select the "Restore" option. This action will return the EXE file to its original location on your system.
Step 4: Check the Restored Location
Navigate to the original folder or directory where the EXE file was stored to confirm the successful restoration. Now you have recoverd the deleted files from Recycle bin.
If your lost EXE file is not found in the Recycle Bin, you can utilize the powerful search functionality of File Explorer to track it down. Follow these steps:
Step 1: Open File Explorer
Launch File Explorer by pressing the Windows key and 'E' simultaneously or by clicking on the File Explorer icon in the taskbar.
Step 2: Navigate to the Search Bar
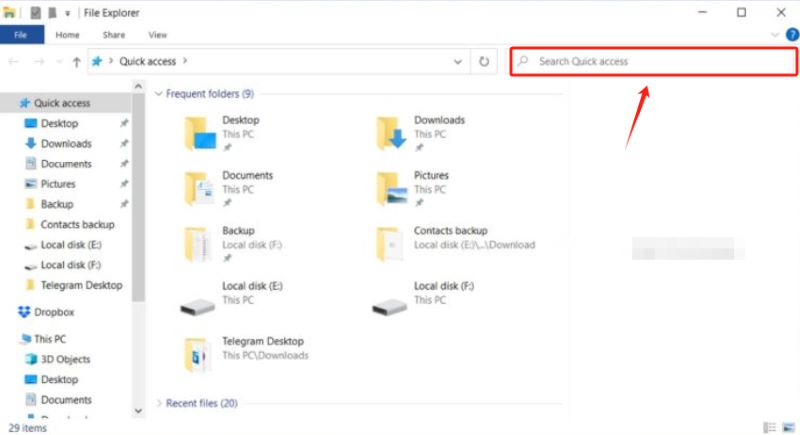
In the upper-right corner of the File Explorer window, locate the search bar. Click on it to activate.
Step 3: Input File Name or Extension
Type either the name of the lost EXE file or its file extension (.exe) into the search bar. If you're unsure of the exact name, using ".exe" will broaden the search to include all executable files.
Step 4: Review Search Results
File Explorer will display a list of files matching your search criteria. Browse through the results to find your lost EXE file.
Step 5: Restore the File
Once you've located the lost EXE file, right-click on it and select "Restore". This action will place the file back into its original directory.
Step 6: Verify the Restoration
Navigate to the original folder to confirm that the EXE file has been successfully restored. You should now have access to your recovered executable file.
If the previous methods haven't yielded results, you can turn to the powerful feature of System Restore in Windows. This method allows you to roll back your system to a previous state, effectively undoing recent changes, including the deletion of files. Here's how to use System Restore:
Step 1: Open System Restore
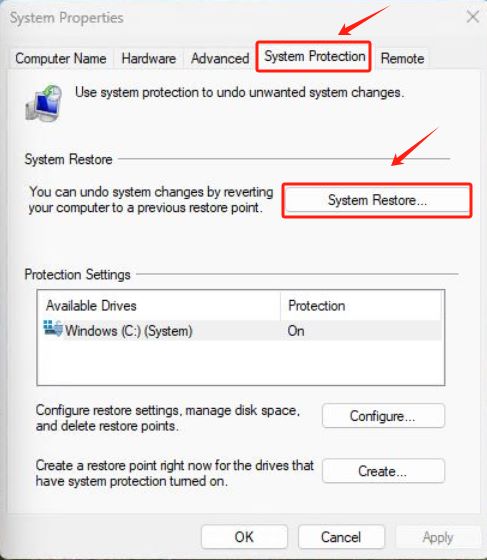
Step 2: Choose a Restore Point
Step 3: Confirm the Restoration
Step 4: Check for the Recovered EXE File
Once the system restore is complete, log in to your computer. Navigate to the location where the EXE file was originally stored to check if it has been recovered.
For more advanced users, the Command Prompt can be a powerful tool to recover deleted or lost EXE files. Here's a step-by-step guide on how to utilize this method:
Step 1: Open Command Prompt with Administrative Privileges
Press the Windows key, type "Command Prompt," right-click on the result, and select "Run as administrator". If prompted by User Account Control, click "Yes" to grant administrative privileges.

Step 2: Navigate to the Original Directory
Use the cd command to navigate to the directory where the lost EXE file was located. For example:
bashCopy code
cd C:\Path\To\Directory
Replace "C:\Path\To\Directory" with the actual path of the folder containing the lost EXE file.
Step 3: Use the ATTRIB Command
In the Command Prompt, enter the following command:
attrib -h -r -s /s /d *.*
This command removes hidden, read-only, and system attributes from all files in the specified directory and its subdirectories.
Step 4: Check for the Recovered EXE File
After running the ATTRIB command, check the directory for your lost EXE file. It might have been hidden or had certain restrictions that prevented its visibility.
Step 5: Recover the File if Found
If you locate the lost EXE file, you can manually copy it to another location. Use the copy command:
copy filename.exe C:\Destination\Path
Replace "filename.exe" with the actual name of your EXE file and "C:\Destination\Path" with the path where you want to copy the file.
If you've been diligent about creating backups, the Backup & Restore feature in Windows can be a lifesaver for recovering lost EXE files. Follow these steps to check and restore from backups:
Step 1: Open Backup & Restore Settings
Step 2: Check for Backups
Step 3: Restore the EXE File
Step 4: Confirm Restoration
After the restoration process is complete, navigate to the chosen location to confirm that your lost EXE file has been successfully restored.
Windows has a built-in feature called Volume Shadow Copy that can create snapshots of files and folders at different points in time. These snapshots, also known as Shadow Copies, can be a valuable resource for recovering lost or deleted files, including EXE files. Here's how to explore and potentially restore from Shadow Copies:
Step 1: Open File Explorer
Launch File Explorer by pressing the Windows key and 'E' simultaneously.
Step 2: Navigate to the Folder Containing the Lost EXE File
Locate the folder where the lost EXE file was stored. Right-click on the folder and select "Restore previous versions".
Step 3: Access Previous Versions
In the "Previous Versions" tab, you'll see a list of available shadow copies. Select a version that predates the deletion of your EXE file.
Step 4: Restore the Previous Version
Click on the "Open" or "Restore" button to view the contents of the selected shadow copy. If your lost EXE file is present, you can copy it to the desired location on your current system.
Step 5: Confirm the Restoration
Navigate to the location where you copied the file to verify that your lost EXE file has been successfully restored.
Note: The availability of Shadow Copies depends on your system settings and storage capacity. Additionally, this feature may not be available on all editions of Windows.
Temporary folders on your system may retain copies of files, including EXE files. Exploring these temporary directories can sometimes lead to the discovery of lost or deleted files. Here's how to examine temporary files:
Step 1: Access the Temporary Folder
Step 2: Search for the Lost EXE File
Step 3: Paste the File to a Safe Location
Step 4: Verify the Restoration
Check the destination folder to confirm that your lost EXE file has been successfully copied and is now accessible.
Note: Temporary folders are periodically cleaned by the system, so the chances of finding your lost EXE file in this location may vary depending on the timing of the deletion.
When traditional methods prove unsuccessful, a dedicated data recovery tool can be a game-changer. FoneDog Data Recovery is a powerful and user-friendly tool designed to recover various file types, including EXE files. Here's an overview of the steps to use FoneDog Data Recovery:
Step 1: Download and Install FoneDog Data Recovery
Step 2: Launch FoneDog Data Recovery
Step 3: Select File Types and Storage Location
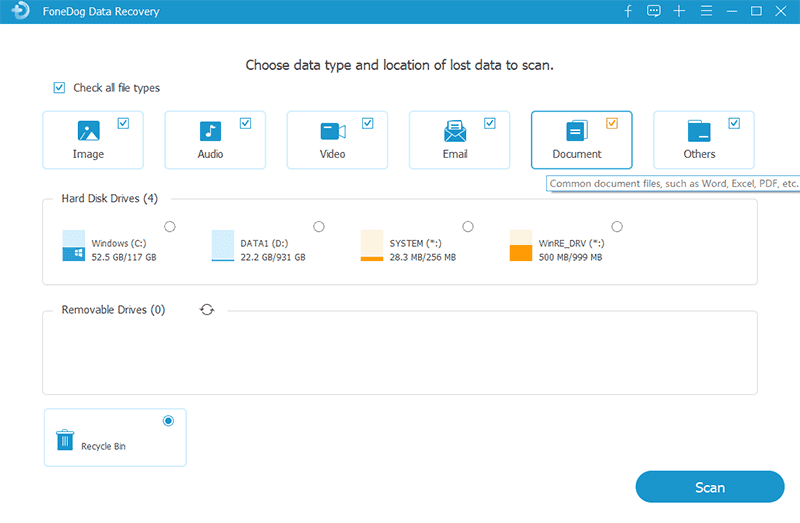
Step 4: Scan for Lost Files
Step 5: Preview and Select the Lost EXE File
Step 6: Recover the Lost EXE File
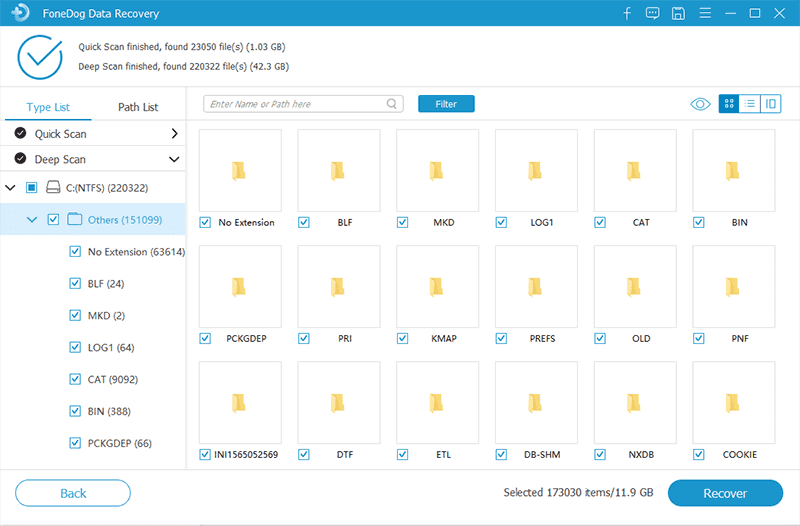
Step 7: Verify the Recovery
Navigate to the selected recovery location and confirm that the EXE file has been successfully recovered.
FoneDog Data Recovery simplifies the process of recovering deleted or lost EXE files with its intuitive interface and robust recovery capabilities. Always ensure that you save the recovered files to a different location to prevent overwriting data on the original storage device.
People Also ReadUltimate Guide: How to Recover Deleted Files Windows 10How to Recover Deleted Files Using CMD
Losing important EXE files on your Windows system can be a stressful experience, but with the right methods and tools, recovery is often possible. From utilizing built-in features like the Recycle Bin and File Explorer to exploring advanced options such as System Restore and Command Prompt, there are several avenues to explore.
In cases where traditional methods fall short, dedicated data recovery tools like FoneDog Data Recovery can be invaluable. These tools offer a comprehensive solution, scanning your storage devices for lost files, including EXE files, and providing a user-friendly interface for recovery.
Remember to act promptly when you discover the loss of an EXE file, as the chances of successful recovery often depend on minimizing changes to the storage device. Additionally, implementing regular backups and maintaining good data hygiene practices can prevent future data loss and simplify the recovery process.
By combining the methods outlined in this guide and adapting them to your specific situation, you can increase the likelihood of successfully retrieving your deleted or lost EXE files on Windows.
Leave a Comment
Comment
Data Recovery
FoneDog Data Recovery recovers the deleted photos, videos, audios, emails, and more from your Windows, Mac, hard drive, memory card, flash drive, etc.
Free Download Free DownloadHot Articles
/
INTERESTINGDULL
/
SIMPLEDIFFICULT
Thank you! Here' re your choices:
Excellent
Rating: 4.8 / 5 (based on 65 ratings)