

By Gina Barrow, Last updated: November 1, 2017
"How do I find old auido messages on my iPhone?"
“I lost some of my audio clips after I have updated my iPhone7 to the new iOS 11. Is there a way to recover deleted audio files after iOS 11 upgrade?”
Losing important files is very annoying every time you upgrade your iOS. Audio files are just one of the many things that can get deleted or lost and it takes complicated ways to get them back. These audio files can be your voice notes, voicemails, app audio, songs, and much more. It can be stressful when you have realized that all these files were gone just like that. If you have created backups for these audio files then you are lucky enough to restore them however it will be more complicated when you have forgotten to backup these files. In this article, we will discuss how to recover deleted audio files after iOS 11 upgrade in three different effective ways and by only using one effective program.
Part1. What is The Best Tool to Recover Deleted Audio Files?Part2. Recover deleted Audio files after iOS 11 upgrade straight from iPhonePart2. Recover deleted Audio files after iOS 11 upgrade in iTunes with FoneDog Toolkit- iOS Data RecoveryPart3. Recover deleted audio files after iOS 11 upgrade from iCloud with FoneDog Toolkit- iOS Data RecoveryVideo Guide: How to Restore Lost Audio Files from iPhone after iOS 11 UpdatePart4. Conclusions
Apart from restoring these files from your backups such as iTunes and iCloud, you can also effectively recover them using only one program. FoneDog Toolkit- iOS Data Recovery is the tool that has the capability to retrieve those important songs, recordings, and other audio files you have saved on your iPhone. This recovery program has all the essential methods that are proven to be effective, safe, and secured. It can also recover any phone data such as contacts, call logs, text messages, audios, videos, photos, documents, calendars, bookmarks, and much more. The very best part about this program is that it has three recovery methods: “Recover from iOS device, Recover from iTunes, and Recover from iCloud”. FoneDog Toolkit- iOS Data Recovery easily recovers data straight from the device itself even without any backup. This is because this program deeply scans the phone for all the missing and deleted contents. Whenever files are deleted, they stay in the mobile for such a time until they will be overwritten or replaced. This is the only time these files can be recovered while they are in the virtual space of the phone’s internal memory. FoneDog Toolkit will recover these files as long as they were not removed or replaced yet. This software works for all iOS versions including the latest iOS 11 and different iOS devices including the latest, iPhone 8, 8Plus and iPhone X. Get to know more how you can take advantage of this software as we go along.
 Recover Deleted Audio Files after iOS 11 Upgrade
Whether you have made backups or not, you can definitely recover deleted audio files after iOS 11 upgrade directly from the iPhone as long as you have not overwritten those files. When you have realized that you have deleted or lost important contents stop using the phone as much as possible and must proceed to recovery right away. Download the program FoneDog Toolkit- iOS Data Recovery and learn from this tutorial. Follow the steps below on how you can recover deleted audio files after iOS 11 upgrade through the help of FoneDog Toolkit- iOS Data Recovery.
Also Read:
3 Top Ways to Get Back Contacts after iOS 11 UpdateFoneDog Toolkit- iOS Data Recovery is compatible with both Windows and Mac so you can choose which one will work for your computer. Download and install the program and wait until the installation is complete, then launch the software. You must make sure that before running FoneDog Toolkit- iOS Data Recovery software, you already updated iTunes to its latest version and had temporarily disabled the auto-sync option.

Launch FoneDog - iOS Data Recovery -- Step1
To disable the auto-sync in iTunes, go to iTunes>Preferences>Devices>check the option: “Prevent iPods, iPhones, and iPads from syncing automatically”. There is no need to launch the iTunes while the recovery is ongoing.
Using an original USB cable, connect the iPhone to the computer to start the scanning. Once the device has been detected, click on the first recovery method on the left side of the screen: ‘Recover from iOS device’ and then click ‘Start Scan’.

Connect iPhone and Start Scan -- Step2
FoneDog Toolkit- iOS Data Recovery will now scan the entire device for all the missing and deleted files so this process will actually take a while but you can see its progress onscreen. When the scanning stops, you can now see all the available file types you can recover from the device. Choose from the main file categories on the left especially under Media, where you can find all the audio files. Preview those files on the right and then mark the boxes of the items you want to recover. You can choose to recover all or perform a selective recovery. Create a new folder on the desktop to save all the files and then click the ‘Recover’ button at the bottom of the screen.

Recover Deleted Audio Files after iOS 11 update -- Step3
The second recovery method offered by FoneDog Toolkit- iOS Data Recovery is to ‘Recover from iTunes’. This is similar to restoring the backup from iTunes, however, this method is more preferred and convenient because it allows you to perform selective recovery. There is no need for you to extract and download the entire iTunes backup which can lead to further data loss especially to the new and existing mobile contents. Learn how to use the ‘Recover from iTunes’ options using FoneDog Toolkit- iOS Data Recovery.
Launch the program FoneDog Toolkit- iOS Data Recovery and click the second recovery method on the left ‘Recover from iTunes’. Automatically, all the iTunes backups will display on the screen. Choose the desired backup and click ‘Start Scan’.
Note:
No need to launch the iTunes on the computer; just simply make sure that you are using the same computer where iTunes is installed.
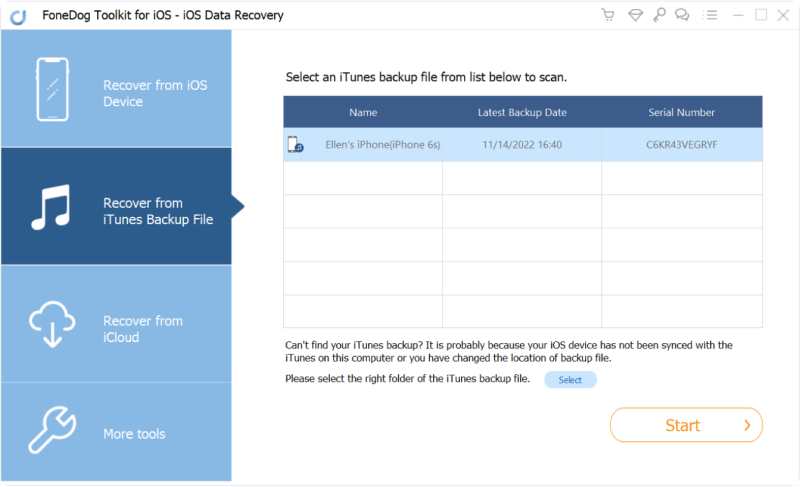
Launch FoneDog and Select iTunes Backup -- 1
FoneDog Toolkit- iOS Data Recovery will now scan the iTunes backup so it may take a while depending on the total data size. Once the scanning stops, you can now see all the files on the left while you can preview each item on the right. Look for the audio files that were deleted under Media category and then mark them individually for selective recovery. You can also filter the search by toggling on the above feature: ‘Only display deleted item/s’. Always create a new folder on the desktop where you can save all the recovered audio files.
Also Read:
How to Recover Deleted Files from iTunes
How Do I Recover Deleted Call History from iTunes?
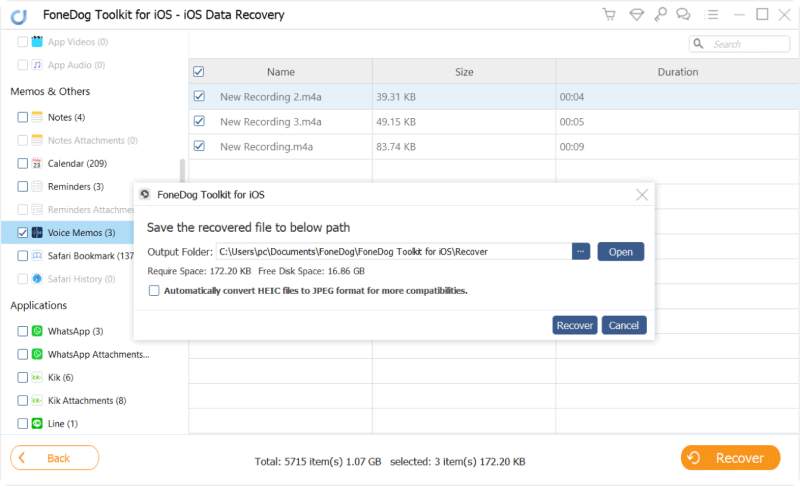
Preview and Recover Deleted Audio Files from iTunes -- 2
The last recovery method that you can use with FoneDog Toolkit- iOS Data Recovery is the ‘Recover from iCloud’. This option is way too convenient to use and very much easy to do. It is so simple that you can finish the recovery process in no particular time. Check out the steps on how you can recover deleted audio files after iOS 11 upgrade:
Run the program FoneDog Toolkit- iOS Data Recovery and then click on the last method, ‘Recover from iCloud’ on the left side panel and then sign in to your own iCloud account. You must use the same exact iCloud account you are using on the iPhone. All the usernames and passwords are not saved for privacy protection.
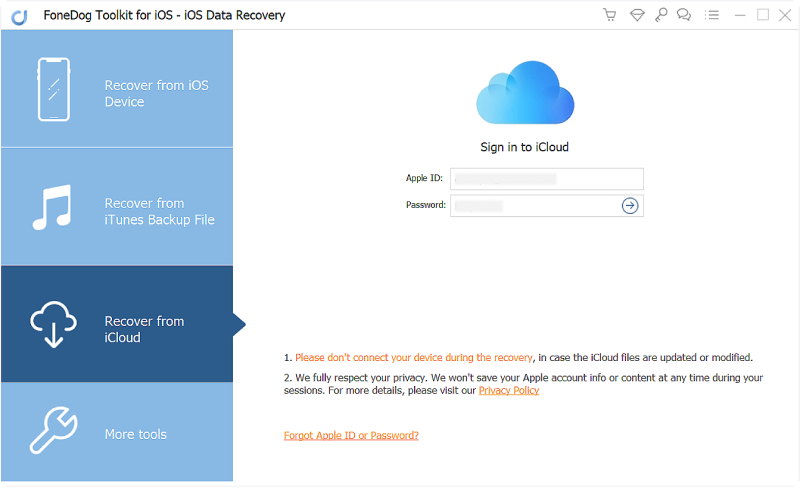
Login iCloud -- #1
Once you have logged in, you can see all the iCloud backup display with complete details. Choose the most recent backup and click the ‘Download’ button beside so the program can scan, extract, and download the entire contents.
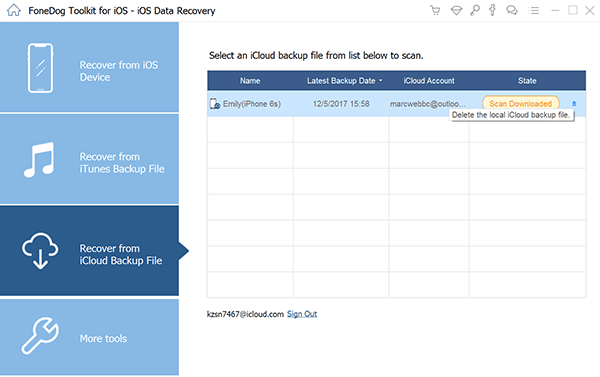
Select iCloud Backup -- #2
After selecting the desired backup content, there will be a pop-up window where you can see all the files you can recover from the iCloud backup. From here you can perform a selective recovery by ticking the boxes of the desired files such as App Audios, voice memos, voicemail, and other audio files. Click ‘Next’ to continue.
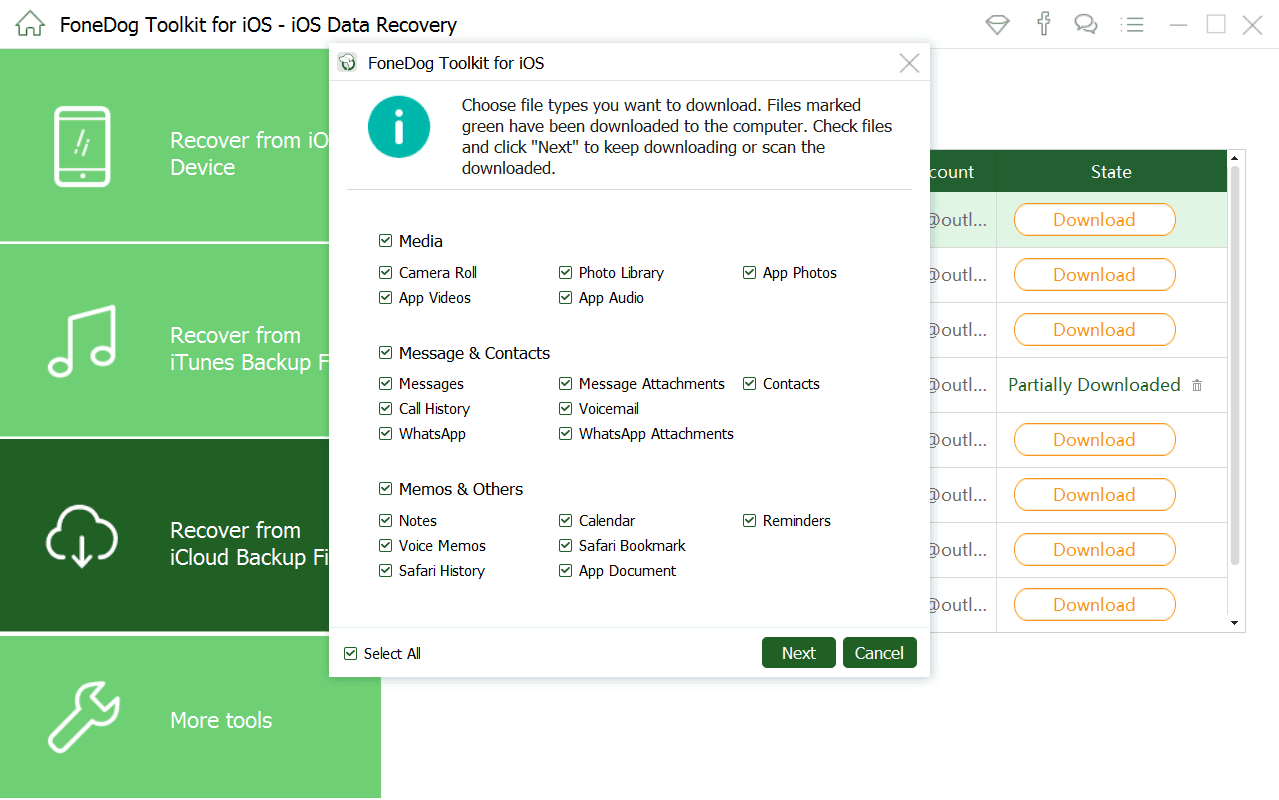 Select iCloud Backup -- #3
FoneDog Toolkit- iOS Data Recovery will begin the backup extraction which may take some time and once it stops, you can now see the entire files you have chosen for recovery earlier. Mark those audio contents you were looking for and save them in a new folder on the desktop. Don’t forget to click the ‘Recover’ button at the bottom of the screen.

Restore Lost Audio Files after iOS 11 Update from iCloud #4
FoneDog Toolkit- iOS Data Recovery simply provides a one-stop solution for any types of recovery. Using this software, you can get back: contacts, call logs, messages, instant messages, reminders, photos videos and you can even recover deleted audio files after iOS 11 upgrade and much more. Of course, never underestimate the value of your backups, always keep them handy at all times. Keep in mind that if all else fails, you can rely on FoneDog Toolkit and surely you will never regret it. Download the Free Trial today.
Leave a Comment
Comment
iOS Data Recovery
3 Methods to recover your deleted data from iPhone or iPad.
Free Download Free DownloadHot Articles
/
INTERESTINGDULL
/
SIMPLEDIFFICULT
Thank you! Here' re your choices:
Excellent
Rating: 4.6 / 5 (based on 104 ratings)