FoneDog Screen Recorder FoneDog Screen Recorder
Special Offer Special Offer
Only Only
$4.49 $4.49
to get a ONE-month license to get a ONE-month license
Sale ends in xx days Sale ends in xx days
Buy Now
sale

3 Effective Ways on How to Transfer MP3 to iPhone [2024 Updated]

By Gina Barrow, Last updated: April 9, 2024

“Hi. I am a big music fan and I want to bring it with me anywhere I go. I was wondering if there are many ways on how to transfer MP3 to iPhone. Thanks”

MP3 is one of the most-used audio file formats where anyone can stream, listen, and save contents like music, podcasts, recordings, audiobooks, and more.

Most people especially the youngsters cannot live without listening to music and it may look a little hassle carrying an MP3 around plus your phone. You can play music on your way to work, school, or home, so why not transfer MP3 tracks to your iPhone instead?

Basically, you can get or download these audio files from Amazon, iTunes, and even directly from your computer. If you own an iPhone, you might probably want to listen to your favorite songs from your MP3.

However, the methods on how to transfer MP3 to iPhone are a quite different approach. And, this is what we will be discussing today. We will give you 3 effective ways on how you can move your MP3 tracks to your iPhone easily. Read along!

Part 1. The Fastest Way to Transfer MP3 to iPhone without iTunes (One Click)Part 2. How to Transfer MP3 to iPhone without iTunesPart 3. How to Transfer MP3 to iPhone with iTunesPart 4. Conclusion

Part 1. The Fastest Way to Transfer MP3 to iPhone without iTunes (One Click)

One popular method on how you can move or transfer MP3 to iPhone is using a third-party application. These kinds of programs act as the middleman to initiate the transfer.

To better help you out, I recommend using FoneDog Phone Transfer. This third-party program highlights a user-friendly interface so that anyone can use it, even the beginners.

FoneDog Phone Transfer does not just let you transfer contents in between mobile devices. It actually features the following:

  • Transfer and Backup (PC to Mobile, Mobile to Mobile and Mobile to PC)
  • Move or transfer music, messages, contacts, videos, photos, and more
  • Seamless transfer between iOS to iOS, Android to Android, iOS to Android (and vice versa), iOS to PC (and vice versa)
  • It allows you to remove or delete unwanted or unnecessary contents
  • Few-clicks program operation
  • Easily converts HEIC images to JPG, PNG, JPEG without losing quality

Phone Transfer Transfer files among iOS, Android and Windows PC. Transfer and backup music, text messages, contacts, photos, video on computer easily. Fully compatible with the latest iOS and Android. Free Download FoneDog Phone Transfer

How to Use FoneDog Phone Transfer to Transfer MP3 to iPhone

Free Download

  1. Download this program on your computer. Make sure you already had a folder saved on your desktop with all the MP3 files.
  2. Connect your iPhone using a USB cable.
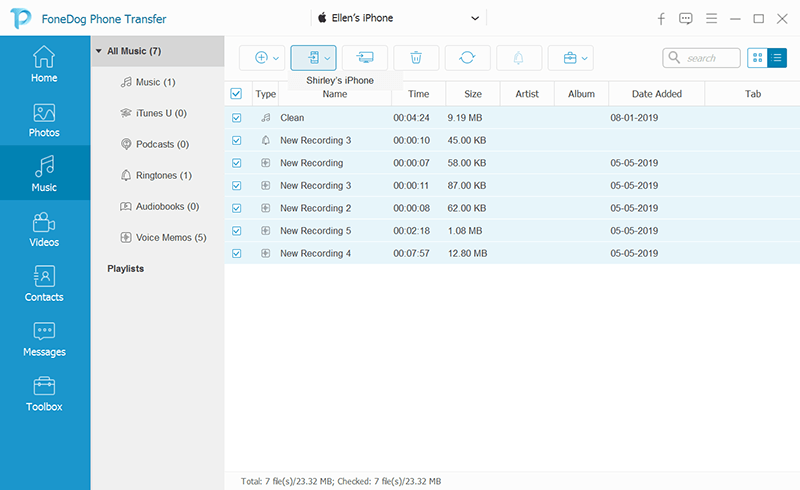
  3. Choose Music as the File Type.
  4. Select the MP3 files your need to transfer to iPhone.
  5. Export the selected MP3 to your iPhone/iPad/iPod.

You are all set and ready!

Transfer mp3 to iPhone

You can now enjoy MP3 tracks on your iPhone without doing a lot of work and hassles. Apart from this, you can enjoy the benefits of being able to transfer more music files from the computer to the iPhone, not just audio contents and music. The best part of this program is that it works with almost all kinds of Smartphones today!

Part 2. How to Transfer MP3 to iPhone without iTunes

Apple has been highly dependent on iTunes in terms of music file sync. You pretty much need iTunes on whatever you want to do on your device. But, don’t get me wrong, iTunes play an important part in iOS devices and I too, am using this service.

But, what if you want to transfer MP3 files down to your iPhone without iTunes? How can it be done? Is it even possible?

Method #1: Use Dropbox

One of the most efficient methods on how to transfer MP3 to iPhone is by using Dropbox. Dropbox allows you to upload all your music or audio contents wherein you can transfer it to another device such as the iPhone.

Dropbox is a cloud storage where you can use it for storage or file transfers. It offers a 2GB free storage limit and has an upgradable option if you need more.

Notes:

  • You must register for a Dropbox account and download the app on your iPhone in order to do this transfer.
  • Your MP3 files should be saved on your computer.

Here are the Steps on How to Use Dropbox to Transfer MP3 Files to your iPhone:

  1. The first step is to sign in to your Dropbox account.
  2. Click Upload and go to the MP3 folder from your desktop to transfer all your audio files. You can create a new folder in Dropbox to manage your audio files.
  3. Select the files you wish to upload to Dropbox.

To Transfer MP3 Files from Dropbox to iPhone:

  1. Open the Dropbox app on your iPhone.
  2. Find and open the MP3 folder.
  3. Tap Download.

Transfer MP3 to iPhone Using Dropbox

Method #2: Use iCloud Drive

To add MP3 files to your iPhone's Apple Music library from your PC using iCloud Drive, you can follow these steps:

    1. Upload the MP3 files to iCloud Drive from your PC by going to iCloud.com and signing in with your Apple ID and password. Then, click on iCloud Drive and drag the MP3 files from your PC to the iCloud Drive window or a folder icon in the iCloud Drive window. Alternatively, you can click on the upload button in the iCloud Drive toolbar and select the files you want to upload.
    2. On your iPhone, make sure that iCloud Drive is turned on. You can do this by going to Settings > [your name] > iCloud and then turning on the toggle for iCloud Drive.
    3. Open the Files app on your iPhone and navigate to the location where you uploaded the MP3 files in iCloud Drive.
    4. Tap and hold on the MP3 file you want to add to Apple Music and then tap on the "Share" button.
    5. In the share sheet, scroll down and tap on "Add to Apple Music". This will add the MP3 file to your Apple Music library on your iPhone.

    Transfer MP3 to iPhone Using iCloud Drive

    Part 3. How to Transfer MP3 to iPhone with iTunes

    Apple’s standard sync and transfer option are always iTunes. It is reliable and efficient most of the time. However, the only issue we have with iTunes is that you really need to connect your iOS device upon doing any sync or transfer and even backup and restore.

    If you haven’t synced your music to iPhone, follow this tutorial and see how simple it is:

    Notes:

    • Always keep your iTunes up to date. You can go to Help and Check Updates. Do this before connecting your iPhone every time.
    • iTunes is a one-way synchronization.
    • Always check the remaining storage on your iPhone when connected to iTunes before. transferring mp3. Having a low space on your device might cause your phone to slow down.

    Method #1: Use The Automatic Sync Method on iTunes:

    1. Connect your iPhone to iTunes and make sure that sync option is enabled on your iTunes. To do this go the Summary pane and click on Music. Verify that the Sync Music box is checked
    2. To allow the transfer method, tick the box beside Entire music to select all tracks. If you want to choose certain tracks only then choose the “Selected Playlists…”
    3. Click Apply to begin the transfer.

    Transfer MP3 to iPhone with iTunes

    Method #2: Use the Manual Transfer Method on iTunes:

    1. Under the Summary tab on the left pane, tick the box for Manually manage music under Options
    2. Click Apply.
    3. Go to iTunes Library and click Songs. You can also choose Albums, Playlists, Artists, or Genres. Find the tracks you want to transfer
    4. Highlight the tracks you want to transfer and drag them to your iPhone to the left pane under Devices. You can use CTRL for windows and Command key for Mac.

    That’s how you transfer your audio tracks using iTunes. Remember to review the steps carefully to avoid overwriting your old songs. You might not be able to retrieve them back once overwritten.

    Part 4. Conclusion

    There are so many ways you can follow on how to transfer MP3 to iPhone. In this article, we have discussed 3 effective ways which are, with iTunes, using Dropbox, and lastly, using FoneDog Phone Transfer.

    However, if you are not keen with the transfer, you might overwrite or delete existing tracks on your iPhone. Among these three methods, FoneDog Phone Transfer is the most reliable and stable option plus it’s without any data loss.

    Have you tried doing any of these methods we recommended above? Tell us your thoughts!

    Leave a Comment

    Comment

    Comment ()
    author image

    Gina Barrow

    Technical/Creative Writer

    Kitchen, my safe space; black, my favorite color

    Was a Technical Specialist for a while, troubleshooting Smartphone and Software-related issues until a writing stint caught my attention.

    Phone Transfer logo

    Phone Transfer

    Transfer data from iPhone, Android, iOS, and Computer to Anywhere without any loss with FoneDog Phone Transfer. Such as photo, messages, contacts, music, etc.

    Free Download

    How Do You Like This Article?

    Check icon/ Check icon

    INTERESTINGDULL

    Check icon/ Check icon

    SIMPLEDIFFICULT

    Thank you! Here' re your choices:

    Rate This Article: Excellent

    Rating: 4.5 / 5 (based on 106 ratings)

    Phone Transfer logo

    Phone Transfer

    Transfer data from iPhone, Android, iOS, and Computer to Anywhere without any loss with FoneDog Phone Transfer. Such as photo, messages, contacts, music, etc.

    Free Download

    FoneDog uses cookies to ensure you get the best experience on our website. Click here to learn more.