FoneDog Screen Recorder
FoneDog Screen Recorder
Special Offer
Special Offer


By Nathan E. Malpass, Last updated: April 24, 2025
There inevitably comes a time when we need to transfer these photos to our PC for various reasons, such as creating backups, freeing up storage space, or simply for easier editing and sharing.
Traditionally, iTunes has been the go-to solution for managing iPhone content, including photo transfers. However, iTunes can be cumbersome and is often considered overkill for those who just want to move photos. The good news is that you can transfer photos from iPhone to PC without iTunes, and it's easier than you might think.
In this article, we'll explore various hassle-free methods to help you transfer your cherished photos from your iPhone to your PC without the need for iTunes. Whether you're using a Windows PC or a Mac, we've got you covered. So, let's dive into these efficient solutions and ensure your memories are safe and accessible whenever you need them.
Part 1. 4 Ways to Transfer iPhone Photos to PC without iTunesPart 2. Best Tool to Transfer iPhone Photos to PC without iTunesPart 3. Conclusion
How to transfer photos from iPhone to PC without iTunes? When it comes to transferring a few select photos from your iPhone to your PC without the need for any additional software or cables, using email is one of the simplest and quickest methods. Follow these steps:
Step 1: Compose an Email
Unlock your iPhone and open the Photos app. Navigate to the album or camera roll containing the photos you want to transfer.
Step 2: Select Photos
Tap the photos you want to transfer to select them. You can select multiple photos by tapping each one individually.
Step 3: Share via Email
After selecting the photos, tap the share icon (usually represented by a square with an arrow pointing upward). From the sharing options, choose the "Mail" option. This will open the Mail app on your iPhone.
Step 4: Compose the Email
In the email composition screen, enter your own email address in the "To" field. You can add a subject and a message if you like. Tap the "Send" button to email the selected photos to yourself.
Step 5: Access the Email on Your PC
Open your PC's email client (e.g., Outlook, Gmail, Yahoo Mail) and find the email you just sent to yourself. Open the email and download the attached photos to your PC.
Step 6: Save the Photos to Your PC
Once downloaded, you can choose where to save the photos on your PC. You can create a new folder or save them to an existing one.
Using email for photo transfer is a quick and efficient way to move a few pictures from your iPhone to your PC. However, keep in mind that there may be limitations on the number of photos you can attach to a single email, so this method is best suited for smaller transfers. If you have a large number of photos to transfer, consider one of the other methods we'll explore in this series.
If you're looking for a convenient way to transfer photos from iPhone to PC without iTunes, utilizing popular messaging apps like Telegram or WhatsApp can be a smart choice. These apps allow you to send photos to yourself or others and easily access them on your PC. Here's how to do it using Telegram:
Step 1: Install Telegram (if not already installed)
Download and install the Telegram app from the App Store on your iPhone if you haven't already. Sign in or create an account if prompted.
Step 2: Create a Chat with Yourself
Open Telegram and tap the pencil icon or "New Message" button. In the search bar, type your own name or username to create a chat with yourself.
Step 3: Send Photos to Yourself
Inside the chat with yourself, tap the attachment icon (usually a paperclip or camera icon) and select "Photo or Video." Choose the photos you want to transfer from your iPhone's gallery. Send the selected photos to yourself by tapping the send button.
Step 4: Access Photos on Your PC
On your PC, open the Telegram website or desktop application. Log in using the same Telegram account you used on your iPhone. Open the chat with yourself, and you'll find the photos you sent.
Using messaging apps like Telegram or WhatsApp to transfer photos is not only quick but also convenient, as it allows you to access your pictures on multiple devices easily. Just ensure you have an active internet connection on both your iPhone and PC for this method to work seamlessly.
Transferring photos from your iPhone to your PC using a USB cable is a reliable and efficient method. This approach ensures a direct connection between your devices, making it suitable for transferring a large number of photos quickly. Here's how to do it:
Step 1: Prepare Your iPhone and PC
Make sure your iPhone is unlocked. Connect your iPhone to your PC using a compatible USB cable. Use the cable that came with your iPhone or a certified third-party cable.
Step 2: Trust the PC
When you connect your iPhone to your PC, you may see a pop-up on your iPhone asking whether you "Trust This Computer." Tap "Trust" to establish the connection.
Step 3: Open Windows Photos App
On your Windows PC, open the "Photos" app. You can usually find it in the Start menu or by searching for "Photos."
Step 4: Import Photos
In the Photos app, click the "Import" button located in the upper-right corner of the window. If you don't see this button, look for "Import > From a USB device" in the left sidebar. The Photos app will automatically detect your connected iPhone and display the photos and videos on your device.
Step 5: Select Photos to Import
Select the photos and videos you want to transfer to your PC. You can either click "Select All" or individually select the ones you want.
Step 6: Choose Import Settings
Choose your import settings: "Review, organize, and group items before importing" allows you to organize the imported items into folders. You can also select where you want to save the imported photos.
Step 7: Start Import
Click the "Import" button to begin transferring the selected photos from your iPhone to your PC.
This method provides a straightforward way to transfer photos from iPhone to PC without iTunes. It's particularly useful when you have a significant number of photos or videos to transfer, as it ensures a direct and stable connection between your devices.
Transferring photos from your iPhone to your PC using Google Drive is a convenient and cloud-based approach that allows you to access your photos from any device with internet access. Here's how to do it:
Step 1: Install Google Drive (if not already installed on iPhone)
Download and install the Google Drive app from the App Store on your iPhone if you haven't already. Open Google Drive and sign in with your Google account or create one if needed.
Step 2: Upload Photos to Google Drive
In the Google Drive app, tap the "+" icon or the "Add" button. Select "Upload" from the menu options. Choose the photos you want to transfer from your iPhone's gallery. Tap "Upload" to start uploading the selected photos to your Google Drive account.

Step 3: Access Google Drive on Your PC
On your PC, open a web browser and go to the Google Drive website (https://drive.google.com/). Sign in with the same Google account used on your iPhone.
Step 4: Download Photos to Your PC
Inside Google Drive, you'll find the uploaded photos in the "My Drive" section. They may be in the "Recent" folder if you haven't organized them into specific folders. Select the photos you want to download to your PC by clicking on them. You can select multiple photos at once. Right-click on the selected photos, then choose "Download" from the context menu.
Step 5: Save the Photos on Your PC
Choose the location on your PC where you want to save the downloaded photos and click "Save" or "OK."
By using Google Drive, you can easily transfer photos from iPhone to PC without iTunes and have them accessible on any device with an internet connection. This method is especially useful if you want to back up your photos and have them available for download on multiple devices.
Transferring photos from your iPhone to your PC using iCloud.com is a seamless and cloud-based method provided by Apple. iCloud allows you to access and download your photos from anywhere with an internet connection. Here's how to do it:
Step 1: Enable iCloud Photos on Your iPhone
On your iPhone, go to "Settings. Tap your name at the top of the Settings menu. Select "iCloud" and then "Photos." Toggle on "iCloud Photos." Your iPhone will start uploading your photos to iCloud.
Step 2: Access iCloud.com on Your PC
On your PC, open a web browser and go to the iCloud website (https://www.icloud.com/). Sign in with your Apple ID and password. Ensure you use the same Apple ID as on your iPhone.
Step 3: Access Photos on iCloud.com
In iCloud, click on the "Photos" icon.
Step 4: Select and Download Photos
You'll see your iCloud Photo Library with all your photos and albums. Select the photos you want to download to your PC by clicking on them. You can select multiple photos at once.
Step 5: Download Photos
After selecting the photos, click the download button (represented by a cloud with an arrow pointing down) in the upper-right corner of the screen.
Step 6: Save the Photos on Your PC
Choose the location on your PC where you want to save the downloaded photos, and click "Save" or "OK."
This method allows you to seamlessly transfer photos from iPhone to PC using Apple's iCloud service. It's particularly useful if you want your photos to be automatically synced between your devices and have easy access to them on the iCloud website. Just ensure that you have sufficient iCloud storage for all your photos.
When it comes to efficiently transferring photos from your iPhone to your PC without using iTunes, FoneDog Phone Transfer is a highly recommended tool.
And aside from photos, it can also help you in transferring other data from your smartphone devices such as music, messages, videos, and your contacts. Here's why FoneDog Phone Transfer, an iPhone 15 supported tool, stands out as the best software for the job:
Here’s how to use this top iOS third-party transfer app to transfer photos from iPhone to PC without iTunes:
Step 1: Download and Install FoneDog Phone Transfer
Visit the official FoneDog website to download the FoneDog Phone Transfer software. Install the software on your PC by following the on-screen instructions.
Phone Transfer
Transfer files among iOS, Android and Windows PC.
Transfer and backup text messages, contacts, photos, video, music on computer easily.
Fully compatible with the latest iOS and Android.
Free Download

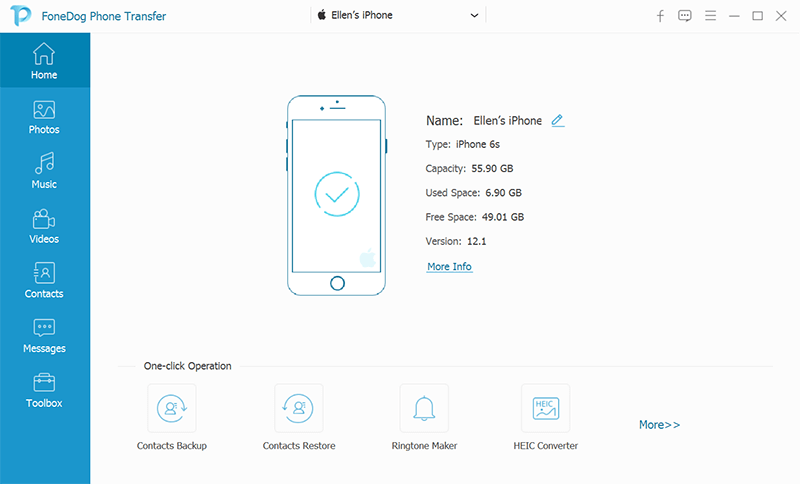
Step 2: Launch FoneDog Phone Transfer
Launch the FoneDog Phone Transfer software on your PC by double-clicking its icon.
Step 3: Connect Your iPhone and PC
Use a USB cable to connect your iPhone to your PC. Ensure that you unlock your iPhone and trust the computer if prompted.
Step 4: Select "Phone to Phone Transfer" Mode
In the FoneDog Phone Transfer software, you'll see several options. Choose "Phone to Phone Transfer" to initiate the transfer process.
Step 5: Scan Your iPhone
The software will start scanning your iPhone for its data, including photos. This may take a few moments.
Step 6: Choose Photos to Transfer
After the scan is complete, you'll see a list of data categories on the left side of the software interface. Select "Photos" or "Camera Roll" from the list.

Step 7: Begin the Transfer
Select the specific photos you want to transfer from your iPhone to your PC. You can also choose to transfer all photos.
Step 8: Start the Transfer Process
Click the "Export to PC" or "Start Transfer" button, depending on the software version, to initiate the transfer of the selected photos.
Step 9: Choose a Destination Folder
A window will pop up asking you to choose a destination folder on your PC where the photos will be saved. Select or create the desired folder and click "OK" or "Save."
Step 10: Monitor the Transfer Progress
The software will begin transferring the selected photos from your iPhone to your PC. You can monitor the transfer progress on the screen.
Step 11: Transfer Completed
Once the transfer is complete, you will receive a notification indicating that the process was successful. You can then access your iPhone photos on your PC in the chosen destination folder.
FoneDog Phone Transfer is the ideal tool for transferring photos from your iPhone to your PC without the complexities of iTunes. Its user-friendly interface, versatility, and efficient transfer process make it a top choice for managing your iPhone data. Whether you have a few photos or an extensive gallery, FoneDog Phone Transfer streamlines the process, ensuring your memories are safe and accessible on your PC.
Up till now, you have got 5 helpful ways to transfer photos from iPhone to PC without iTunes easily. Whether you choose email, messaging apps, USB cable, cloud services like Google Drive or iCloud, or specialized tools like FoneDog Phone Transfer, you have several convenient options to suit your preferences and needs. With these methods, managing your iPhone photos on your PC has never been easier.
Leave a Comment
Comment

iPhone/Android Devices’ Maintenance Expert
Staying home, listening to music, writing tech articles
Many people asked me to repair their mobile phones so I have a lot of experience in mobile phone repair, and I know a lot about Android or Apple phones.
Phone Transfer
Transfer data from iPhone, Android, iOS, and Computer to Anywhere without any loss with FoneDog Phone Transfer. Such as photo, messages, contacts, music, etc.
Free DownloadHot Articles
 /
/
INTERESTINGDULL
/
SIMPLEDIFFICULT
Thank you! Here' re your choices:
Excellent
Rating: 4.7 / 5 (based on 71 ratings)