FoneDog Screen Recorder FoneDog Screen Recorder
Special Offer Special Offer
Only Only
$4.49 $4.49
to get a ONE-month license to get a ONE-month license
Sale ends in xx days Sale ends in xx days
Buy Now
sale

Full Guide about Best OBS Recording Settings [Step-by-Step]

By Adela D. Louie, Last updated: May 23, 2024

In order to attract a stable audience, the quality of the live broadcast must be of the highest standard. The OBS recording settings are crucial for achieving high-quality pictures, clear audio, and an immersive viewer experience. Whether you are an experienced streamer or improving your OBS recording settings when using the OBS screen recorder, mastering them can enhance your footage and leave a lasting impact.

This article will provide a detailed analysis of the optimal OBS settings for recording, enabling you to enhance your setup and achieve flawless streaming performance consistently. Let us go into the process of enhancing your broadcasting skills and videos!

Part 1. Overview: What’s OBS Recording Settings?Part 2. Top Alternative to OBS in Quality Screen RecordingPart 3. Best OBS Recording SettingsPart 4. How to Optimize Recording on OBSPart 5. Tips on Setting up the Best OBS Recording SettingsPart 6. FAQSConclusion

Part 1. Overview: What’s OBS Recording Settings?

OBS has sophisticated features for encoding video and audio, as well as for applying scene transitions and filters. To adjust recording settings, users have the option to modify OBS in order to optimize recordings either for superior quality or for reduced file size.

Typical options involve picking a recording format as well as choosing a codec for video reduction. It is possible for users to change the speed and quality settings to get the best video quality and file size. Frame rate along with the resolution can also be adjusted to match the content's intended use and platform requirements.

Part 2. Top Alternative to OBS in Quality Screen Recording

FoneDog Screen Recorder is a top alternative to OBS for quality screen recording. It offers an intuitive interface with easy setup, making it accessible for beginners. FoneDog provides high-quality video and audio capture with customizable settings, including multiple recording modes and editing tools. Its lightweight design ensures smooth performance, and the software supports various output formats for versatile compatibility.

windows Free Download For Windows mac Free Download For normal Macs mac Free Download For M1, M2, M3

How to Use:

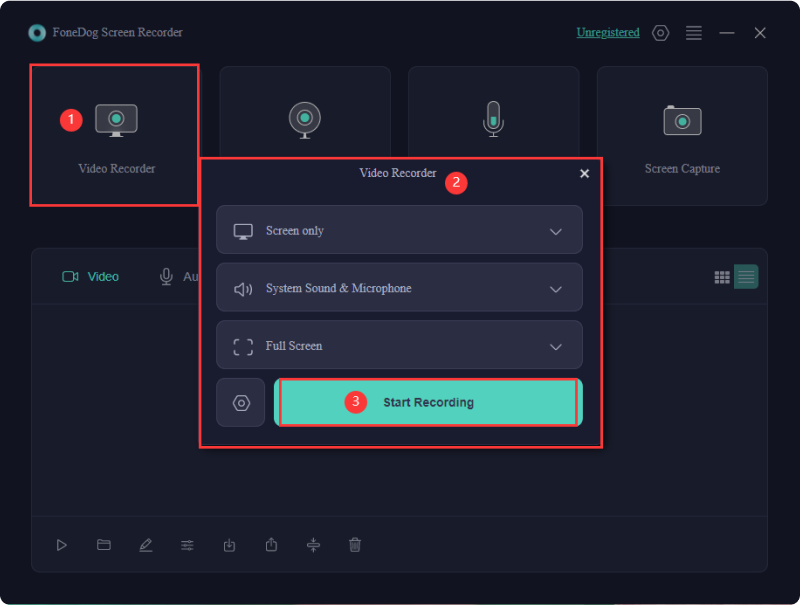
  1. To commence, download and afterwards launch the application on the device operating system. After which, initiate the "Video Recorder" function within the primary interface.
  2. Choose the "System Sound & Microphone" right within the respective menu to capture system audio as well as microphone input.
  3. Once preparations are complete, and to commence screen capture, ensure to select the "Start Recording" option.
  4. While recording, an overlay toolbar featuring annotation tools will appear. Access the "Edit" tab to utilize these features.
  5. Cease recording by clicking the red stop icon, saving the file locally.
  6. Utilize the "Pause" function as needed, and resume accordingly. To clear all recordings and start anew, employ the "Restart" option.

Best Alternative to OBS Recorder

Part 3. Best OBS Recording Settings

Adjusting your OBS configurations to align with the type and goal of your content is essential. Doing so guarantees an optimal viewing experience for your audience while conserving system resources and bandwidth. Let's delve into ideal and suggested OBS recording settings suitable for different typical scenarios.
Video Settings:

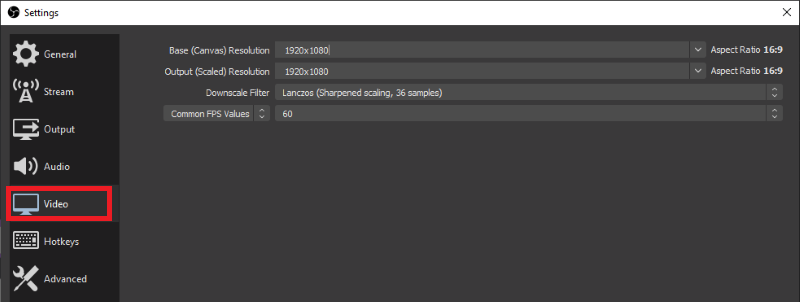
  • Resolution Settings: Commonly set to 1920x1080 for Full HD recordings, but 1280x720 is a suitable option for less intensive tasks.
  • Frame Rate: Opt for 30 FPS for standard recording or 60 FPS for high-motion footage.
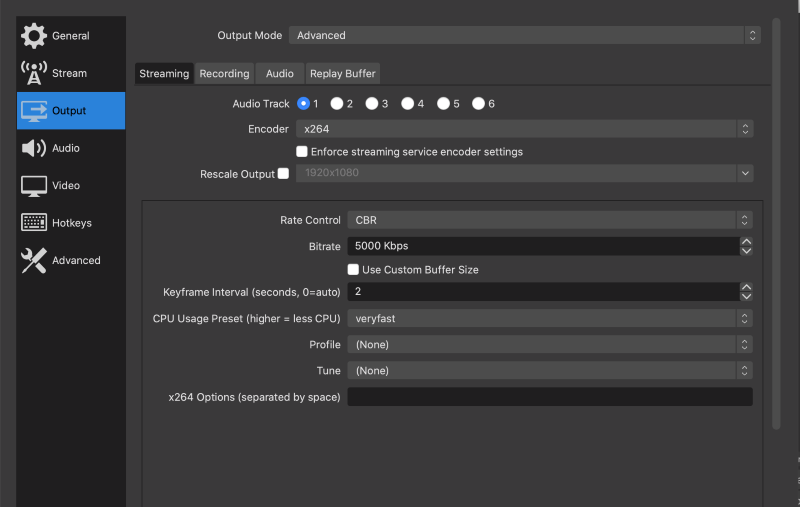
  • Video Compression Rate: A bitrate of 2500-4000 Kbps suits 1080p recordings, but 4K footage necessitates much higher bitrates.
  • Encoding: x264 is a widely used and adaptable option; however, NVENC is recommended if you have a high-performance Nvidia GPU for improved efficiency.
  • Bitrate Management: CBR (Constant Bitrate) provides uniform quality, whereas VBR (Variable Bitrate) adapts to video complexity, potentially leading to quality fluctuations.
  • Color Profile: Color Space 709 works well with most modern displays, while 601 may be necessary for compatibility with older monitors.
  • Downscaling Method: Lanczos was much preferred for a crisper image when resizing, particularly during downscaling.

OBS Video Settings

Sound Settings:

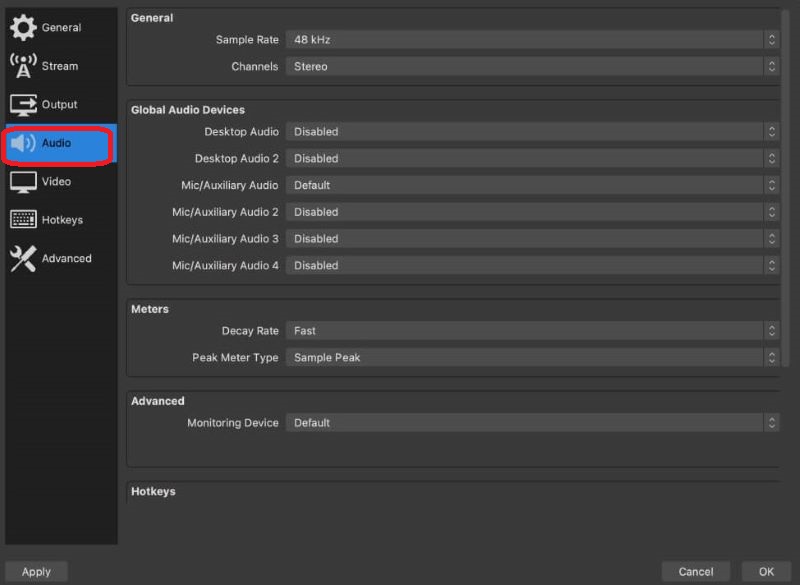
  • Audio Sample Rate: Typically, 44.1 kHz is the norm, but choosing 48 kHz can enhance audio quality slightly.
  • Audio Channels: Generally, stereo is preferred, but mono is an option when there is only one audio source.
  • Bitrate: Can vary from 128 to 320 Kbps, with higher bitrates providing better audio clarity.
  • Audio Codec: AAC is a popular choice and offers broad compatibility.

OBS Sound Settings

Screen Recording of Tutorial or Lectures:

  • Recording Resolution: Set to 1920x1080 for sharpness, though 1280x720 is sufficient for simple tutorials.
  • Frame Rate: 30 FPS, suitable for most instructional videos as high frame rate is unnecessary.
  • Video Bitrate: Choose 2500-3000 Kbps to achieve a good balance between video quality and file size.
  • Encoder: Opt for x264 for broad compatibility and reliable performance.
  • Audio Bitrate: Use 128 Kbps to ensure clear audio quality for voice narration.

Output Settings for Tutorial or Lectures Screen Recording

Gameplay:

  • Recording Resolution: Choose 1920x1080 for Full HD quality or opt for 2560x1440 or 3840x2160 for high-resolution content.
  • Recording Frame Rate: Use 60 FPS to effectively capture rapid in-game movements.
  • Video Data Rate: For 1080p recordings, aim for a bitrate of 5000-8000 Kbps; for 4K, consider a range of 12000-24000 Kbps.
  • Video Codec: Select NVENC if you have an Nvidia GPU that supports it, or x264 otherwise.
  • Audio Data Rate: A setting of 160 Kbps ensures clear capture of game audio and voice commentary.

Does OBS show a black screen when capturing gameplay? Read the other article to fix the issue.

Video Meeting:

  • Resolution: Set to 1280x720 for smooth video chats while minimizing bandwidth usage.
  • Frame Rate: Ensure a consistent frame rate of 30 frames per second to achieve realistic movement without excessively straining your hardware.
  • Video Bitrate: Adjust to 1500-2500 Kbps for sharp visuals without network congestion.
  • Video Encoder: Use x264 for wide-ranging compatibility with various devices.
  • Audio Bitrate: Select 128 Kbps for crisp voice quality.

Streaming Video for YouTube:

  • Resolution Settings: Choose 1920x1080 for standard quality streams; opt for 2560x1440 for higher-resolution content.
  • Frame Rate: Use 30 FPS for talk shows or minimal movement; go for 60 FPS for gaming or fast-paced streaming.
  • Video Quality: Maintain a bitrate of 4000-6000 Kbps for 1080p quality as recommended by YouTube.
  • Encoding Options: Select x264 or NVENC depending on your graphics card and personal preference.
  • Audio Quality: Set the audio bitrate between 128-160 Kbps for clear sound quality for your audience.

Part 4. How to Optimize Recording on OBS

To capture gameplay, navigate over to option “Sources” and click the “+” sign, then choose “Game Capture”. This allows to indeed select whether to record the entire screen or such of a specific game window. If recording a specific window, ensure that the Base Resolution aligns with the game's resolution. Also, review the Audio settings, particularly whenever using an external microphone for voice narration.

Adjust the following settings for optimal gameplay recording:

  • Video settings: Align the base canvas resolution and output scaled resolution with your desired recording quality. Utilize the H.264 codec for video compression and select a proper bitrate for quality. Test different presets from "ultrafast" going into "slow" for the best balance.
  • Audio settings: Choose your preferred audio bitrate, sample rate as well as the channel configuration. Confirm you’ve set the correct sources for gameplay along with the microphone audio.
  • Additional settings: Enable hardware acceleration if your system can handle it for improved performance. Choose a recording format and set a location to save your recordings.

Part 5. Tips on Setting up the Best OBS Recording Settings

1. Enhancing Speed and Effectiveness

Experimenting with Settings: Adjust different recording options to find the right balance between quality and computer performance.

Monitoring System Resources: Track your computer's CPU, GPU, and memory usage during recordings using monitoring tools. This ensures smooth operation.

2. Enhancing Audio Quality

Audio Settings Adjustments: Modify audio settings for clearer recordings. Select larger sample rates, ranging to 44.1kHz to 48kHz, and bitrates of 128kbps or greater to enhance the quality of the sound.

3. Keeping Software and Drivers Updated

Stay Current with OBS: Always use the latest version of OBS Studio to benefit from new features and fixes.

Update GPU Drivers: Ensure your graphics card drivers are current, especially when using hardware encoders, for optimal performance.
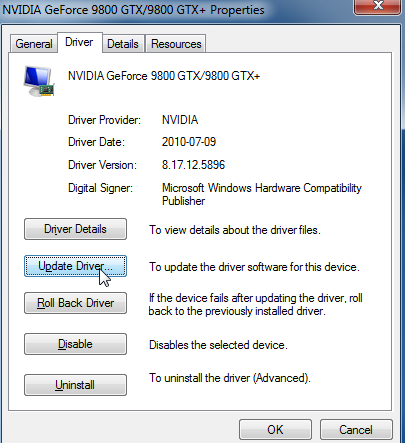
Keep Drivers Updated to Enhance OBS Recording

4. Evaluating Test Recordings

Analyzing Test Recordings: Carefully review test recordings to assess audio and video quality.

Making Incremental Adjustments: Use insights from test recordings to tweak settings gradually for the best results.

Part 6. FAQS

How do I fix OBS recordings that look pixelated?

To fix pixelated OBS recordings, increase the video bitrate or resolution in your settings. Choose a higher quality encoder preset and ensure your source video quality is high.

Should I use VBR or CBR in OBS for recording?

For recording in OBS, Variable Bitrate (VBR) typically offers better quality at lower file sizes, making it a preferred choice. However, Constant Bitrate (CBR) provides more predictable results and is better for compatibility with editing software. Choose based on your needs.

How can I prevent recording lag in OBS?

To prevent recording lag in OBS, lower the resolution, bitrate, or frame rate. Ensure your system meets OBS's requirements and keep software and drivers updated. Use hardware encoding for efficiency, and close unnecessary background applications.

People Also ReadInsight Guide: Where Does OBS Save Recordings?13 Solutions! How to Solve "OBS Recording Laggy" (2024)

Conclusion

In conclusion, OBS recording settings offer a wealth of customization options to achieve such high quality videos while balancing performance. By experimenting with different setups along with monitoring system resources, users can optimize settings for their needs. Constant monitoring as well as indeed adjusting settings based on test recordings ensure optimal results. Have a nice day recording in HD!

Leave a Comment

Comment

Comment ()
author image

Adela D. Louie

Tech Website Writing /Content Optimization

Singing, smiling, surprising every day!

So as a technical writer, it is my duty to gather effective and reliable solutions to answer questions on how to deal with the issues they are having with their devices.

Screen Recorder logo

Screen Recorder

Powerful screen recording software to capture your screen with webcam and audio.

How Do You Like This Article?

Check icon/ Check icon

INTERESTINGDULL

Check icon/ Check icon

SIMPLEDIFFICULT

Thank you! Here' re your choices:

Rate This Article: Excellent

Rating: 4.8 / 5 (based on 61 ratings)

Screen Recorder logo

Screen Recorder

Powerful screen recording software to capture your screen with webcam and audio.

FoneDog uses cookies to ensure you get the best experience on our website. Click here to learn more.