FoneDog Screen Recorder
FoneDog Screen Recorder
Special Offer
Special Offer


By Adela D. Louie, Last updated: June 24, 2024
Communicating visually is crucial in the digital era, and screen recording provides an excellent tool to enhance your message. Learning screen recording is crucial for content creators, educators, and professionals looking to enhance communication efficiency. The following guide will provide you with all the necessary information, on how to record part of screen of your device.
Master the art of recording on-screen activities, delivering tutorials with quality, and creating captivating presentations that engage your audience instantly. Join up on this to maximize the capabilities of screen recording while improving the way you interact!
Part 1. Why Screen Record Part of Screen?Part 2. How to Record Part of Screen on Windows or Mac ComputerPart 3. How to Screen Record Part of Screen (Mac)Part 4. How to Screen Record Part of Screen (Windows)Part 5. FAQSConclusion
Why would you choose to capture only a portion of the screen, rather than the entire thing? Because there are various reasons and advantages to doing partial screen captures.
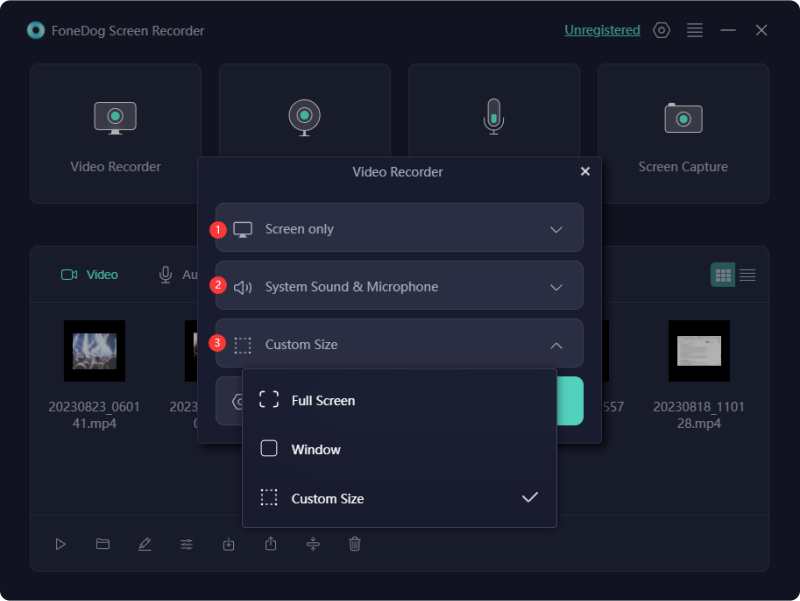
FoneDog Screen Recorder is regarded as a great solution when it comes to capturing portions of your PC’s screen. Its easily recognizable interface and simple installation make it an ideal application for screen recording on both Mac and Windows. By incorporating attributes such as annotation tools, continuous audio capture, and an adjustable recording area, FoneDog ensures streamlined and perfect screen recording.
![]() Free Download
For Windows
Free Download
For Windows
![]() Free Download
For normal Macs
Free Download
For normal Macs
![]() Free Download
For M1, M2, M3
Free Download
For M1, M2, M3
When it comes to capturing portions of the screen on a PC, FoneDog Screen Recorder is the best option due to its exceptional versatility and convenience, regardless of if it be for tutorials or simply presentations.
Capturing screen activity is a widely used and beneficial method. It helps produce videos for purposes such as problem solving, instruction, and learning.
Some people may need to capture the entire screen to ensure their viewers have a comprehensive understanding of all on-screen actions, while others may prefer to capture only specific portions to highlight important information without distracting from the overall content.
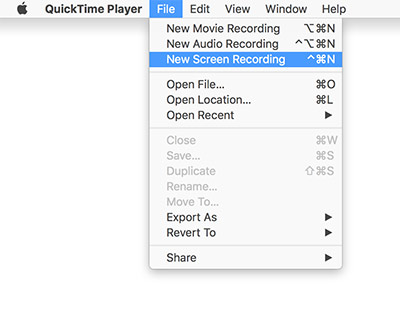
QuickTime has the capability to function as a screen capture tool on Mac computers, enabling users to record specific sections of their screen. Ensure that QuickTime is installed on your Mac system and adhere to the provided instructions to initiate the screen recording process.
Screen capturing software streamlines the procedure for capturing a specific area of the Windows display. Without requiring additional installations, you can capture a specific region of your screen using the screen recording feature that is native to Windows. Below are two techniques you can employ within your Windows OS.
The Xbox Game Bar, initially crafted for capturing gameplay, serves as an integrated screen recorder tailored for Windows 10. Its forte lies in effortlessly capturing screen activities spanning games, web browsers, and various programs, saving the recordings in MP4 format. How to utilize it to capture a portion of the screen on Windows? Here's how to record a selected area of the screen on Windows:
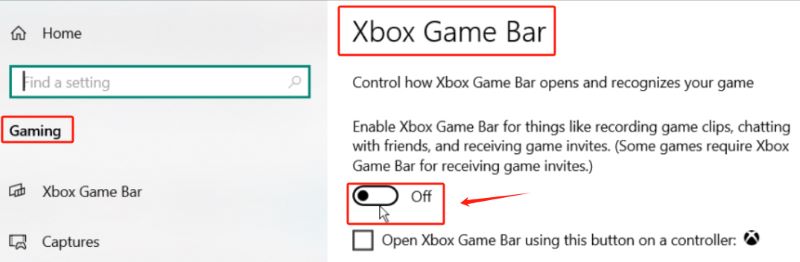
It's worth noting that the Windows screen recorder only allows recording of active windows. It does not facilitate selecting a specific area for recording. Additionally, occasional non-functioning issues may arise, leading to inconsistent performance and possible recording delays. While proficient in capturing browser tabs and program windows, it lacks the flexibility of choosing the recording region.
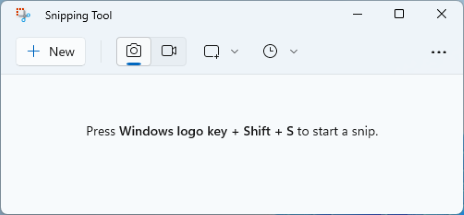
The Snipping Tool comes as a pre-installed screenshot application within Windows. With the advent of Windows 11, it has gained an additional function as a multifaceted screen recording tool. Let's now explore the process of capturing a segment of the screen on Windows using this tool.
Numerous applications are available for both Windows and Mac systems to record part of screen. For a comprehensive option, consider experimenting with FoneDog Screen Recorder. This tool enables you to designate any desired area on your screen for high-definition and 4K recording, provides immediate editing capabilities post-recording, and supports exporting videos in a variety of widely used formats.
On both Mac and Windows systems, the recorded part of the screen is typically saved in a designated folder chosen by the user during the recording process. This folder location can vary depending on the screen recording software being used and any custom settings configured by the user.
People Also Read16 Best Audio Recording Software for Mac (2024)11 Top Good Gaming Recording Software in 2024
In conclusion, knowing how to record part of screen is made easy with the right tools and techniques. Whether using FoneDog Screen Recorder on PC or other tools mentioned above, the process involves a few simple steps. With these user-friendly tools, users can create professional-quality screen recordings for various purposes. Happy Recording!
![]() Free Download
For Windows
Free Download
For Windows
![]() Free Download
For normal Macs
Free Download
For normal Macs
![]() Free Download
For M1, M2, M3
Free Download
For M1, M2, M3
Leave a Comment
Comment

Tech Website Writing /Content Optimization
Singing, smiling, surprising every day!
So as a technical writer, it is my duty to gather effective and reliable solutions to answer questions on how to deal with the issues they are having with their devices.
Screen Recorder
Powerful screen recording software to capture your screen with webcam and audio.
Hot Articles
 /
/
INTERESTINGDULL
/
SIMPLEDIFFICULT
Thank you! Here' re your choices:
Excellent
Rating: 4.7 / 5 (based on 64 ratings)